Recording
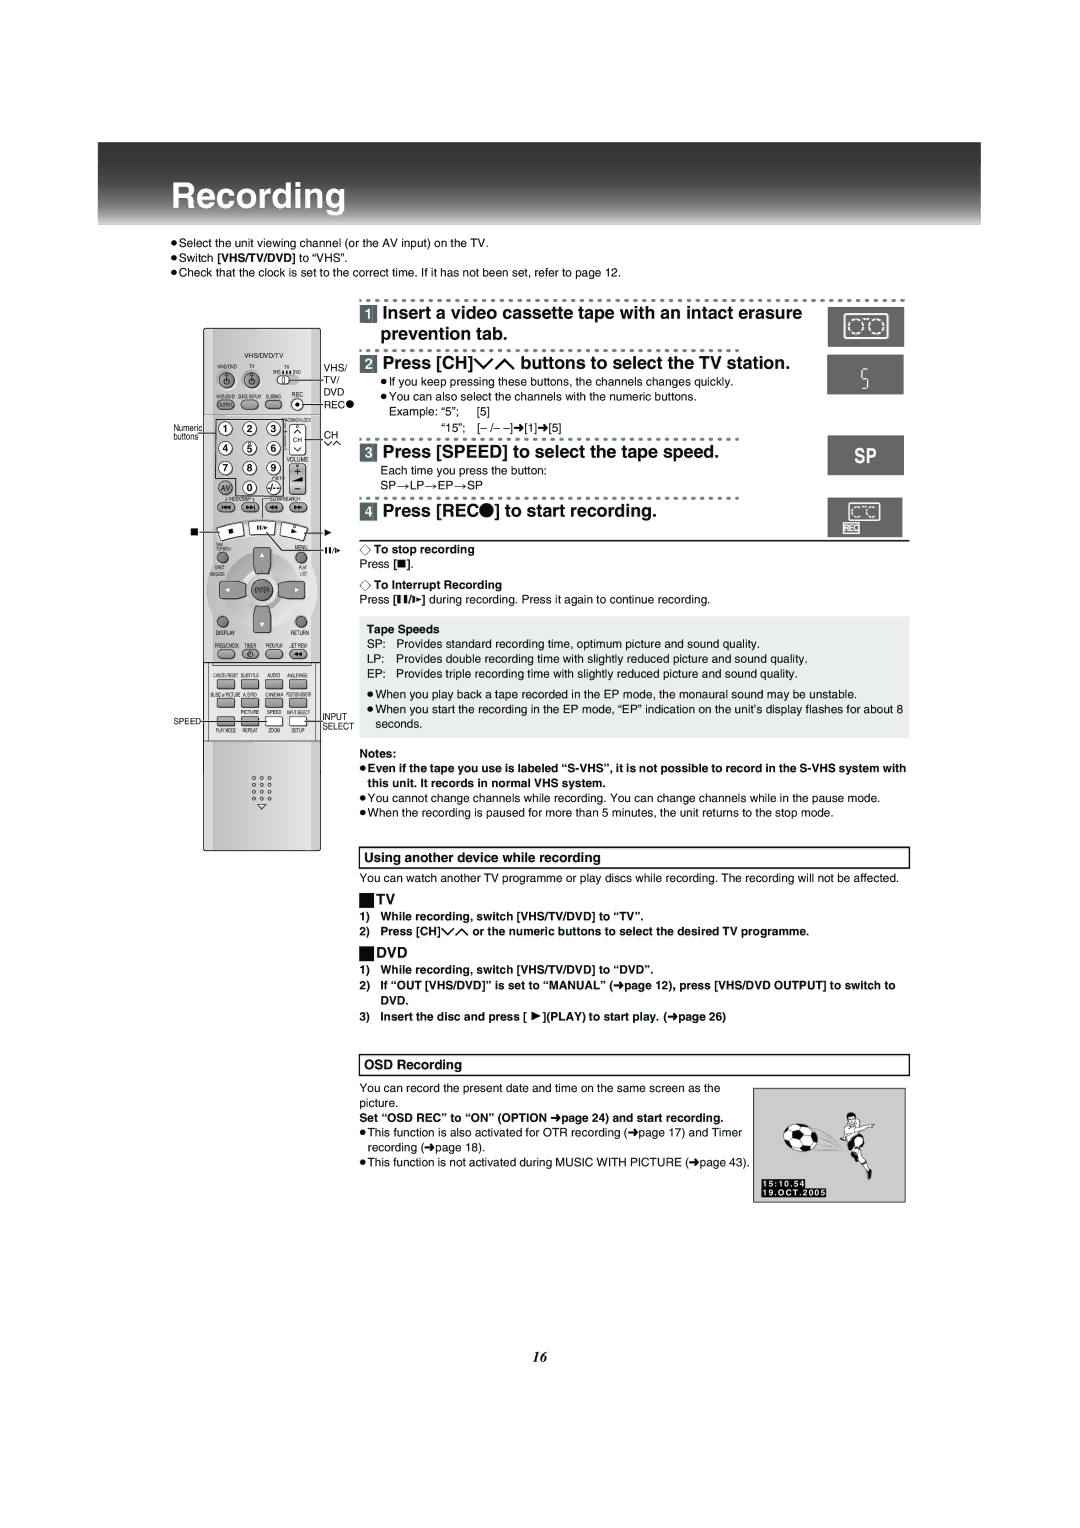
≥Select the unit viewing channel (or the AV input) on the TV. ≥Switch [VHS/TV/DVD] to “VHS”.
≥Check that the clock is set to the correct time. If it has not been set, refer to page 12.
|
| VHS/DVD/TV |
| |
| VHS/DVD | TV |
| TV |
|
|
| VHS | DVD |
| VHS/DVD QUICK REPLAY | DUBBING | REC | |
| OUTPUT |
|
|
|
Numeric |
|
| ||
1 | 2 | 3 |
| |
buttons | 4 | 5 | 6 | CH |
|
| |||
| 7 | 8 | 9 | VOLUME |
|
| |||
| AV | 0 |
| |
| INDEX/SKIP | SLOW/SEARCH | ||
| NAVI |
|
| MENU |
| TOP MENU |
|
| |
| DIRECT |
|
| PLAY |
| NAVIGATOR |
|
| LIST |
|
| ENTER |
| |
| DISPLAY |
|
| RETURN |
| PROG/CHECK | TIMER | PROG PLAY | JET REW |
| CANCEL/RESET | SUBTITLE | AUDIO | ANGLE/PAGE |
| MUSIC w/ PICTURE A.SRD | CINEMA POSITION MEMORY | ||
|
| PICTURE | SPEED | INPUT SELECT |
SPEED |
|
|
|
|
| PLAY MODE | REPEAT | ZOOM | SETUP |
[1]Insert a video cassette tape with an intact erasure
prevention tab.
VHS/ | [2] | Press [CH]IJ buttons to select the TV station. |
| |
TV/ |
| ≥If you keep pressing these buttons, the channels changes quickly. |
| |
DVD |
| ≥You can also select the channels with the numeric buttons. |
| |
|
| |||
REC |
|
| ||
| Example: “5”; | [5] |
| |
|
|
| ||
CH |
| “15”; |
| |
| Press [SPEED] to select the tape speed. |
| ||
| [3] | SP | ||
Each time you press the button:
SP>LP>EP>SP
[4] Press [REC¥] to start recording.
¬ To stop recording Press [∫].
¬To Interrupt Recording
Press [;/D] during recording. Press it again to continue recording.
Tape Speeds
SP: Provides standard recording time, optimum picture and sound quality.
LP: Provides double recording time with slightly reduced picture and sound quality.
EP: Provides triple recording time with slightly reduced picture and sound quality.
≥When you play back a tape recorded in the EP mode, the monaural sound may be unstable.
INPUT ≥When you start the recording in the EP mode, “EP” indication on the unit’s display flashes for about 8 SELECT seconds.
Notes:
≥Even if the tape you use is labeled
≥You cannot change channels while recording. You can change channels while in the pause mode. ≥When the recording is paused for more than 5 minutes, the unit returns to the stop mode.
Using another device while recording
You can watch another TV programme or play discs while recording. The recording will not be affected.
ªTV
1)While recording, switch [VHS/TV/DVD] to “TV”.
2)Press [CH]IJ or the numeric buttons to select the desired TV programme.
ªDVD
1)While recording, switch [VHS/TV/DVD] to “DVD”.
2)If “OUT [VHS/DVD]” is set to “MANUAL” (lpage 12), press [VHS/DVD OUTPUT] to switch to
DVD.
3)Insert the disc and press [ 1](PLAY) to start play. (lpage 26)
OSD Recording
You can record the present date and time on the same screen as the picture.
Set “OSD REC” to “ON” (OPTION lpage 24) and start recording.
≥This function is also activated for OTR recording (lpage 17) and Timer recording (lpage 18).
≥This function is not activated during MUSIC WITH PICTURE (lpage 43).
1 5 : 1 0 . 5 4
1 9 . O C T . 2 0 0 5
16
