Adding Music to Video
MUSIC WITH PICTURE
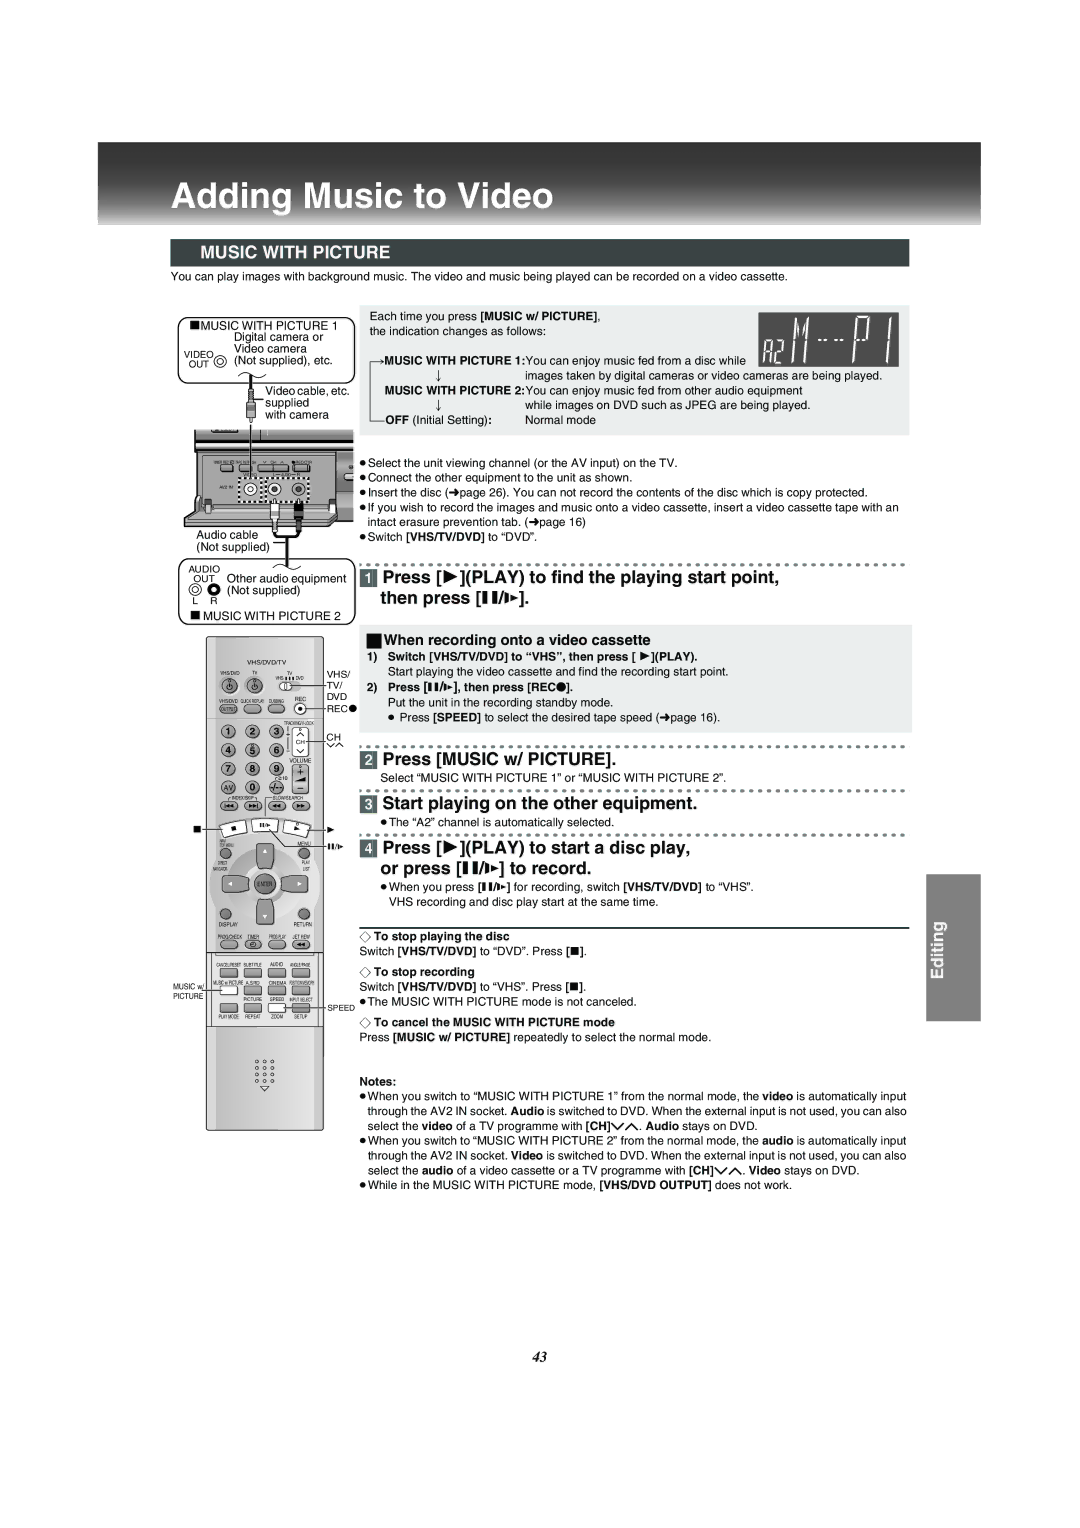
You can play images with background music. The video and music being played can be recorded on a video cassette.
Each time you press [MUSIC w/ PICTURE],
|
| MUSIC WITH PICTURE 1 | the indication changes as follows: | ||||||
|
|
| Digital camera or | ||||||
|
|
|
|
|
| ||||
VIDEO | Video camera | [#MUSIC WITH PICTURE 1:You can enjoy music fed from a disc while | |||||||
(Not supplied), etc. | |||||||||
OUT | |||||||||
|
|
|
|
|
| l | ; | images taken by digital cameras or video cameras are being played. | |
|
|
|
|
|
| ||||
|
|
|
|
| Video cable, etc. | l MUSIC WITH PICTURE 2:You can enjoy music fed from other audio equipment | |||
|
|
|
|
| |||||
|
|
|
|
| supplied | l | ; | while images on DVD such as JPEG are being played. | |
|
|
|
|
| |||||
|
|
|
|
| |||||
|
|
|
|
| |||||
|
|
|
|
| with camera | {=OFF (Initial Setting): | Normal mode | ||
|
|
|
|
|
| ||||
EJECT/ |
|
|
|
|
|
|
|
|
| ≥Select the unit viewing channel (or the AV input) on the TV. | |
TIMER REC | TAPE REFRESH | CH |
| REC/OTR | |
| VIDEO | L | AUDIO | R | ≥Connect the other equipment to the unit as shown. |
AV2 IN |
|
|
|
| ≥Insert the disc (lpage 26). You can not record the contents of the disc which is copy protected. |
|
|
|
|
| |
|
|
|
|
| ≥If you wish to record the images and music onto a video cassette, insert a video cassette tape with an |
Audio cable |
|
|
| intact erasure prevention tab. (lpage 16) | |
|
|
| ≥Switch [VHS/TV/DVD] to “DVD”. | ||
(Not supplied) |
|
|
|
| |
AUDIO | [1] Press [1](PLAY) to find the playing start point, | ||
| OUT Other audio equipment | ||
|
| (Not supplied) | then press [;/D]. |
| L R | ||
|
| MUSIC WITH PICTURE 2 |
|
|
|
| |
|
|
| |
|
| VHS/DVD/TV |
| |
| VHS/DVD | TV |
| TV |
|
|
| VHS | DVD |
| VHS/DVD QUICK REPLAY | DUBBING | REC | |
| OUTPUT |
|
|
|
|
|
| ||
| 1 | 2 | 3 |
|
| 4 | 5 | 6 | CH |
|
| |||
| 7 | 8 | 9 | VOLUME |
|
| |||
| AV | 0 |
| |
| INDEX/SKIP | SLOW/SEARCH | ||
| NAVI |
|
| MENU |
| TOP MENU |
|
| |
| DIRECT |
|
| PLAY |
| NAVIGATOR |
|
| LIST |
|
| ENTER |
| |
| DISPLAY |
|
| RETURN |
| PROG/CHECK | TIMER | PROG PLAY | JET REW |
| CANCEL/RESET | SUBTITLE | AUDIO | ANGLE/PAGE |
MUSIC w/ | MUSIC w/ PICTURE A.SRD | CINEMA POSITION MEMORY | ||
|
|
|
| |
PICTURE |
| PICTURE | SPEED | INPUT SELECT |
|
| |||
| PLAY MODE | REPEAT | ZOOM | SETUP |
ªWhen recording onto a video cassette
| 1) | Switch [VHS/TV/DVD] to “VHS”, then press [ 1](PLAY). |
VHS/ |
| Start playing the video cassette and find the recording start point. |
TV/ | 2) | Press [;/D], then press [REC¥]. |
DVD
Put the unit in the recording standby mode.
REC
≥ Press [SPEED] to select the desired tape speed (lpage 16).
CH
[2]Press [MUSIC w/ PICTURE].
Select “MUSIC WITH PICTURE 1” or “MUSIC WITH PICTURE 2”.
[3]Start playing on the other equipment.
≥The “A2” channel is automatically selected.
[4] Press [1](PLAY) to start a disc play, or press [;/D] to record.
≥When you press [;/D] for recording, switch [VHS/TV/DVD] to “VHS”. VHS recording and disc play start at the same time.
¬To stop playing the disc
Switch [VHS/TV/DVD] to “DVD”. Press [∫].
¬To stop recording
Switch [VHS/TV/DVD] to “VHS”. Press [∫].
SPEED ≥The MUSIC WITH PICTURE mode is not canceled.
¬To cancel the MUSIC WITH PICTURE mode
Press [MUSIC w/ PICTURE] repeatedly to select the normal mode.
Notes:
≥When you switch to “MUSIC WITH PICTURE 1” from the normal mode, the video is automatically input through the AV2 IN socket. Audio is switched to DVD. When the external input is not used, you can also select the video of a TV programme with [CH]IJ. Audio stays on DVD.
≥When you switch to “MUSIC WITH PICTURE 2” from the normal mode, the audio is automatically input through the AV2 IN socket. Video is switched to DVD. When the external input is not used, you can also select the audio of a video cassette or a TV programme with [CH]IJ. Video stays on DVD.
≥While in the MUSIC WITH PICTURE mode, [VHS/DVD OUTPUT] does not work.
Editing
43
