The pRP6 Presets
The pRP6 contains 32 Internal Presets, consisting of Single, Layered and Split sound combinations.
Each sound combination of the Presets recalls an appropriate configuration of effects (Reverb and Chorus) together with Volume and Balance settings.
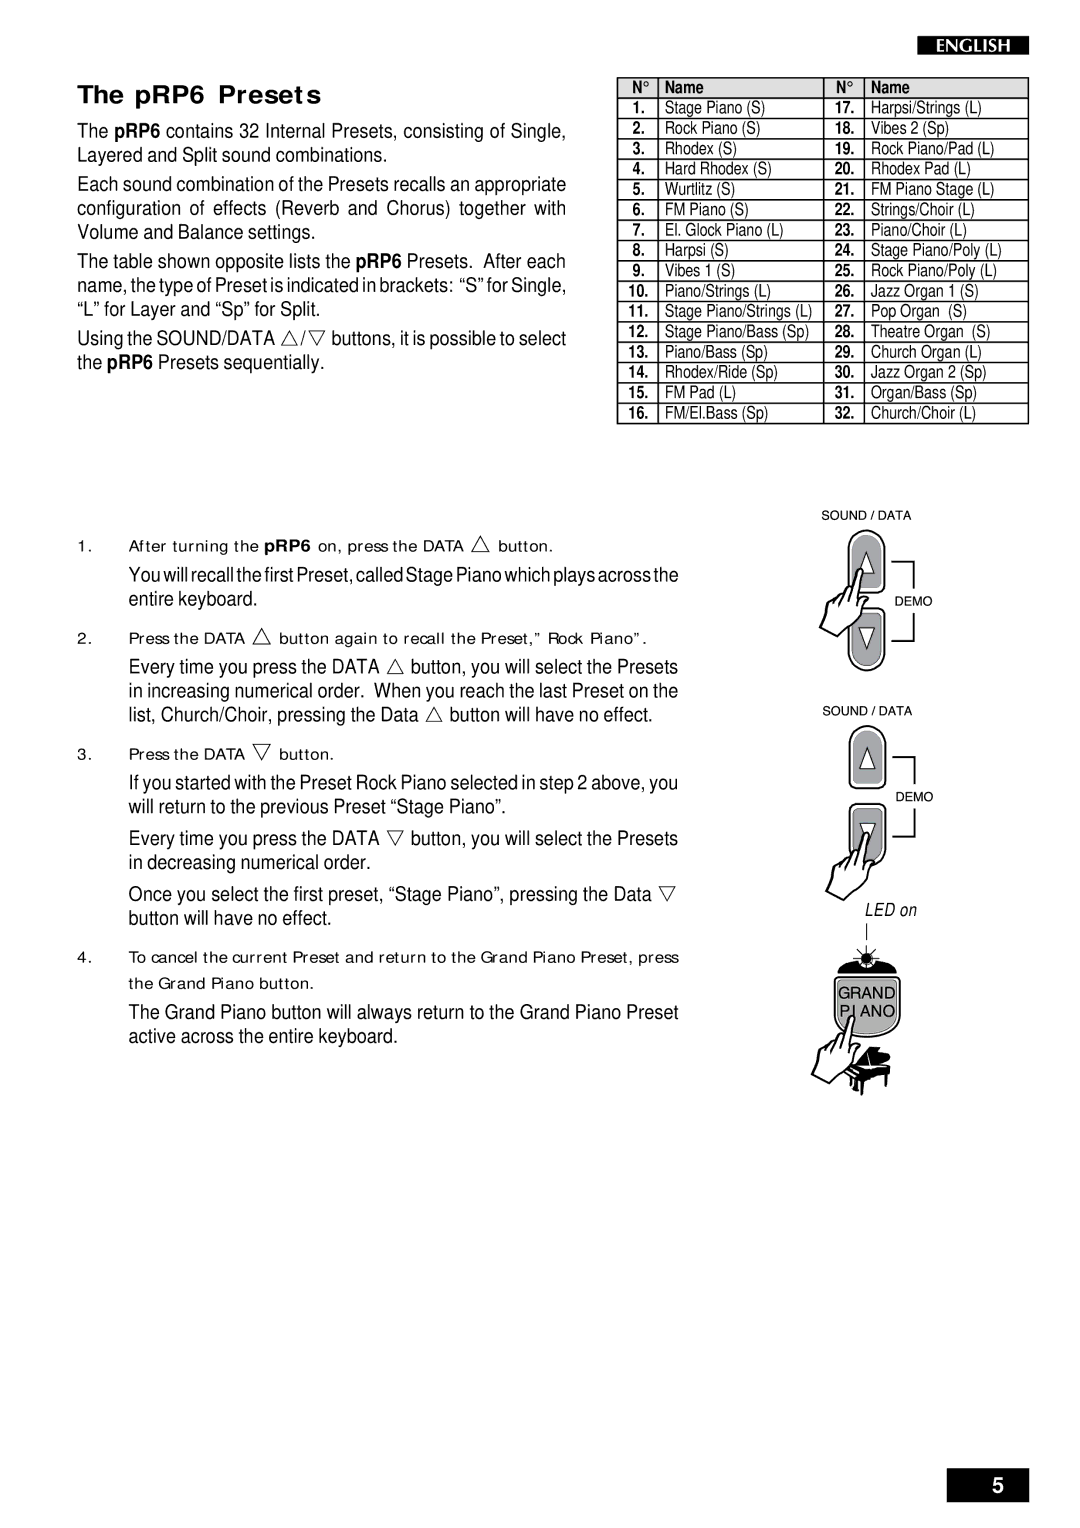
The table shown opposite lists the pRP6 Presets. After each name, the type of Preset is indicated in brackets: “S” for Single, “L” for Layer and “Sp” for Split.
Using the SOUND/DATA m/n buttons, it is possible to select the pRP6 Presets sequentially.
N° | Name | N° | Name |
1. | Stage Piano (S) | 17. | Harpsi/Strings (L) |
2. | Rock Piano (S) | 18. | Vibes 2 (Sp) |
3. | Rhodex (S) | 19. | Rock Piano/Pad (L) |
4. | Hard Rhodex (S) | 20. | Rhodex Pad (L) |
5. | Wurtlitz (S) | 21. | FM Piano Stage (L) |
6. | FM Piano (S) | 22. | Strings/Choir (L) |
7. | El. Glock Piano (L) | 23. | Piano/Choir (L) |
8. | Harpsi (S) | 24. | Stage Piano/Poly (L) |
9. | Vibes 1 (S) | 25. | Rock Piano/Poly (L) |
10. | Piano/Strings (L) | 26. | Jazz Organ 1 (S) |
11. | Stage Piano/Strings (L) | 27. | Pop Organ (S) |
12. | Stage Piano/Bass (Sp) | 28. | Theatre Organ (S) |
13. | Piano/Bass (Sp) | 29. | Church Organ (L) |
14. | Rhodex/Ride (Sp) | 30. | Jazz Organ 2 (Sp) |
15. | FM Pad (L) | 31. | Organ/Bass (Sp) |
16. | FM/El.Bass (Sp) | 32. | Church/Choir (L) |
1. | After turning the pRP6 on, press the DATA m button. |
|
| You will recall the first Preset, called Stage Piano which plays across the |
|
| entire keyboard. |
|
2. | Press the DATA m button again to recall the Preset,” Rock Piano”. |
|
| Every time you press the DATA m button, you will select the Presets |
|
| in increasing numerical order. When you reach the last Preset on the |
|
| list, Church/Choir, pressing the Data m button will have no effect. |
|
3. | Press the DATA n button. |
|
| If you started with the Preset Rock Piano selected in step 2 above, you |
|
| will return to the previous Preset “Stage Piano”. |
|
| Every time you press the DATA n button, you will select the Presets |
|
| in decreasing numerical order. |
|
| Once you select the first preset, “Stage Piano”, pressing the Data n | LED on |
| button will have no effect. | |
|
|
4. To cancel the current Preset and return to the Grand Piano Preset, press the Grand Piano button.
The Grand Piano button will always return to the Grand Piano Preset active across the entire keyboard.
5