SETTING UP A PHILIPS ACCESSORY DEVICE
CHOOSING THE BRAND
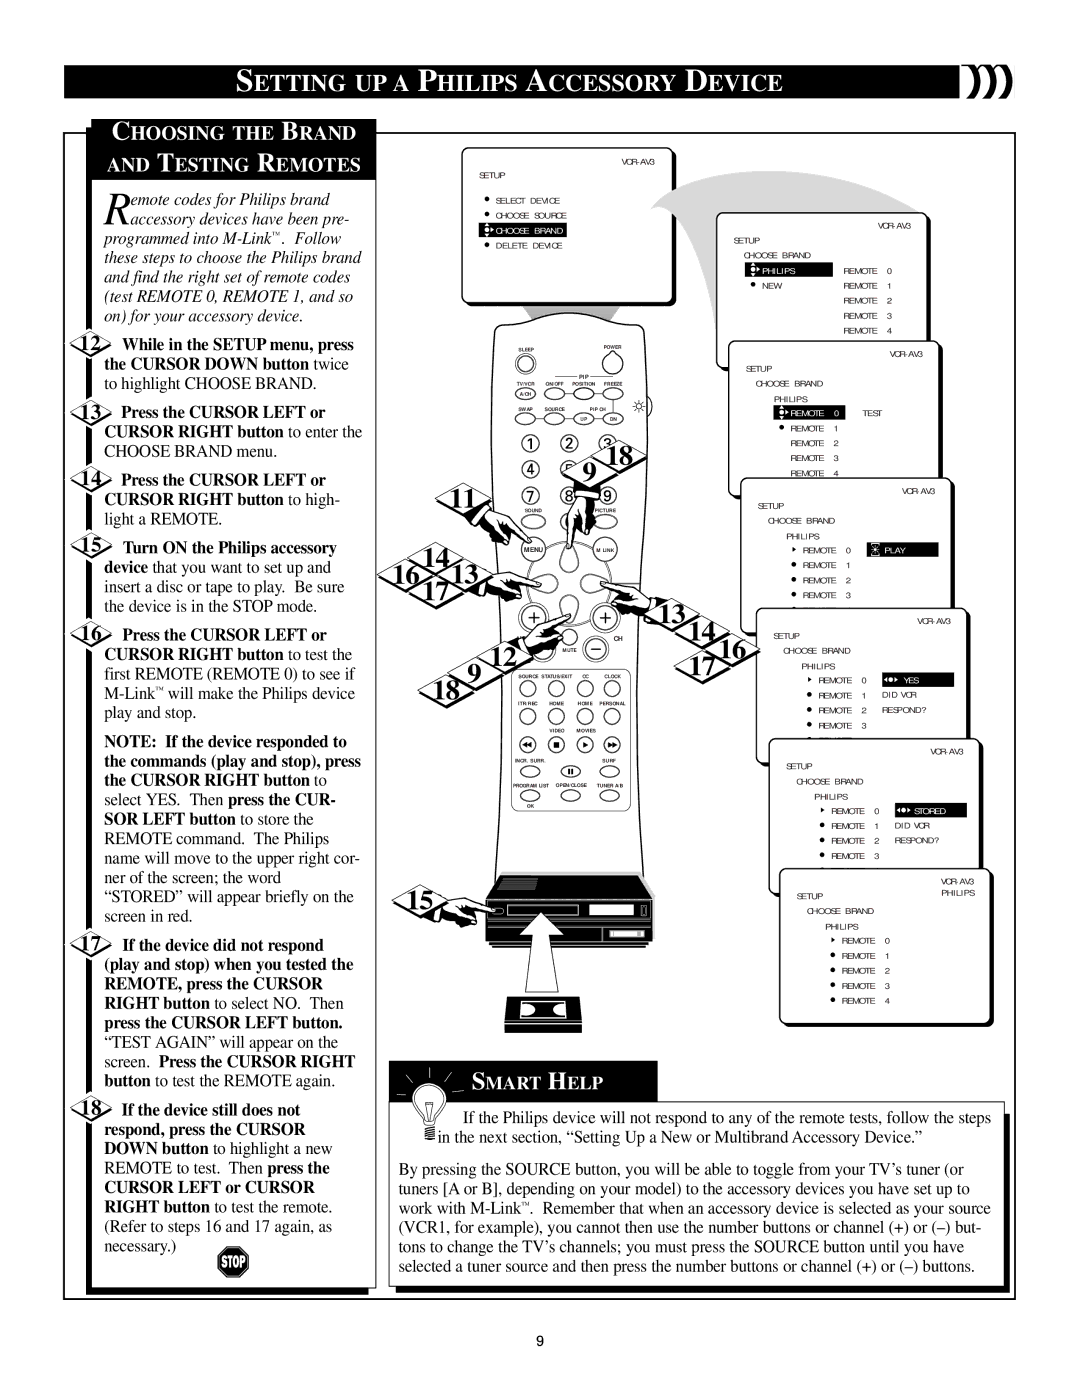
AND TESTING REMOTES
Remote codes for Philips brand accessory devices have been pre-
programmed into
12 | While in the SETUP menu, press |
| the CURSOR DOWN button twice |
| to highlight CHOOSE BRAND. |
13 | Press the CURSOR LEFT or |
| CURSOR RIGHT button to enter the |
| CHOOSE BRAND menu. |
14 | Press the CURSOR LEFT or |
SETUP |
|
|
|
|
|
|
|
SELECT DEVICE |
|
|
|
|
|
| |
CHOOSE SOURCE |
|
|
|
|
| ||
CHOOSE BRAND |
|
|
|
|
| ||
|
| SETUP |
|
|
| ||
DELETE DEVICE |
|
|
|
|
| ||
|
| CHOOSE BRAND |
|
|
| ||
|
|
|
|
|
|
| |
|
|
|
| PHILIPS |
| REMOTE | 0 |
|
|
|
| NEW |
| REMOTE | 1 |
|
|
|
|
|
| REMOTE | 2 |
|
|
|
|
|
| REMOTE | 3 |
|
|
|
|
|
| REMOTE | 4 |
SLEEP |
|
| POWER |
|
|
| |
|
|
|
|
|
| ||
|
|
|
|
|
|
| |
|
| PIP |
| SETUP |
|
|
|
|
|
| CHOOSE BRAND |
|
|
| |
TV/VCR | ON/OFF | POSITION | FREEZE |
|
|
| |
A/CH |
|
|
| PHILIPS |
|
|
|
|
|
|
|
|
|
| |
SWAP | SOURCE | PIP CH | REMOTE | 0 | TEST | ||
|
| UP | DN | ||||
|
| REMOTE | 1 |
|
| ||
|
|
|
|
|
| ||
|
|
| 18 | REMOTE | 2 |
|
|
|
| 9 | REMOTE | 3 |
|
| |
|
|
|
|
| |||
|
|
| REMOTE | 4 |
|
| |
|
|
|
|
|
| ||
CURSOR RIGHT button to high- |
light a REMOTE. |
15Turn ON the Philips accessory device that you want to set up and insert a disc or tape to play. Be sure the device is in the STOP mode.
16Press the CURSOR LEFT or CURSOR RIGHT button to test the first REMOTE (REMOTE 0) to see if
NOTE: If the device responded to
11
SOUNDPICTURE
MENUM LINK
16141713![]()
![]()
![]()
| VOL |
| CH | |
| 12 | MUTE |
|
|
18 9 |
| SOURCE STATUS/EXIT | CC | CLOCK |
| ITR/REC HOME | HOME | PERSONAL | |
|
| VIDEO | MOVIES |
|
 1314 1716
SETUP
CHOOSE BRAND
PHILIPS
REMOTE 0
REMOTE 1
REMOTE 2
REMOTE 3 REMOTE 4
SETUP
CHOOSE BRAND
PHILIPS
REMOTE 0
REMOTE 1
REMOTE 2
REMOTE 3 REMOTE 4
PLAY
![]()
![]() YES
YES
DID VCR
RESPOND?
the commands (play and stop), press the CURSOR RIGHT button to select YES. Then press the CUR-
SOR LEFT button to store the REMOTE command. The Philips name will move to the upper right cor- ner of the screen; the word “STORED” will appear briefly on the screen in red.
17 If the device did not respond |
(play and stop) when you tested the |
REMOTE, press the CURSOR |
RIGHT button to select NO. Then |
press the CURSOR LEFT button. |
“TEST AGAIN” will appear on the |
screen. Press the CURSOR RIGHT |
INCR. SURR. | SURF |
PROGRAM LIST OPEN/CLOSE | TUNER A/B |
OK |
|
15 |
SETUP |
|
|
|
CHOOSE BRAND |
|
|
|
PHILIPS |
|
|
|
REMOTE | 0 |
| STORED |
REMOTE | 1 | DID VCR | |
REMOTE | 2 | RESPOND? | |
REMOTE | 3 |
|
|
REMOTE | 4 |
|
|
|
| |
SETUP |
| PHILIPS |
CHOOSE BRAND |
|
|
PHILIPS |
|
|
REMOTE | 0 | STORED |
REMOTE | 1 |
|
REMOTE | 2 |
|
REMOTE | 3 |
|
REMOTE | 4 |
|
button to test the REMOTE again. |
18 If the device still does not |
respond, press the CURSOR |
DOWN button to highlight a new |
REMOTE to test. Then press the |
CURSOR LEFT or CURSOR |
RIGHT button to test the remote. |
(Refer to steps 16 and 17 again, as |
necessary.) |
SMART HELP
![]()
![]() If the Philips device will not respond to any of the remote tests, follow the steps
If the Philips device will not respond to any of the remote tests, follow the steps ![]() in the next section, “Setting Up a New or Multibrand Accessory Device.”
in the next section, “Setting Up a New or Multibrand Accessory Device.”
By pressing the SOURCE button, you will be able to toggle from your TV’s tuner (or tuners [A or B], depending on your model) to the accessory devices you have set up to work with
9