| FEATURE MENU CONTROLS (CONTINUED) | ||||||
| ADD/DELETE CHANNELS |
|
|
|
|
|
|
|
|
|
|
|
|
| |
| Aprevious page) adds all the |
|
|
|
|
|
|
| channels it can find (on your |
|
|
|
|
|
|
| Antenna or Cable TV system) into |
|
|
|
|
|
|
| the TV's memory. Add/Delete |
|
|
|
|
|
|
| Channels makes it easy for you to |
|
|
|
|
|
|
| add other channels, or drop |
|
|
|
|
|
|
| unwanted channels, from the list of |
|
|
|
|
|
|
| channels in the TV's memory. |
|
|
|
|
|
|
|
| MAIN MENU |
|
|
|
| |
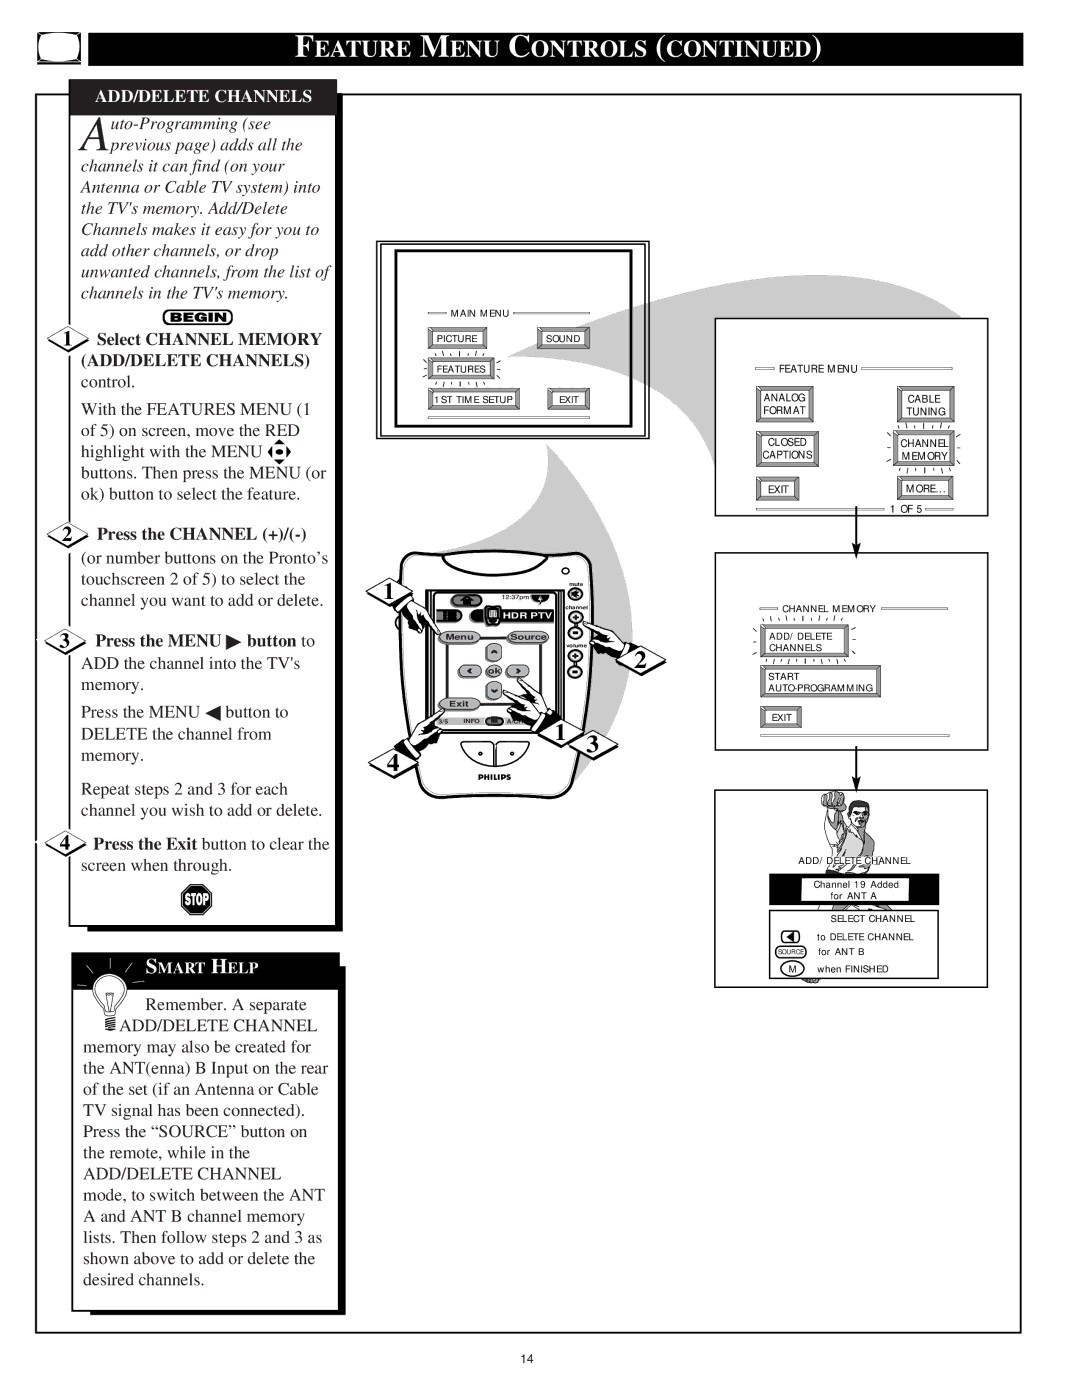
1 | Select CHANNEL MEMORY | PICTURE | SOUND |
|
|
| |
|
|
|
|
|
| ||
| (ADD/DELETE CHANNELS) | FEATURES |
|
|
| FEATURE MENU | |
| control. |
|
|
| |||
|
|
|
|
|
|
| |
| With the FEATURES MENU (1 | 1ST TIME SETUP | EXIT |
| ANALOG | CABLE | |
|
|
|
|
| FORMAT | TUNING | |
| of 5) on screen, move the RED |
|
|
|
| CLOSED | CHANNEL |
| highlight with the MENU |
|
|
|
| ||
|
|
|
|
| CAPTIONS | MEMORY | |
| buttons. Then press the MENU (or |
|
|
|
|
|
|
| ok) button to select the feature. |
|
|
|
| EXIT | MORE... |
|
|
|
|
|
| 1 OF 5 | |
|
|
|
|
|
|
| |
2 Press the CHANNEL |
|
|
|
|
|
| |
| (or number buttons on the Pronto’s |
|
|
|
|
|
|
| touchscreen 2 of 5) to select the | DN |
| mute |
|
|
|
| 1 |
|
|
|
| ||
| channel you want to add or delete. |
| channel | CHANNEL MEMORY | |||
|
|
| HDR PTV | + |
| ||
|
|
|
|
|
| ||
3 | Press the MENU ▶ button to | Menu | Source |
|
| ADD/DELETE | |
|
| volume | CHANNELS | ||||
| ADD the channel into the TV's |
|
| + |
| 2 |
|
|
| ok |
|
|
| ||
| memory. |
|
|
|
| START |
|
|
|
|
|
| |||
| Press the MENU ◀ button to | Exit |
|
|
|
|
|
| 3/5 INFO | A/CH | 1 |
| EXIT |
| |
| DELETE the channel from |
|
| ||||
|
|
| 3 |
|
| ||
| memory. | 4 |
|
|
| ||
|
|
|
|
|
| ||
|
|
|
|
|
|
| |
| Repeat steps 2 and 3 for each |
|
|
|
|
|
|
| channel you wish to add or delete. |
|
|
|
|
|
|
4 Press the Exit button to clear the |
|
|
|
|
|
| |
| screen when through. |
|
|
|
| ADD/DELETE CHANNEL | |
|
|
|
|
|
|
| |
|
|
|
|
|
|
| Channel 19 Added |
|
|
|
|
|
|
| for ANT A |
|
|
|
|
|
|
| SELECT CHANNEL |
|
|
|
|
|
|
| to DELETE CHANNEL |
| SMART HELP |
|
|
|
| SOURCE | for ANT B |
|
|
|
|
| M | when FINISHED | |
| Remember. A separate |
|
|
|
|
|
|
| ADD/DELETE CHANNEL |
|
|
|
|
|
|
| memory may also be created for |
|
|
|
|
|
|
| the ANT(enna) B Input on the rear |
|
|
|
|
|
|
| of the set (if an Antenna or Cable |
|
|
|
|
|
|
| TV signal has been connected). |
|
|
|
|
|
|
| Press the “SOURCE” button on |
|
|
|
|
|
|
| the remote, while in the |
|
|
|
|
|
|
| ADD/DELETE CHANNEL |
|
|
|
|
|
|
| mode, to switch between the ANT |
|
|
|
|
|
|
| A and ANT B channel memory |
|
|
|
|
|
|
| lists. Then follow steps 2 and 3 as |
|
|
|
|
|
|
| shown above to add or delete the |
|
|
|
|
|
|
| desired channels. |
|
|
|
|
|
|
|
|
| 14 |
|
|
|
|
