TYPE Nr
Business Solutions
Philips Professional
EN User Manual
DISPOSAL OF USED ELECTRICAL & ELECTRONIC EQUIPMENT
1. SAFETY PRECAUTIONS
ALWAYS OBEY ALL SAFETY MESSAGES
1.1 POWER This product must be properly grounded
Do not use this product in the neighbourhood of a bath or show- er
1.2 INSTALLATION
Do not place this Monitor on an unstable cart, stand, or table
Minimum distances around the apparatus for sufficient ventilation
Do not install the product where there is oil, smog, moist, or dust
Do not place a candle or lighted cigarette on the Monitor
1.3 DURING USE
Do not allow children to play or hang on the Monitor
Do not spray water onto the Monitor or wipe with damp cloth
Do not place any object or cover on the Monitor
Do not place heavy objects or heat sources on the power cord
2.1 SUPPLIED ACCESSORIES
2. CHECKING ACCESSORIES
4. REMOTE CONTROL
CONTENTS
1. SAFETY PRECAUTIONS
2. CHECKING ACCESSORIES
3.1 FRONT PANEL
RETURN TO THE CONTENTS
3. PANEL CONTROLS
REAR PANEL
1. Power cord input
4. Volume UP/DOWN buttons
6. Main Power button
PIP POSITION PIP SOURCE SWAP - PIP buttons
4. REMOTE CONTROL
4.1 REMOTE CONTROL
Volume buttons “ / ”
RETURN TO THE CONTENTS
4.2 INSTALLING THE BATTERIES IN YOUR REMOTE CONTROL
4.3 WHEN USING REMOTE CONTROL
1. Connect a Digital Broadcasting Receiver to the PDP
5. CONNECTING WITH AN EXTERNAL SOURCE
2. Press the Power Buttons
5.1 WATCHING DIGITAL BROADCASTS
RETURN TO THE CONTENTS
WATCHING CABLE BROADCASTS
1. Connect a Cable Broadcasting Receiver to the PDP
4. Select the Desired Program and Function
3. Input Select
WATCHING SATELLITE BROADCASTS
1. Connect a Satellite Broadcasting Receiver to the PDP
RETURN TO THE CONTENTS
2. Press the Power Buttons
WATCHING A DVD IMAGE
1. Connect a DVD Player to the PDP
4. Select the Desired Title and Function
RETURN TO THE CONTENTS
WATCHING A VCR IMAGE
1. Connect a VCR to the PDP
2. Press the Power Buttons
2. Press the Power Buttons
WATCHING A CAMCORDER/GAME CONSOLE IMAGE
1. Connect a Camcorder/Game Console to the PDP
4. Select Function
CONNECTING PC 15 PIN D-SUB
1. Before Connecting to the PDP, Set the Resolution of the PC
2. Connect the PC to the PDP
RETURN TO THE CONTENTS
RETURN TO THE CONTENTS
3. Press the Power Buttons
5. Enjoy Dynamic Ultra Screen Monitor by Using PC’s Keyboard or Mouse
4. Input Select
HDMI input port receives only digital signal
CONNECTING HDMI
PC and HDMI Input Resolution Available in PDP
1. Connect the HDMI to the PDP
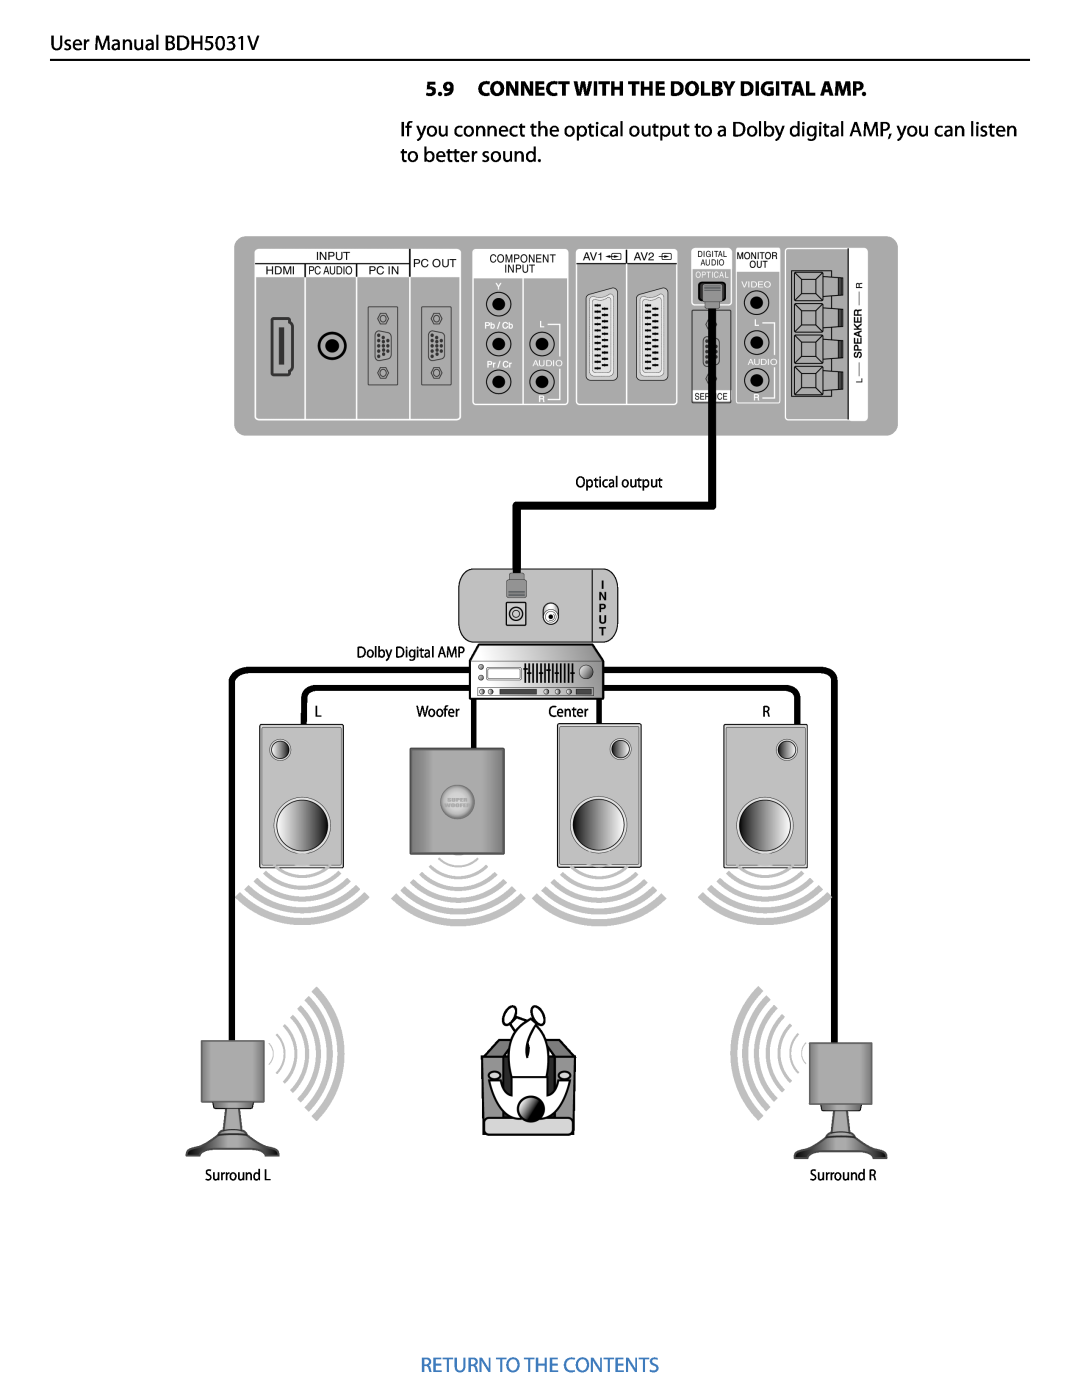
Optical output
5.9 CONNECT WITH THE DOLBY DIGITAL AMP
RETURN TO THE CONTENTS
SERVICE
2. Each Press of the Button Will Select One of Four Picture Modes
6.1 SELECTING PICTURE MODE
1. Selecting Picture Mode
6. PICTURE
2. Press the / button
3. Select the User Mode
6.2 CUSTOMIZING PICTURE
1. Press the MENU Button
Normal Warm Cool
4. Select User Mode Adjustments
5. Picture Condition Adjustments
6. Press the “COLOR TEMP” button on the remote con- trol
Auto 169 43 LB169 LBS169 149 LB149 LBS149 Auto
6.3 ADJUSTING SCREEN
6.3.1 Adjusting with PICTURE FMT button
1. Press the PICTURE FMT Button
1. Press the MENU Button
6.3.2 Adjusting Screen in the MENU
3. Press the Volume “/” buttons
Under PIP mode
STILL
6.4 WATCHING A STILL IMAGE
1. Press the “STILL” button
RETURN TO THE CONTENTS
2. Position of the Sub-picture
Screen Adjustment of the Sub-picture
1. Engaging PIP mode
6.5 WATCHING TWO PICTURES SIMULTANEOUSLY
PIP SOURCE
4. Select the Input Source
AV1 AV2 AV3 5. Available PIP Input Combinations
RETURN TO THE CONTENTS
2. Every Press of the Button Changes Modes
7.1 SELECTING SOUND MODE
7. SOUND
1. Select “SOUND MODE”
3. Select SOUND BALANCE
7.2 CUSTOMIZING SOUND MODE
2. Press the “/” Button
“” button to display the following
RETURN TO THE CONTENTS
4. Select the Effect Mode
5. Select the Sound Mode
Off BBE M.Voice
RETURN TO THE CONTENTS
8. INPUT SIGNAL
8.1 SELECTING INPUT SIGNAL
1. Press the Input Signal Selecting Button
2. If you watch VCR image
8.2 CHECKING THE CURRENT INPUT SIGNAL
1. Press the “RECALL” Button
1. If you watch Component, PC, or HDMI
RETURN TO THE CONTENTS
9. OTHER FUNCTIONS
2. Press the “/” button
3. Select the menu Background
RETURN TO THE CONTENTS
4. Select LANGUAGE by using the “/” button
5. Keyboard Lock Setting
6. RC Lock Setting
RETURN TO THE CONTENTS
2. Select Feature
3. MGDI Plus Setting
9.2 MGDI PLUS META GENUINE DIGITAL IMAGE
Auto Power
9.3 AUTO POWER SETTING POWER/STANDBY Indicator
1. Auto Power Setting
from Feature
Select Feature by the “/” button
9.4 TIME SETTING 1. Press the MENU Button
3. Select Time Setting
2. Select Feature
First, set Clock- current time, and then You can setup
4. Off-Time setting
Time Setting Functions
RETURN TO THE CONTENTS
1. Press the MENU Button
9.5 ANTI BURN-IN
10 3. Select Anti Burn-In
RETURN TO THE CONTENTS
PIXEL SHIFT
4. Select Functions
RETURN TO THE CONTENTS
3. Mode Reset
9.6 MODE RESET
2. Select Feature
Select Feature by the “/” button
RETURN TO THE CONTENTS
9.7 SETTING SLEEP TIMER
1. Press the “TIMER” Button
2 If you turn the PDP off after setting TIMER, the setting is erased
RETURN TO THE CONTENTS
AUDIO FEATURES
CONNECTION TERMINAL
10. SPECIFICATIONS DISPLAY UNIT