Model No. CF-30FTSAZAM
How to replace the fuse
For U.K
Safety Precautions
Precautions Battery Pack
Contents
Specifications
Disable Utility
Only for model with wireless LAN
Only for model with Bluetooth
GB. Operation on other SD equipment is not guaranteed
Reference Manual Multimedia Pocket
Reference Manual PC Card / ExpressCard
Only for model with touchscreen
C D E F G H
Block
Diagnosis Procedure
Troubleshooting
Beep signal sound Error message
Error Diagnosis by Checking Beep Signal Sound
Outline of Post
Stuck key
02F0 CPU ID
Self Diagnosis Test
Operation of PC-Diagnostic Utility
Selection of tested device
DMA, INT, TIMER, RTC operation are confirmed
Memory access pattern based on
T . technology Record area frequently accessed
Wireless LAN modem controller
Content of Standard Test Content of Extend Test
Express Card Connector
Wiring between Super I/O
Test Item
Wiring Connection Diagram
Removing the Battery Pack and HDD
Preparation Pack
Removing the HDD
Removing the KB Cable Cover and LCD Cable Cover
Removing the GPS PCB and Blue- tooth PCB
Removing the Dimm Cover and Bot- tom Cover
Removing the USB PCB and Antenna
Removing the PAD PCB
Removing the FPC HDD BAT
Removing the Main PCB
MP PCB
Removing the SD PCB, Express Card and Pcmcia Card
Removing the I/O PCB
Removing the Handle and Power SW
Removing the Display Unit
Removing the LCD Rear Cabinet, Hinge L and R
Removing the Inverter PCB, TS PCB and LCD Unit
Removing the Antenna PCB L and R
Reassembly Instructions
Setting the Antenna PCB L and R
Safety Working
Arranging the Antenna L and R Cables
Setting the Inverter PCB, TS PCB and LCD Unit
Assembly of LCD Unit
Preparation of Inverter
Setting the LCD Rear Cabinet, Hinge L and R
Setting the Handle and Power SW
Setting the Display Unit
Screws N9 DRYN4+J10FKL Screws N10 DXSB4+15FNLB
Preparation of SW LED FPC
Attach the Tape
Assembly of Power SW
Safety Working
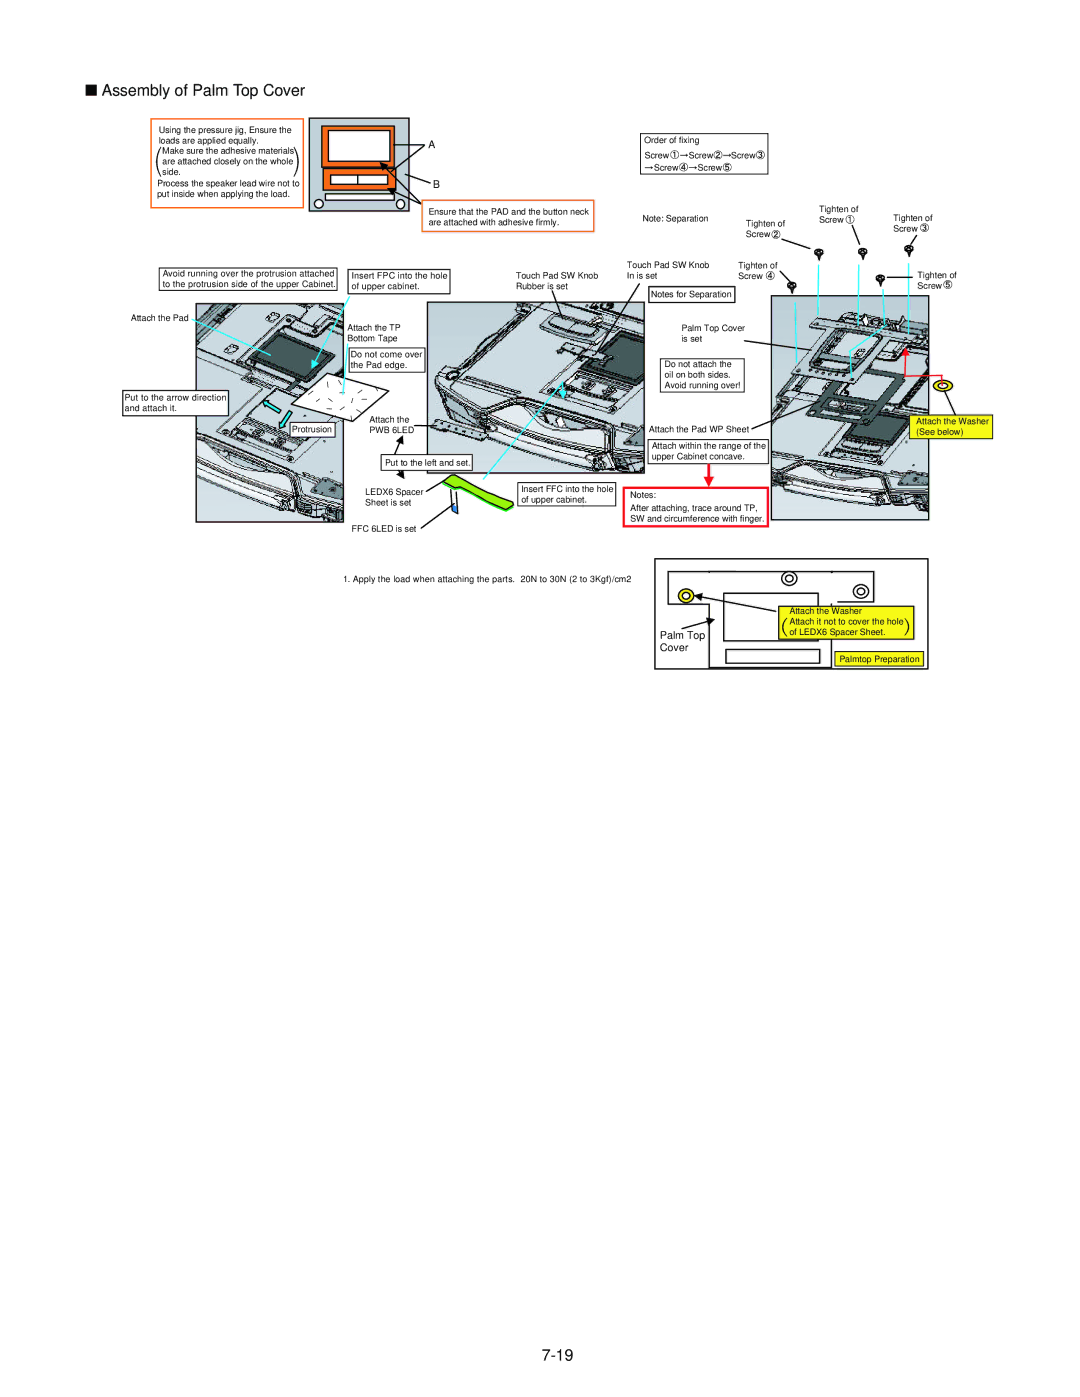
Assembly of Palm Top Cover
Attach the Pad
Setting the SD PCB, Express Card Pcmcia Card
Setting the I/O PCB
Screws N6 DRQT26+E4FKL Screws N22 DXQT2+G4FNL
Setting the Main PCB
Connect the 2 Cables to the 2 Connectors. CN17,CN27
Fix the Screw. N7 Attach the TOP Screws
Assembly of LAN, Modem and MDC
Assembly of Main PCB
Setting the PAD PCB
Assembly of PAD PCB
Setting the FPC HDD BAT
Preparation of HDD FPC Assy
Direction C View Tighten
Setting the USB PCB and Antenna PCB
Assembly of USB PCB
Setting the Dimm Cover and Bottom Cover
Preparation of Dimm Cover
Setting the GPS PCB and Bluetooth PCB
Screws N11 DFHE5025XA Screws N12 DXQT2+F3FNL
Setting the KB Cable Cover, Keyboard and LCD Cable Cover
Arranging the Keyboard
Setting the HDD
Screws N2 DRHM5054XA Screws N6 DRQT26+E4FKL
Preparation oh HDD Assy
HDD INS Sheet
HDD Cushion Black Metal Plate
HDD Thermal Plate
SEC
Page
Setting the Battery Pack and HDD Pack
Set the HDD Pack Set the Battery Pack
Exploded View
18 + 0.22 N.m + 0.2 kgf.cm 2 + 0.02 N.m 3 + 0.05 N.m
19 ± 0.02 N.m
± 0.2 kgf.cm
45 ± 0.05 N.m
± 0.5 kgf.cm
19 + 0.02 N.m
216 + 0.0196 N.m + 0.2 kgf.cm
314 + 0.0196 N.m
441 + 0.049 N.m
K1213
45 + 0.50 N.m
Screw tightening torque
216 + 0.0196 N.m
Replacement Parts List
Components identified by
A21
A22
A23
A91
CN Latch Assy
DFHG1931ZA WM SW Case Cushion
LCD Rear Cabinet Assy
DFHR3619ZA LEDX6 Spacer Sheet
DFHR3K09ZA LCD Cable Guide
CAPACITOR, 2V, 220µF
442 528 610 611 58, 86, 88, 114
9, 13, 17, 21, 25 F1G1C104A042 CAPACITOR, 16V, 0.1µF
642 644 156
293 294 F1G1H150A542 CAPACITOR, 50V, 15pF 162
164 165 F1G1A104A014 CAPACITOR, 10V, 0.1µF 167
169 224 353
491
515 552
CAPACITOR, 4V, 100µF 577
K1MN50AA0018
33, 34, 35, 36, 37 MAZ80620ML
MA3S132E0L
B2ABAM000002
MA2S111-TX
IC 79, 80 C0JBAZ002836
C0DBGYY00423
C0JBAZ002837
C0JBAC000367
79, 105, 106, 113 B1CHRD000001
122
B1DHDD000031
116 XP0421400L
85, 88, 245, 491
624 634 93, 94, 96, 98, 99 D1HY5608A007
95, 100 D1H85604A024
105, 106 189 D1H83304A024
336 337
340 341, 367, 371
RESISTOR, 1/16W, 100KΩ 545 582 348
349
651 656
RESISTOR, 1/16W, 6.98KΩ 658
RESISTOR, 1/16W, 1.69KΩ 659
RESISTOR, 1/16W, 143KΩ 661 662
800 DED1SS355T17
C1DB00001417
800
RESISTOR, 1/16W, 220KΩ 801
200 206
203 205, 207, 209
211 212, 217, 220 222 223 208
213 214, 215