EN HDD & DVD Player / Recorder with Digital Tuner
Precautions
Dear Philips product owner
For Customer Use
Antees that your date of purchase
Important Safety Instructions
Precautions
Safety Precautions
Welcome
Declaration of Conformity
Model Number
Supplied Accessories
Maintenance Servicing
Cleaning the cabinet
Cleaning discs
Contents
Contents
Features
Recording
Playback
Dubbing
Features
Symbol Description
Compatibility
Others
10 EN
Functional Overview
Front Panel
Functional Overview
Rear Panel
11 10
Introduction
Remote Control
12 EN
Open the cover Insert batteries
Close the cover
REC Mode button
Timer button
Setup button
Confirm button Analog mode
14 EN
Front Panel Display
Display Message
Current status of the unit
Antenna Cable Connection
VHF / UHF
Plug in the power cords of the devices to the AC outlet
RF Modulator Connection
16 EN
Supplied cables used in this connection are as follows
With this setup
You cannot record one channel while watching another channel
18 EN
Connection to a TV
This unit
Hdmi Mode and Actual Output Signals
Front Panel Display Video Output Signal
Connection to a TV
Press Hdmi
20 EN
Connection to AN Audio System
Audio
Proceed to in Initial Setting on
Before YOU Start
Finding the Viewing Channel on Your TV
Turn on your TV
22 EN
Before YOU Start
Guide to On-Screen Display / Menu
Main Menu
24 EN
Switching HDD / DVD Mode
How to Insert a Disc
HDD mode
DVD mode
Proceed to in Manual Clock Setting on
Initial Setting
26 EN
When scanning is over, press Setup to exit
Channel Setting
Auto Channel Scan
Channel Setting
Use K / L to select Manual Channel Preset, then press OK
28 EN
Adding / Deleting Channels
Press Setup to exit
Select the channel number to add or delete
Use K / L to select Add or Delete, then press OK
Select the channel number to delete
Auto Clock Setting
Setting the Clock
30 EN
Setting the Clock
Manual Clock Setting
Use K / L to select Clock Setting, then press OK
Daylight Saving Time
Tuner Settings
Switching Analog Mode Digital Mode
32 EN
Channel Selection
Selecting TV Audio
Tuner Settings
Press Audio to cycle through available audio languages
34 EN
Selecting TV Audio cont’d
Use K / L to select TV Audio Select, then press OK
Stereo
Editing Function Setup Others
Use K / L to select User Setting, then press OK
36 EN
Closed Caption Style
Use K / L to select ON, then press OK
Use K / L to select the item
Switch the setting for each item you
Want to set, then press OK
Information on Recording
38 EN
Recordable Discs
Unrecordable Discs
Information on Recording
Recording Mode
About HDD
Setting for Auto Chapter
Before Recording
40 EN
Make Recording Compatible
Insert a recordable disc refer to On how to insert a disc
Press REC Mode to select a recording mode
Or CH
Channel to record
Basic Recording & ONE-TOUCH Timer Recording
42 EN
Press REC I to start recording
Press Stop C to stop recording
Press Timer Use K / L to select New Program, then press OK
Timer Recording
Use K / L to enter the date, then press B
Timer Recording
44 EN
To stop the timer recording in progress
How to select a channel number for the timer recording
Press Stop C to stop the timer recording in progress
Press Timer Check the information
Priority of Overlapped Settings
Hints for Timer Recording
46 EN
Live TV mode
Special Recording
Pause Live TV
Live TV twice
Special Recording
48 EN
Overwriting from the Beginning
Title
Overwrite recording a Existing title B After overwriting
Hints for Overwriting
Overwrite recording a Existing title B Existing title C
Recording Mode for Dubbing
Dubbing
50 EN
Information on Dubbing
Settings for an External Device
Dubbing
52 EN
Recording from an External Device
Information on DV Dubbing
Guide to DV and On-Screen Display
54 EN
DVC to HDD / DVD Dubbing
Press Info
Input, then press OK
Editing Function Setup Others
56 EN
Selected Title Dubbing
Use K / L to select HDD DVD, then press OK
Use K / L to select DVD HDD, then press OK
Mode, then press OK
Use s / B to select a desired
Use K / L to select Yes, then press
58 EN
One Title Dubbing HDD to DVD only
Protecting a Disc
To cancel the disc protection
Use K / L to select Yes, then press OK
60 EN
Finalizing a Disc
Finalizing is completed
DVD-RW only
Playing the Discs on Other DVD Players
You can finalize discs automatically using this function
Auto Finalizing
Information on Playback
62 EN
CD Playback Mode menu will appear
Information on Playback
PBC playback control for Video CD
Hint for HDD / DVD Playback
64 EN
Basic Playback
Direct Playback
Basic Playback
Playback from the Title List
Disc name Default No Disc Name Disc type
Making edits compatible/finalize When DVD+RW is inserted
66 EN
Total time of recorded disc space
When selecting the folder Not available for audio CD
When selecting track/file
MP3 / Windows Media Audio
68 EN
Plug in your USB device
Select the desired drive, then press OK or B
USB memory USB card reader
When selecting folder
When selecting file
Playing Back a DivX
70 EN
Using the Title / Disc Menu
Pause
Special Playback
72 EN
Special Playback
Step by Step Playback
Slow Forward / Slow Reverse Playback
Time Shift Playback
Marker Setting
74 EN
Zoom
DVD-video
Repeat Playback
Random Playback
76 EN
Program Playback
Slide Show
5Press Play B
Using Prev / Next
Using Info
Search
Title / Chapter Search
Search
78 EN
Time Search
Audio CD
Switching Subtitles
Switching Audio Soundtrack
Switching Virtual Surround System
Switching Camera Angles
Selecting the Format of Audio and Video
80 EN
HDD mode
DVD mode
Information on Editing
Guide to a Title List
How to Access the Edit Menu
Information on Editing
82 EN
Edit Menu
If you are editing the titles on DVD, proceed to . HDD mode
DVD mode
Editing
Deleting a Title
Editing
84 EN
Use K / L to select Edit, then
Title is now deleted
Deleting Selected Titles
Use K / L to select Delete Multiple Titles, then press OK
Repeat until you select all the titles you want to delete
Press Clear
When you finish entering a title name, press OK
86 EN
Putting Names on Titles
Guide to Edit Title Name
To add a chapter mark
Chapter Marks Add
Use K / L to select Add, then press OK
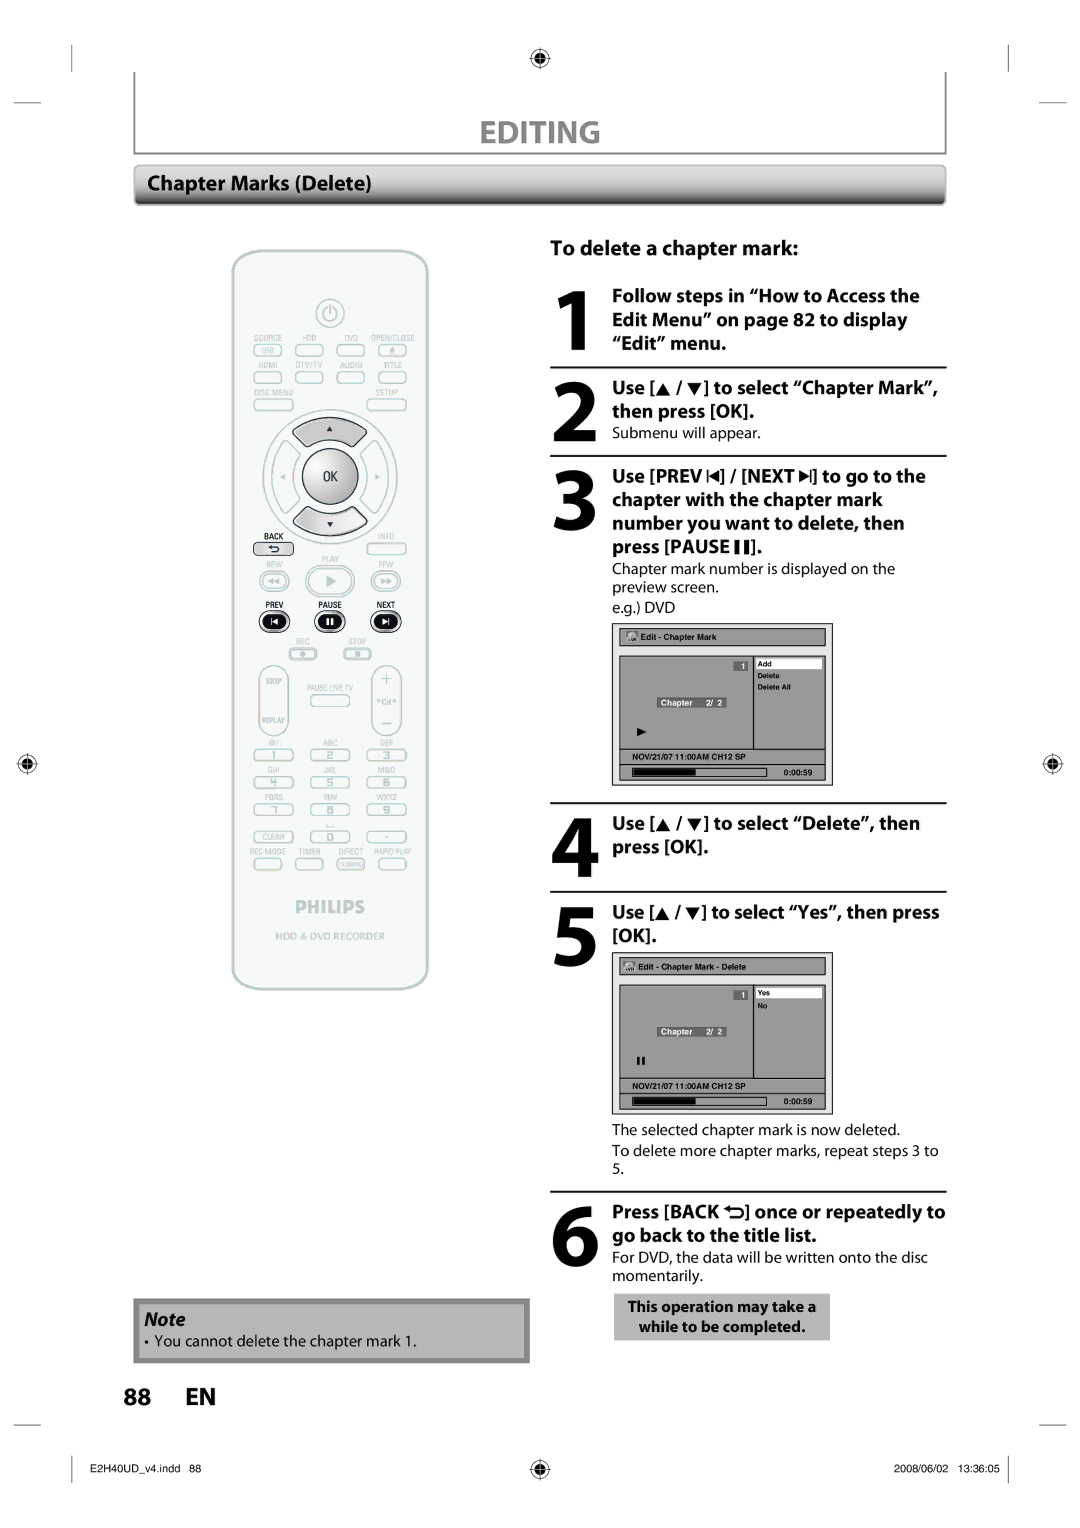
88 EN
Chapter Marks Delete To delete a chapter mark
Chapter Marks Delete All
To delete all chapter marks
Where you want to divide the title
90 EN
Dividing a Title
Edit Menu on page 82 to display
Deleting a Scene of a Title
You can delete a specific part of a title
92 EN
OK to preview the result
Use K / L to select Delete then press OK
Use K / L to select Yes then press OK
Protecting a Title
With OFF On selected, press
Use K / L to select Protect, then
Press Back once or repeatedly to go back to the title list
94 EN
Hiding Chapters
Chapter is now hidden
Data will be written onto the disc momentarily
New index picture is now set
Setting an Index Picture
Editing
When you finish entering a title name, press OK
96 EN
Putting Name on Disc
Name, then press OK. e.g. DVD+RW
Contents of the disc is now deleted
Erasing Disc
98 EN
Making Edits Compatible
Deleting All Titles in HDD
List of Settings
100 EN
List of Settings
102 EN
ONAPR-OCT OFF
Setups
Playback
Setups
Parental Lock Default OFF DVD only
104 EN
Playback cont’d
Audio Language Default Original DVD only
Disc Audio
Subtitle Language Default OFF DVD only
Angle Icon Default on DVD only
Still Mode Default Auto DVD only Select Auto usually
106 EN
When you finish with setting, press Setup to exit
Display
Refer to 1 to 5 on page 108 and set the selected item
Use K / L to select a desired item
108 EN
Display cont’d
Refer to 1 to 2 on page 110 and set the selected item
Video
For 3 refer to
Progressive Scan Default OFF
TV Aspect Default 43 Letter Box
110 EN
Video cont’d
DivX
Format Default RGB
Hdmi Audio Default on
Set to OFF when not outputting the Hdmi sound
RGB Range Default Normal
Reset All
Select Yes again using K / L Then press OK
Select Yes using K / L , then press
Reset the setting to default
Troubleshooting
Symptom Remedy
OPEN/CLOSE a to take out the disc. The disc canceled during
Repairing process MAY not work
Troubleshooting
116 EN
Frequently Asked Questions
Error message Cause Solution
118 EN
Language Code
Language Code
Glossary
120 EN
Specifications
General
Recording
Tuner
Limited Warranty
122 EN
E2H40UDv4.indd 2008/06/02
DVDR3575H/37
AADivisionofofPhilipss ElectronicsNorth America Corprp
Box 671539 Marietta, GA30006
Box 671539 Marietta, GA 30006 Meet Philips at the Internet