9. ADDITIONAL INFORMATION

Maintenance


LAMP REPLACEMENT

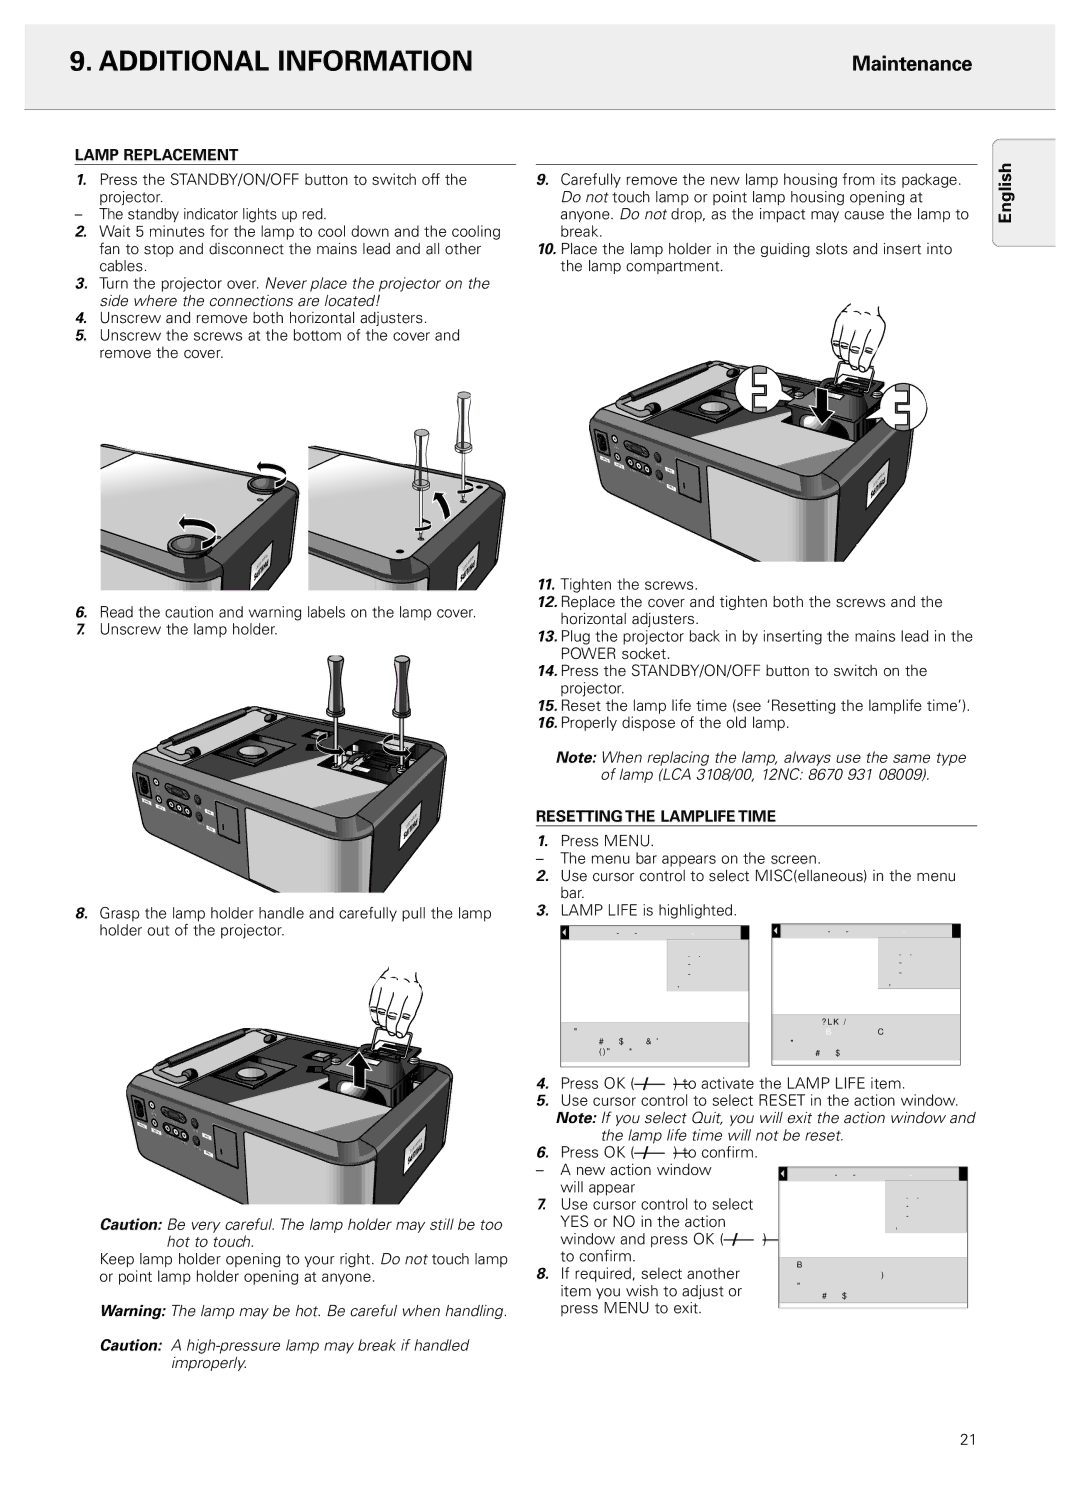
1.Press the STANDBY/ON/OFF button to switch off the projector.

The standby indicator lights up red.

2.Wait 5 minutes for the lamp to cool down and the cooling fan to stop and disconnect the mains lead and all other cables.

3.Turn the projector over. Never place the projector on the side where the connections are located!

4.Unscrew and remove both horizontal adjusters.

5.Unscrew the screws at the bottom of the cover and remove the cover.

9.Carefully remove the new lamp housing from its package. Do not touch lamp or point lamp housing opening at anyone. Do not drop, as the impact may cause the lamp to break.

10.Place the lamp holder in the guiding slots and insert into the lamp compartment.

English

Hopper

Hopper

Hopper

SV10

SV10

SV10

6.Read the caution and warning labels on the lamp cover.

7.Unscrew the lamp holder.

out


Audio


in


in


Power

Data


Audio

Mouse

Data


RR


AudioAudio L


Hopper


in


in


Video


Video-S

SV10


Video

8.Grasp the lamp holder handle and carefully pull the lamp holder out of the projector.


outout


Audio


in

in


Power


Data


Audio


Mouse


R

Audio


Data


L


Hopperopper


in

Video


in

Video-S


S10SV10


Video


Caution: Be very careful. The lamp holder may still be too hot to touch.

Keep lamp holder opening to your right. Do not touch lamp or point lamp holder opening at anyone.

Warning: The lamp may be hot. Be careful when handling.

Caution: A high-pressure lamp may break if handled improperly.

out


Audio


in


in


Power


Data


Audio

R

MouseMouse

Data


Audio L


Hopper


in


in


Video

Video-


SV10


S

Video


11.Tighten the screws.

12.Replace the cover and tighten both the screws and the horizontal adjusters.

13.Plug the projector back in by inserting the mains lead in the POWER socket.

14.Press the STANDBY/ON/OFF button to switch on the projector.

15.Reset the lamp life time (see ‘Resetting the lamplife time’).

16.Properly dispose of the old lamp.

Note: When replacing the lamp, always use the same type of lamp (LCA 3108/00, 12NC: 8670 931 08009).

RESETTING THE LAMPLIFE TIME

1.Press MENU.

The menu bar appears on the screen.

2.Use cursor control to select MISC(ellaneous) in the menu bar.

3.LAMP LIFE is highlighted.


Source P . Pref .

Misc .


Source P . Pref .

Misc .


Lamp life


Lamp life


Language


Language


Hor . mirror


Hor . mirror


Ver . mirror


Ver . mirror


Counter


Counter


378 hours used


Use cursor control to select


Reset

Quit


Press OK or — to invoke item


Use cursor control to select


Press MENU to exit menu


Press OK or — to accept


4.Press OK (–/–) to activate the LAMP LIFE item.

5.Use cursor control to select RESET in the action window. Note: If you select Quit, you will exit the action window and

the lamp life time will not be reset.

6.Press OK (–/–) to confirm.

A new action window


Source P . Pref .

M i s c .


will appear


Lamp life

7.

Use cursor control to select


Language


Hor . mirror


YES or NO in the action


Ver . mirror


Counter


window and press OK (–/–

)


to confirm.


Reconfirm

8.

If required, select another


Yes No


item you wish to adjust or


Use cursor control to select


Press OK or — to accept


press MENU to exit.


21

Page 21
Image 21
Philips 20 series, LC4043 manual Lamp Replacement, Resetting the Lamplife Time, Yes No

LC4043, 20 series specifications

The Philips LC4043,20 series is a state-of-the-art lighting solution designed to enhance both residential and commercial spaces. Known for its innovative features, this series represents a significant leap forward in energy efficiency and lighting technology.

One of the standout attributes of the LC4043,20 series is its use of LED technology. LEDs are renowned for their long lifespan and low energy consumption, making them a smart choice for those looking to reduce electricity bills and environmental impact. These lights typically last up to 25,000 hours, which means less frequent replacements and reduced maintenance costs.

The LC4043,20 series is equipped with smart dimming capabilities, allowing users to easily adjust brightness levels according to their needs and preferences. This feature not only contributes to a comfortable atmosphere but also enhances energy savings, as users can reduce brightness when full illumination is unnecessary.

Another remarkable feature is the series’ adjustable color temperature. With options ranging from warm to cool light, users can create the desired ambiance for any occasion. The ability to switch from a cozy warm light for relaxation to a bright cool light for focused tasks ensures that the lighting adapts seamlessly to various activities.

Additionally, the Philips LC4043,20 series has received certifications for energy efficiency, positioning it as an eco-friendly choice. By meeting strict energy consumption guidelines, these products help users make a positive impact on both the planet and their utility expenses.

The design of the LC4043,20 series is both sleek and modern, fitting well into various decor styles. Its versatility makes it suitable for different settings, including living rooms, offices, and retail spaces. With a sleek finish and unobtrusive form factor, the fixture complements the existing interior while providing excellent functionality.

Furthermore, installation is straightforward, with the series offering a user-friendly setup that doesn't require specialized tools or expertise. This ensures that users can quickly enjoy the benefits of advanced lighting without delays or additional costs.

In summary, the Philips LC4043,20 series stands out for its energy-efficient LED technology, smart dimming and adjustable color temperature, modern design, and ease of installation. This lighting solution not only elevates the ambiance of any space but also aligns with the growing demand for sustainable and adaptable lighting options.