SCD464
Page
Baby unit Parent unit
Baby unit
What else you’ll need
Contents
EN Welcome
Safety information
Philips Baby Care, taking care together
Getting your baby monitor ready EN
Close the battery compartment cover A-9, using a coin
Baby unit is now ready for battery operated use
Mains operated use
Parent unit is now ready for battery operated use
Using your baby monitor
EN Getting your baby monitor ready
Avoiding interference channel selection
Using your baby monitor EN
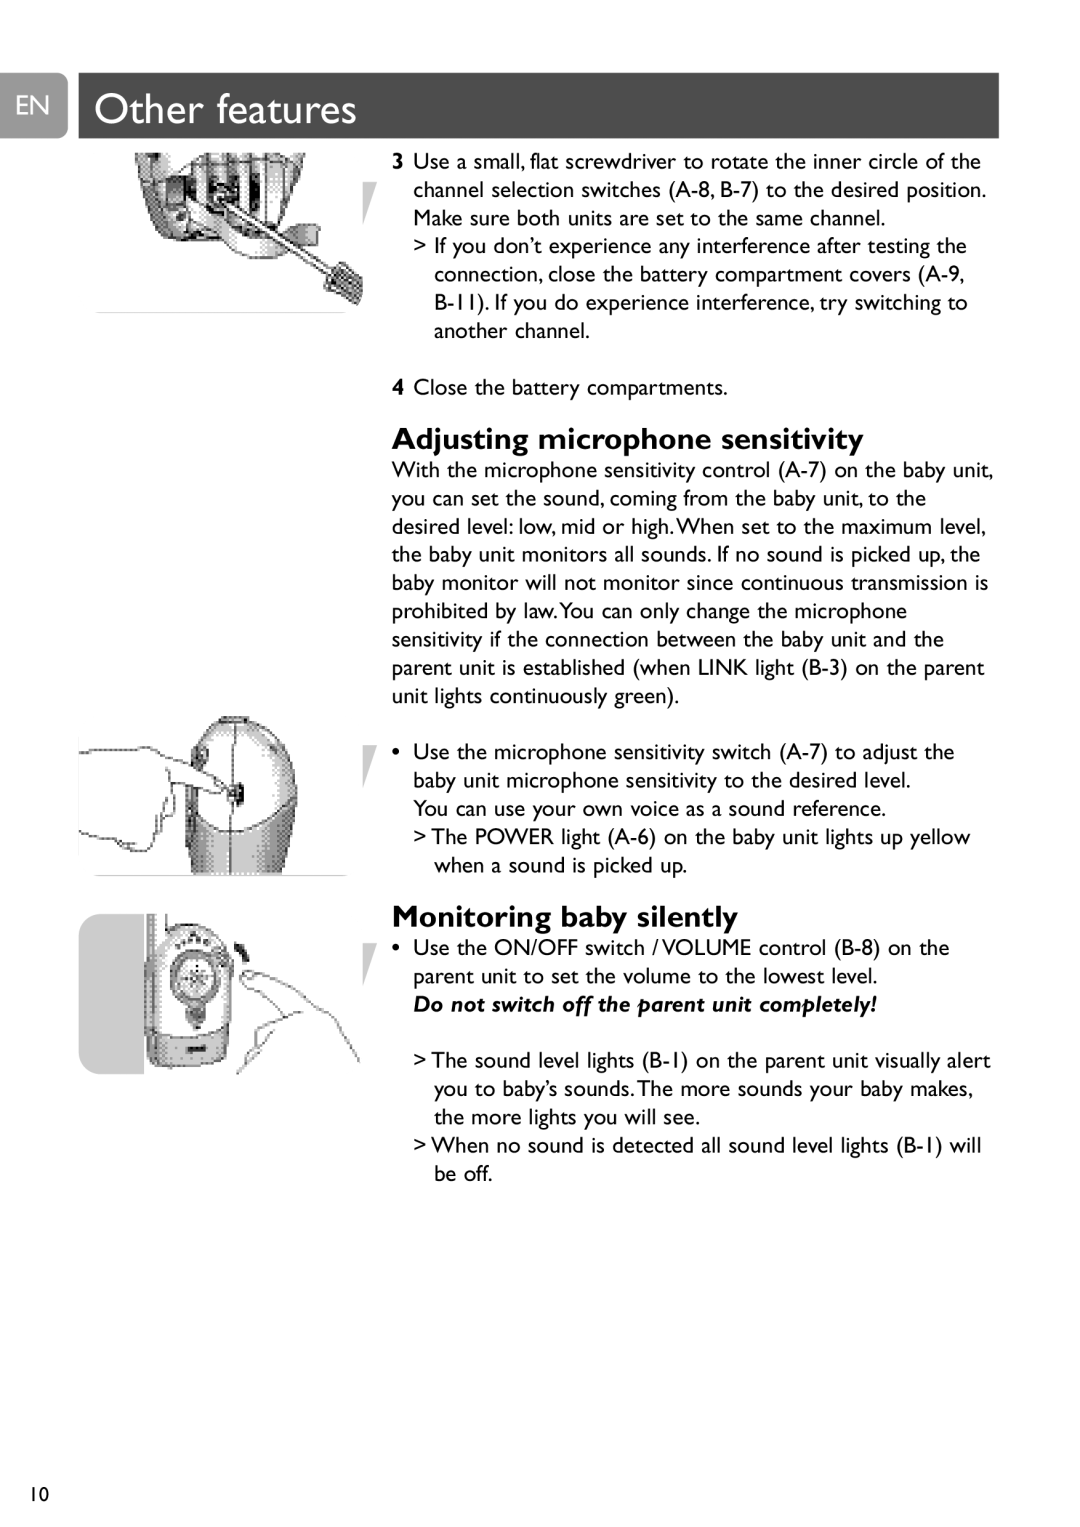
Other features
Your can now monitor you baby
Do not switch off the parent unit completely
EN Other features
Adjusting microphone sensitivity
Monitoring baby silently
Connecting / disconnecting the belt clip
Other features EN
Switching the Link alarm on and off
Connecting the belt clip
Baby unit and parent unit
EN Troubleshooting
Problem Possible cause Solution
Move phones away from baby monitor
Volume set too high Turn ON/OFF switch
Troubleshooting EN
Unit at least 1 metre / 3 feet
EN Frequently asked questions
Technical specifications
Need help?
Maintenance
Important information EN
Environmental information
Unité bébé
Autres accessoires utiles
Légende des fonctions
Unité parents
Sommaire
Unité bébé Unité parents Autres accessoires
Environnement Maintenance
Consignes de sécurité
Consignes de sécurité
FR Bienvenue
Philips Baby Care,Taking care together
’unité bébé peut maintenant fonctionner sur piles
Utilisation sur secteur
’unité parents peut maintenant fonctionner sur secteur
Fonctionnement sur piles
FR Mise en service de votre moniteur pour bébé
Utilisation du moniteur pour bébé
’unité parents peut maintenant fonctionner sur piles
Prévention des interférences sélection de canal
Utilisation du moniteur pour bébé FR
Autres fonctionnalités
Vous pouvez maintenant surveiller votre bébé
Réglage de la sensibilité du microphone
FR Autres fonctionnalités
Surveillance silencieuse du bébé
Fixation/retrait de l’attache de ceinture
Activation et désactivation de l’alarme de connexion
Autres fonctionnalités FR
Fixation de l’attache de ceinture
Problème Cause possible Solution
Dépannage
Unité bébé
Dépannage FR
’une de l’autre
Même fréquence
FR Questions fréquentes
Caractéristiques techniques
Environnement
Important FR
Besoin d’aide ?
Entretien
Unidad para padres
Leyenda de las funciones
Vigilabebés
Qué más necesita
Información acerca de la seguridad
Contenido
Vigilabebés Unidad para padres 28 Qué más necesita
Vigilabebés Unidad para padres
Información acerca de la seguridad
ES Bienvenido
Cuidado de bebés Philips, cuidándolo juntos
Utilización con red eléctrica
Preparación del vigilabebés
El vigilabebés ya está preparado para su uso con las pilas
ES Preparación del vigilabebés
Uso del vigilabebés
Evitar interferencias selección de canales
Uso del vigilabebés ES
Otras funciones
¡Ahora ya puede vigilar al bebé
Control silencioso del bebé
ES Otras funciones
Ajustar la sensibilidad del micrófono
No desactive completamente la unidad para padres
Conectar/desconectar el enganche de cintura
Encender y apagar la alarma de Enlace
Otras funciones ES
Fijar el enganche de cintura
ES Solución de problemas
Problema Posible causa Solución
Solución de problemas ES
Cerca entre sí
ES Preguntas frecuentes
Especificaciones técnicas
Protección del medio ambiente
Información importante ES
Ayuda
Mantenimiento
Elterneinheit
Babyeinheit
Was Sie sonst noch brauchen
Sicherheitshinweise
Inhalt
Babyeinheit Elterneinheit Was Sie sonst noch brauchen
Babyeinheit Elterneinheit
Sicherheitshinweise
DE Herzlichen Glückwunsch
Philips Baby Care, In besten Händen
Stecken Sie den Netzadapter A-3 in eine Wandsteckdose
Inbetriebnahme des Babysitters DE
Netzbetrieb
Die Babyeinheit ist jetzt für den Batteriebetrieb bereit
Benutzen des Babysitters
DE Inbetriebnahme des Babysitters
Die Elterneinheit ist jetzt für den Batteriebetrieb bereit
Vermeiden von Störungen Kanalwahl
Benutzen des Babysitters DE
Weitere Funktionen und Leistungsmerkmale
Sie können jetzt Ihr Baby überwachen
Geräuschlose Babyüberwachung
DE Weitere Funktionen und Leistungsmerkmale
Einstellen der Mikrofonempfindlichkeit
Schließen Sie die Batteriefach-Abdeckungen
Anbringen / Abnehmen des Gürtel-Clips
Ein- und Ausschalten des Verbindungsalarms
Weitere Funktionen und Leistungsmerkmale DE
Anbringen des Gürtel-Clips
Problem Mögliche Ursache Abhilfe
Fehlerbehebung
Fehlerbehebung DE
DE Häufig gestellte Fragen
Technische Daten
Informationen zum Umweltschutz
Wichtige Informationen DE
Brauchen Sie Hilfe?
Wartung
Oudereenheid
NLFunctieoverzicht
Babyeenheid
Overige benodigdheden
Veiligheidsinformatie
Inhoud
Babyeenheid Oudereenheid Overige benodigdheden
Babyeenheid Oudereenheid
Veiligheidsinformatie
NL Welkom
Philips Baby Care, Samen zorgen
De babyeenheid is nu klaar voor gebruik op batterijen
Gebruiksklaar maken van de babyfoon NL
Gebruik op netspanning
De oudereenheid is nu klaar voor gebruik op netspanning
Bediening van de babyfoon
NL Gebruiksklaar maken van de babyfoon
De oudereenheid is nu klaar voor gebruik op batterijen
Storing voorkomen kanaalkeuze
Bediening van de babyfoon NL
Overige eigenschappen
Kunt nu op uw baby letten
Geluidloos toezicht houden op uw baby
NL Overige eigenschappen
Gevoeligheid van microfoon instellen
Sluit de batterijvakken
Riemclip aanbrengen / losmaken
Verbindingsalarm in- of uitschakelen
Overige eigenschappen NL
Riemclip aanbrengen
NL Problemen oplossen
Probleem Mogelijke oorzaak Oplossing
Problemen oplossen NL
NL Vaak gestelde vragen
Technische specificaties
Hebt u hulp nodig?
Klantenservice
Belangrijke informatie NL
Milieu
Unità Genitore
Unità Baby
Cosa serve
Informazioni sulla sicurezza
Sommario
Unità Baby Unità Genitore Cosa serve
Unità Baby Unità Genitore
Informazioni sulla sicurezza
IT Benvenuti
Philips Baby Care, proteggiamolo insieme
’unità Baby è ora pronta per l’uso, alimentata a batterie
Preparare all’uso il baby monitor IT
Alimentazione di rete
Collegate l’alimentatore CA B-5 ad una presa a muro
IT Preparare all’uso il baby monitor
Utilizzare il baby monitor
Evitare le interferenze selezione canale
Utilizzare il baby monitor IT
Altre funzioni
Ora potete vigilare sul vostro bimbo
Controllare il bimbo in sordina
IT Altre funzioni
Regolare la sensibilità del microfono
Chiudete i vani batteria
Collegare / Scollegare il gancio da cintura
Altre funzioni IT
Accendere e spegnere l’allarme connessione Link
Collegare il gancio da cintura
IT Risoluzione di problemi
Problema Possibile causa Soluzione
Problema
IT Domande frequenti
Specifiche tecniche
Informazioni sull’ambiente
Importanti informazioni IT
Bisogno di aiuto?
Manutenzione
Unidade dos pais
Unidade do bebé
Outros elementos necessários
Unidade do bebé Unidade dos pais
Índice
Informações de segurança
Informações relativas ao meio ambiente Manutenção
Informações de segurança
PR Bem-vindo
Philips Baby Care, juntos a cuidar
Ligue o transformador de AC A-3 a uma tomada de parede
Preparar o monitor para bebés
Funcionamento com ligação à tomada eléctrica
Unidade do bebé fica pronta a funcionar com pilhas
Utilizar o monitor para bebés
PR Preparar o monitor para bebés
Unidade dos pais fica pronta a funcionar com pilhas
Outras funções
Utilizar o monitor para bebés PR
Evitar interferências selecção de canais
Monitorizar o bebé em silêncio
PR Outras funções
Regular a sensibilidade do microfone
Amarelo quando é captado um som
Colocar/retirar o clip para cinto
Ligar e desligar o alarme Link
Outras funções PR
Colocar o clip para cinto
PR Resolução de problemas
Problema Causa possível Solução
Metro/3 pés
Resolução de problemas PR
Volume demasiado alto
Para cima
PR Perguntas mais frequentes
Características técnicas
Informações relativas ao meio ambiente
Informações importantes PR
Precisa de ajuda?
Manutenção
On/Off
DC 9 V -+
Page
Philips
Philips
DC 9 V -+ A-2
Philips DC 9 V -+ B-4
Philips ON/OFF A-1 Power A-6 ON/OFF B-9
Page
B-11 Power A-6
OFF
Page
B-4 B-5
B-9 d On/Off B-8 B-5 AC d DC 9 V -+
DC 9V -+
B-9 ON/OFF / B-8
DC, 200 mAh
100%
SCD464
Föräldraenhet
Funktioner
Babyenhet
Övrigt du behöver
102 Säkerhetsinformation
Innehåll
Babyenhet 100 Föräldraenhet 100 Övrigt du behöver
Babyenhet 103 Föräldraenhet
SV Välkommen
Säkerhetsinformation
Sätt tillbaka batterifackslocket A-9 med hjälp av ett mynt
Installera babyvakten SV
Nätansluten drift
Därmed är babyenheten klar att använda batteridriven
Använda babyvakten
SV Installera babyvakten
Därmed är föräldraenheten klar att använda batteridriven
Undvika störningar kanalval
Använda babyvakten SV
Övriga funktioner
Därmed kan du övervaka barnet
Tyst babyövervakning
SV Övriga funktioner
Justera mikrofonkänsligheten
Stäng batterifacken
Montera/demontera bältesfästet
Övriga funktioner SV
Slå på/av länklarmet
Montera bältesfästet
Problem Möjlig orsak Lösning
Felsökning
Felsökning SV
Störning från annan FM-källa Avlägsna den andra FM-källan
SV Vanliga frågor
Tekniska data
Miljöinformation
Viktig information SV
Behöver du hjälp?
Underhåll
Forældreenhed
DKFunktionsforklaring
Babyenhed
Hvad du ellers har brug for
Sikkerhedsoplysninger
Indhold
Babyenhed 112 Forældreenhed Hvad du ellers har brug for
Babyenhed 115 Forældreenhed
Sikkerhedsoplysninger
DK Velkommen
Philips babypleje, fælles omsorg
Babyenheden er nu klar til brug med batteristrømforsyning
Klargøring af babyfonen DK
Netdrift
Forældreenheden er nu klar til brug med netstrømforsyning
DK Klargøring af babyfonen
Brug af babyfonen
Undgå interferens kanalvalg
Brug af babyfonen DK
Andre funktioner
Du kan nu holde øje med dit barn
Lydløs overvågning af barnet
DK Andre funktioner
Regulering af mikrofonfølsomhed
Begge enhederne skal være indstillet på den samme kanal
Tilslutning / frakobling af bælteclipsen
Tænde og slukke Link alarmen
Andre funktioner DK
Tilslutning af bælteclipsen
Problem Mulig årsag Afhjælpning
DK Fejlfinding
Fejlfinding DK
DK Hyppigt stillede spørgsmål
Tekniske specifikationer
Miljøoplysninger
Vigtige oplysninger DK
Brug for hjælp?
Vedligeholdelse
Foreldreapparat
Forklaring på funksjonene
Babyapparat
Hva du ellers vil komme til å trenge
Babyapparat Foreldreapparat
Innhold
Sikkerhetsinformasjon
Miljøinformasjon Vedlikehold
Sikkerhetsinformasjon
No Velkommen
Philips babyomsorg, vi viser omsorg sammen
Bruk med strøm fra strømnettet
Klargjøring av babyvarsleren
Babyapparatet er nå klart til batteridrift
No Klargjøring av babyvarsleren
Bruke babyvarsleren
Unngå forstyrrelser kanalvalg
Bruke babyvarsleren no
Andre funksjoner
Nå kan du overvåke babyen din
Lydløs overvåking av babyen
No Andre funksjoner
Justere mikrofonfølsomheten
Lukk batteridekslene
Feste/løsne belteklemmen
Slå FORBINDELSES-alarmen Link av og på
Andre funksjoner no
Feste belteklemmen
Vegger og/eller tak mellom
No Problemløsing
Problem Mulig årsak Løsning
Babyapparatet og
Strømadapter AC A-3, B-5
Strømlampe Power Apparatet er ikke slått på
B-9 lyser ikke
Plugg A-2, B-4 Strømadapter AC A-3, B-5
No Vanlige spørsmål
Tekniske spesifikasjoner
Miljøinformasjon
Viktig informasjon no
Trenger du hjelp?
Vedlikehold
Vanhempien yksikkö
Osien kuvaus
Lapsen yksikkö
Muut tarvittavat välineet
Turvallisuustietoja
Sisällys
Lapsen yksikkö Vanhempien yksikkö Muut tarvittavat välineet
Lapsen yksikkö Vanhempien yksikkö
Turvallisuustietoja
FI Tervetuloa
Philips Baby Care, autamme huolehtimaan lapsista
Käyttäminen verkkovirralla
Itkuhälyttimen asettaminen käyttökuntoon FI
Lapsen yksikkö on nyt valmis käytettäväksi paristoilla
Itkuhälyttimen käyttäminen
FI Itkuhälyttimen asettaminen käyttökuntoon
Vanhempien yksikkö on nyt valmis käytettäväksi paristoilla
Häiriöiden välttäminen kanavan valitseminen
Itkuhälyttimen käyttäminen FI
Muut ominaisuudet
Sijoita lapsen yksikkö vähintään 1 metrin päähän lapsesta
Lapsen valvominen käyttämällä pientä äänenvoimakkuutta
FI Muut ominaisuudet
Mikrofonin herkkyyden säätäminen
Älä kytke vanhempien yksikköä kokonaan pois päältä
Vyökiinnikkeen Kiinnittäminen/irrottaminen
Muut ominaisuudet FI
LINK-hälytyksen kytkeminen päälle ja pois päältä
Vyökiinnikkeen kiinnittäminen
Ongelma Mahdollinen syy Ratkaisuehdotus
Vianmääritys FI
FI Kysymyksiä ja vastauksia
Tekniset tiedot
Ympäristönsuojelutietoja
Tärkeä huomautus FI
Tarvitsetko apua?
Hoito ja huolto
Ebeveyn Ünitesi
İşlevlerin açıklamaları
Bebek ünitesi
Diğer gerekli öğeler
150 Güvenlik bilgileri
İçindekiler
Bebek ünitesi Ebeveyn ünitesi 148 Diğer gerekli öğeler
Bebek ünitesi Ebeveyn ünitesi
Güvenlik bilgileri
TR Hoş geldiniz
Philips Baby Care, bebeğe birlikte bakalım
Bebek ünitesi elektrikle kullanıma hazırdır Pille kullanım
Bebek izleme cihazınızı hazırlama TR
Elektrikle kullanım
Bebek ünitesi pille kullanıma hazırdır
Bebek izleme cihazınızı kullanma
TR Bebek izleme cihazınızı hazırlama
Ebeveyn ünitesi pille kullanıma hazırdır
Paraziti önleme kanal seçimi
Bebek izleme cihazınızı kullanma TR
Diğer özellikler
Artık bebeğinizi izleyebilirsiniz
Bebeği sessiz izleme
TR Diğer özellikler
Mikrofon hassasiyetini ayarlama
Ebeveyn ünitesini tamamen kapatmayın
Kemer klipsini takma / çıkarma
Link alarmını açma ve kapatma
Diğer özellikler TR
Kemer klipsini takma
Sorun giderme
Sorun Olası neden Çözüm
Sorun giderme TR
Power ışığı A-6, B-9 Ünite açılmamış. yanmıyor
Üniteleri birbirine yaklaştırın
TR Sık sorulan sorular
Teknik özellikler
Çevresel bilgiler
Önemli bilgiler TR
Yardıma mı ihtiyacınız var?
Bakım
0682