DEH-P3950MP
YRD5079-A/U1
Contents
Using the AUX source About AUX connection method
YRD5079-A/U3
About MP3
Use and care of the remote control
Before You Start About this unit
Visit our website
Protecting your unit from theft
Using the remote control
Before You Start
Removing the front panel
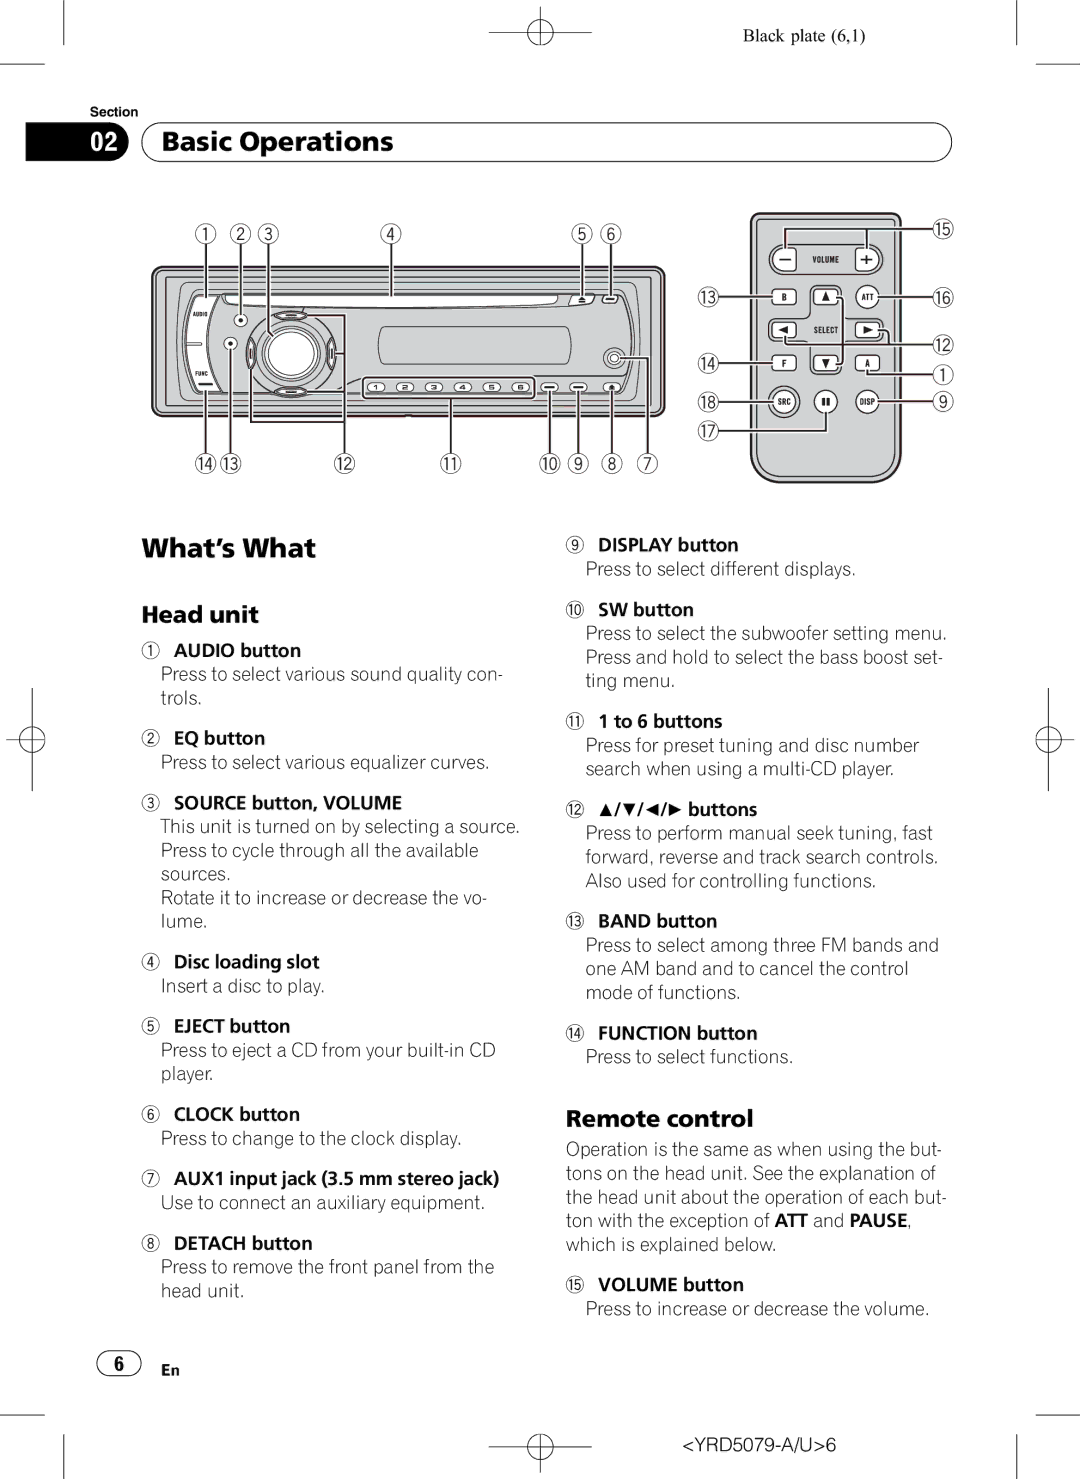
What’s What
Remote control
Basic Operations
Head unit
Turning the unit on and selecting a source
Adjusting the volume
Use Volume to adjust the sound level
Turning the unit off
Storing and recalling broadcast frequencies
Tuner Listening to the radio
Introduction of advanced tuner operation
Band
Storing the strongest broadcast frequencies
Tuning in strong signals
Tuner
FM Local 1-LOCAL 2-LOCAL AM Local 1-LOCAL
Files, playback commences with folder
Built-in Player Playing a disc
Introduction of advanced built-in CD player operation
Eject
Repeating play
Pausing disc playback
Built-in Player
Scanning tracks or folders
Built-in Player Using compression and BMX
Searching every 10 tracks Current disc or folder
Displaying text information on disc
Multi-CD Player Playing a CD
Introduction of advanced
Multi-CD player operation
Multi-CD Player
Pausing CD playback
Using compression and bass emphasis
Scanning CDs and tracks
Playback from your ITS playlist
Using ITS playlists
Creating a playlist with ITS programming
Erasing a track from your ITS playlist
Using CD Text functions
Erasing a CD from your ITS playlist
YRD5079-A/U16
Using balance adjustment
Audio Adjustments Introduction of audio
Adjustments
Using the equalizer
Fine-adjusting equalizer curve
Audio Adjustments
Adjusting equalizer curves
POWERFUL-NATURAL-VOCAL-CUSTOM EQ FLAT-SPR-BASS
Using the high pass filter
Audio Adjustments Adjusting loudness
Using subwoofer output
Adjusting subwoofer settings
Audio Adjustments Boosting the bass
Adjusting source levels
Front image enhancer F.I.E
Setting the FM tuning step
Other Functions Adjusting initial settings
Setting the clock
Setting the AM tuning step
Using the AUX source
Other Functions Switching the auxiliary setting
Setting the rear output
Subwoofer controller Turning the clock display
Other Functions
Introduction of iPod operation
Black plate 24,1
WMA, MP3 and WAV files
Additional Information
Dual Discs
Example of a hierarchy
MS Adpcm
MP3
WAV
Adpcm
Additional Information Specifications
Acerca de WMA Acerca de MP3
Contenido
Antes de comenzar Acerca de esta unidad
Funciones básicas
YRD5079-A/U29
Visite nuestro sitio Web
Antes de comenzar Acerca de esta unidad
Acerca de MP3
Acerca de WMA
Antes de comenzar Uso y cuidado del mando a
Distancia
Protección del producto contra robo
Excesiva para fijar la carátula, ésta puede dañarse
Antes de comenzar
Colocación de la carátula
YRD5079-A/U32
Botón Detach
Funciones básicas Qué es cada cosa
Unidad principal
Presione este botón para extraer la carátula
Encendido de la unidad y selección de una fuente
Ajuste del volumen
Funciones básicas
Apagado de la unidad
Avanzadas del sintonizador
Sintonizador Para escuchar la radio
Introducción a las funciones
Almacenamiento y recuperación de frecuencias
Fuertes
Sintonizador
Sintonización de señales
Almacenamiento de las
Reproductor incorporado Reproducción de un disco
Reproducción de las pistas en orden aleatorio
Reproductor incorporado
Repetición de reproducción
Exploración de pistas o carpetas
Uso de la compresión y BMX
Pausa de la reproducción de un disco
Búsqueda cada 10 pistas en el disco o carpeta actual
YRD5079-A/U40
Ready
Reproductor de CD múltiple Reproducción de un CD
Multi CD
No Disc
Reproducción de las pistas
Reproductor de CD múltiple
Exploración de CD y pistas
En orden aleatorio
Uso de la compresión y del enfatizador de graves
Uso de listas de reproducción ITS
YRD5079-A/U43
Borrado de un CD de la lista de reproducción ITS
Reproducción de la lista de reproducción ITS
Borrado de una pista de la lista de reproducción ITS
ITS
Reproductor de CD múltiple Uso de las funciones CD Text
YRD5079-A/U45
Ajustes de audio Introducción a los ajustes
De audio
Uso del ajuste del balance
Ecualización
Ajustes de audio Uso del ecualizador
Ajuste de las curvas de
Recuperación de las curvas de
Ajuste de la sonoridad
Configuración de los ajustes de subgraves
Ajustes de audio
Uso de la salida de subgraves
Mejora de imagen frontal F.I.E
Uso del filtro de paso alto
Intensificación de los graves
Minuye el nivel
Ajuste de los niveles de la fuente
YRD5079-A/U50
Ajuste del paso de sintonía de FM
Otras funciones Configuración de los
Ajustes iniciales
Ajuste del reloj
Otras funciones Ajuste del paso de sintonía de AM
Cambio del ajuste de un equipo auxiliar
Uso de la fuente AUX
Otras funciones Activación y desactivación
De la visualización del reloj
Selección de AUX como la fuente
Funcionamiento en el iPod
Otras funciones Introducción a las
Funciones de iPod
Visualización de información de texto en el iPod
Incorporado
Use únicamente discos que tengan uno de
Los siguientes dos logos
Ficheros WMA, MP3 y WAV
Información adicional
Discos dobles
Ejemplo de una jerarquía
Compatibilidad con audio comprimido
Formato compatible Lineal PCM Lpcm
YRD5079-A/U57
Información adicional Especificaciones
Aleatória
Conteúdo
Introdução à operação avançada do sintonizador
Ajustes de áudio
Seleção de AUX como a fonte
Ativação do ajuste auxiliar
Hora Utilização da fonte AUX
Introdução à operação do iPod
Sobre MP3
Antes de utilizar este produto Sobre esta unidade
Visite o nosso website
Sobre o WMA
Extração do painel frontal
Proteção da sua unidade contra roubo
Instalação da bateria
Utilização do controle remoto
Você encaixá-lo à força Português B
Antes de utilizar este produto
Colocação do painel frontal
YRD5079-A/U63
Operações básicas Introdução aos botões
Unidade principal
YRD5079-A/U64
Como ligar a unidade e selecionar uma fonte
Ajuste do volume
Operações básicas
Como desligar a unidade
Sintonizador Como ouvir o rádio
Introdução à operação avançada do sintonizador
Freqüências mais fortes de
Sintonia em sinais fortes
Armazenamento das
Transmissão
Player incorporado Reprodução de um disco
Repetição da reprodução
Player incorporado
Introdução à utilização avançada do CD player incorporado
Reprodução de faixas em ordem aleatória
Utilização de compressão e
Busca a cada 10 faixas no disco ou na pasta atual
Pausa na reprodução de disco
Visualização de informações de texto no disco
YRD5079-A/U71
Para retroceder ou avançar uma faixa
Multi-CD player Reprodução de um CD
Introdução à operação avançada do Multi-CD player
Pressione c ou d
Procura de CDs e faixas
Pausa na reprodução do CD
Utilização de compressão e ênfase de graves
Reprodução da sua lista ITS
Utilização de listas de reprodução ITS
Criação de uma lista de reprodução com a programação ITS
Lizado # Para desativar a reprodução ITS, pressione b
Exclusão de um CD da sua lista de reprodução ITS
Utilização das funções CD Text
Exclusão de uma faixa da sua lista de reprodução ITS
Produção da próxima faixa é iniciada
Utilização do ajuste do
Ajustes de áudio Introdução aos ajustes de
Áudio
Balanço
Chamada das curvas do equalizador da memória
Ajustes de áudio
Utilização do equalizador
Ajuste das curvas do equalizador
Ajuste da sonoridade
Utilização da saída do alto
Falante de graves secundário
Ajuste do alto-falante de graves secundário
Aperfeiçoador da imagem frontal F.I.E
Utilização do filtro de alta freqüência
Intensificação de graves
YRD5079-A/U79
Ajuste de níveis de fonte
YRD5079-A/U80
Outras funções Definição dos ajustes iniciais
Ajuste do passo de sintonia
Ajuste da hora
Visualizado
Outras funções
Ativação do ajuste auxiliar
SP FUL
Utilização da fonte AUX
Outras funções Ativação ou desativação da
Visualização de hora
Introdução à operação do
Operação do iPod
Visualização de informações de texto no iPod
YRD5079-A/U84
Utilize apenas os discos com os logotipos a
Ao entrar em contato com o revendedor ou a
YRD5079-A/U85
Arquivos WMA, MP3 e WAV
Informações adicionais
Discos duais
Exemplo de uma hierarquia
Bits de quantização 8 e 16 LPCM, 4 MS
Compatibilidade com compressão de áudio
Formato compatível PCM linear Lpcm
YRD5079-A/U87
Informações adicionais Especificações
YRD5079-A/U89
YRD5079-A/U90
YRD5079-A/U91
Meguro 1-CHOME, MEGURO-KU Tokyo 153-8654, Japan
Kmmzx 06H00000 YRD5079-A/U ES YRD5079-A/U92
 Basic Operations