Home Theater Component
Connections
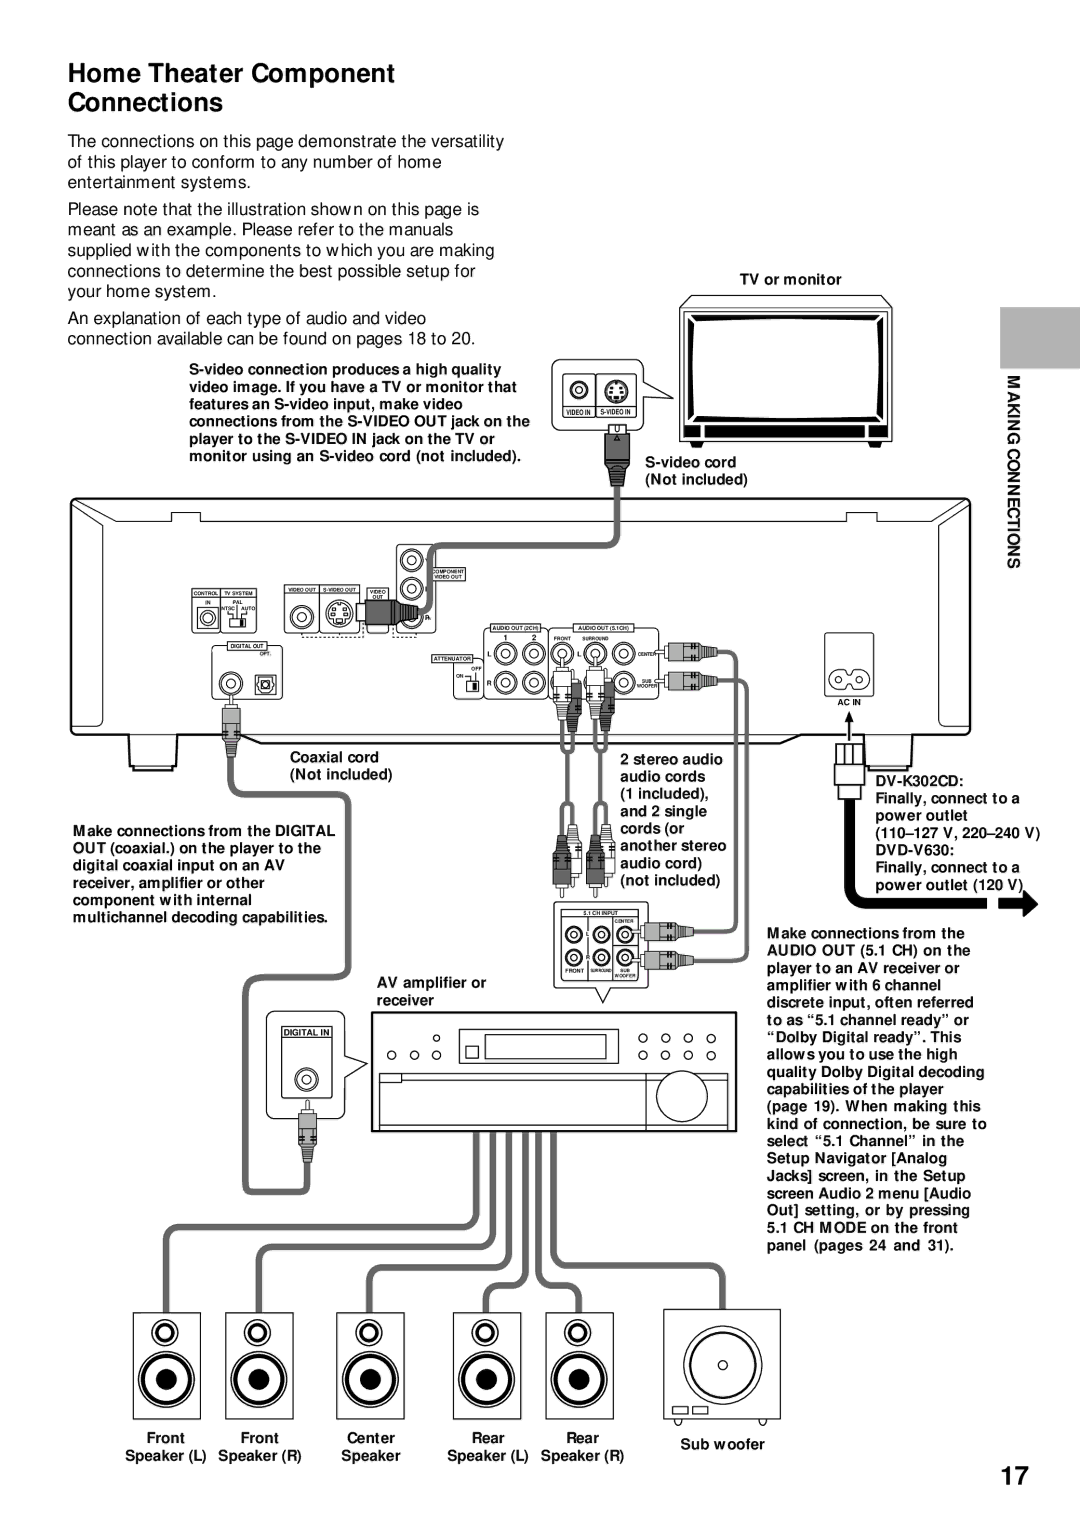
The connections on this page demonstrate the versatility of this player to conform to any number of home entertainment systems.
Please note that the illustration shown on this page is meant as an example. Please refer to the manuals supplied with the components to which you are making connections to determine the best possible setup for your home system.
An explanation of each type of audio and video connection available can be found on pages 18 to 20.
|
|
| Y |
|
|
|
| COMPONENT |
|
|
|
| VIDEO OUT |
|
CONTROL | VIDEO OUT | VIDEO | PB |
|
TV SYSTEM |
|
| ||
| PAL | OUT |
|
|
IN | SELECT |
|
| |
| NTSC AUTO |
|
|
|
|
|
| PR |
|
|
|
| AUDIO OUT (2CH) | |
|
|
| 1 | 2 |
| DIGITAL OUT |
|
|
|
| OPT. |
| L |
|
|
|
| ATTENUATOR |
|
|
|
| OFF |
|
|
|
| ON |
|
|
|
| R |
|
TV or monitor
VIDEO IN
AUDIO OUT (5.1CH)
FRONT SURROUND
L | CENTER |
SUB ![]()
WOOFER
AC IN
MAKING CONNECTIONS
Coaxial cord (Not included)
Make connections from the DIGITAL OUT (coaxial.) on the player to the digital coaxial input on an AV receiver, amplifier or other component with internal multichannel decoding capabilities.
AV amplifier or receiver
DIGITAL IN
2 stereo audio audio cords (1 included), and 2 single
cords (or
![]()
![]()
![]()
![]() another stereo
another stereo ![]()
![]()
![]()
![]() audio cord)
audio cord)
![]()
![]()
![]() (not included)
(not included)
5.1CH INPUT CENTER
L
R
FRONT SURROUND SUB
WOOFER
Finally, connect to a power outlet (120 V)
Make connections from the AUDIO OUT (5.1 CH) on the player to an AV receiver or amplifier with 6 channel discrete input, often referred to as “5.1 channel ready” or “Dolby Digital ready”. This allows you to use the high quality Dolby Digital decoding capabilities of the player (page 19). When making this kind of connection, be sure to select “5.1 Channel” in the Setup Navigator [Analog Jacks] screen, in the Setup screen Audio 2 menu [Audio Out] setting, or by pressing
5.1CH MODE on the front panel (pages 24 and 31).
Front | Front | Center | Rear | Rear | Sub woofer | |
Speaker (L) | Speaker (R) | Speaker | Speaker (L) | Speaker (R) | ||
|
17
