WEEKLY TIMER OPERATION
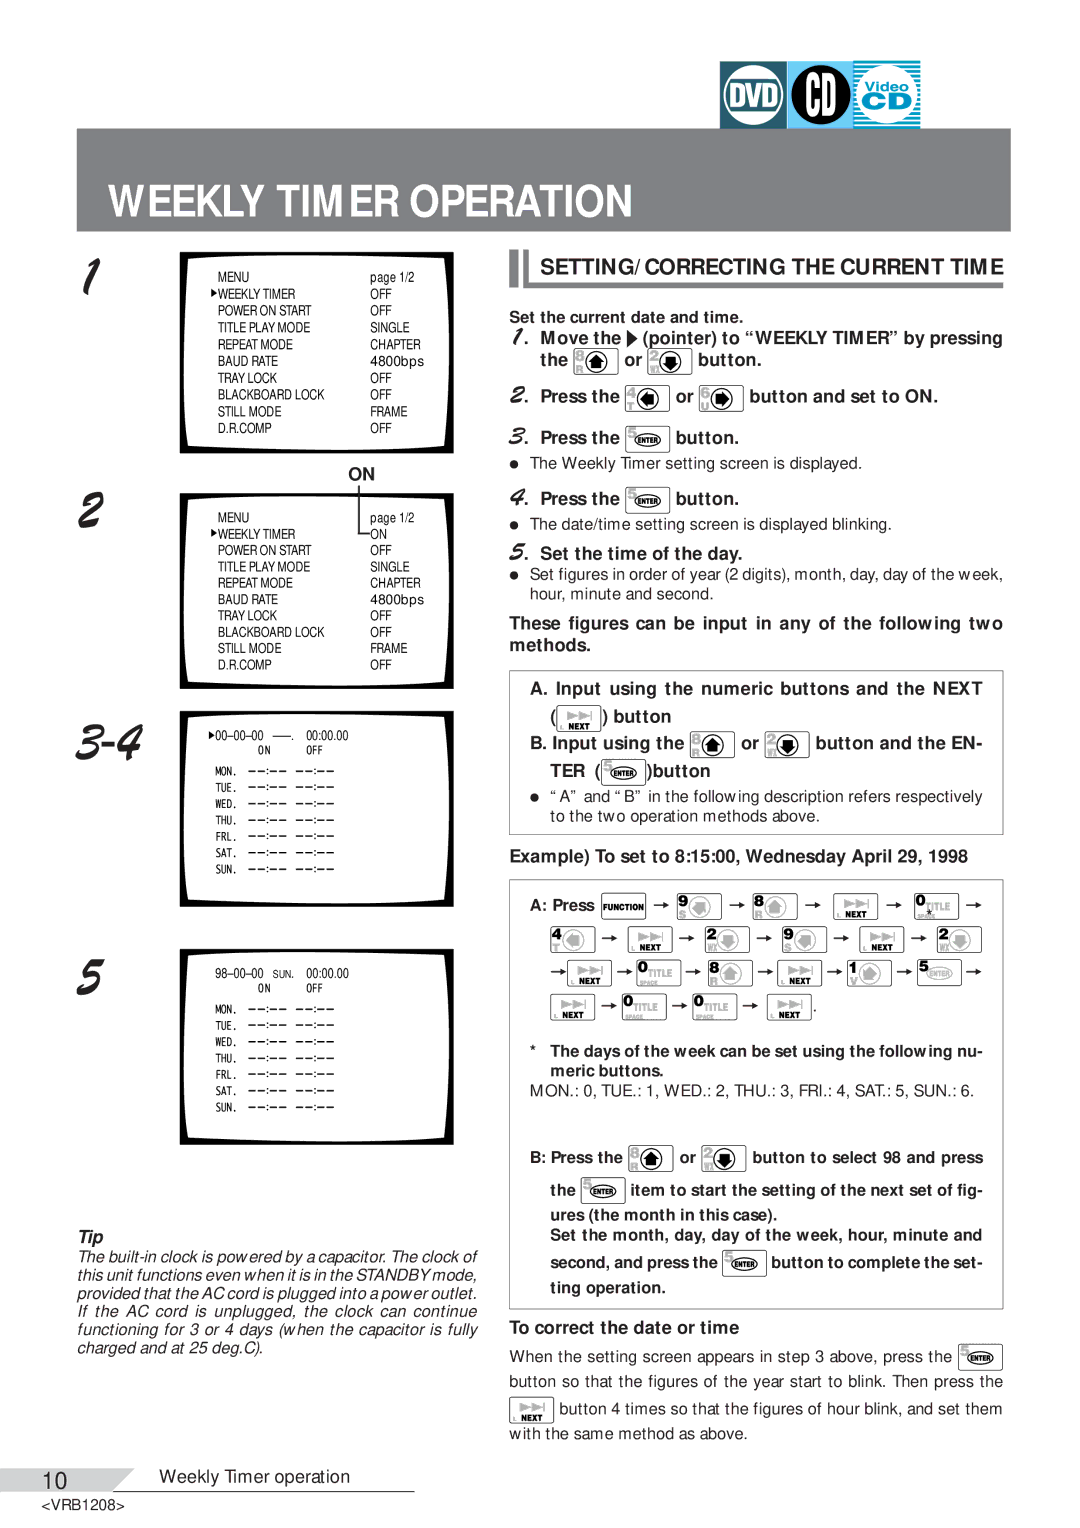
1 | MENU |
| page 1/2 | |
WEEKLY TIMER |
| OFF | ||
| POWER ON START |
| OFF | |
| TITLE PLAY MODE |
| SINGLE | |
| REPEAT MODE |
| CHAPTER | |
| BAUD RATE |
| 4800bps | |
| TRAY LOCK |
| OFF | |
| BLACKBOARD LOCK |
| OFF | |
| STILL MODE |
| FRAME | |
| D.R.COMP |
| OFF | |
|
|
|
| |
2 |
| ON | ||
|
|
| ||
MENU |
| page 1/2 | ||
WEEKLY TIMER |
| ON | ||
| POWER ON START |
| OFF | |
| TITLE PLAY MODE |
| SINGLE | |
| REPEAT MODE |
| CHAPTER | |
| BAUD RATE |
| 4800bps | |
| TRAY LOCK |
| OFF | |
| BLACKBOARD LOCK |
| OFF | |
| STILL MODE |
| FRAME | |
| D.R.COMP |
| OFF | |
|
|
| ||
|
|
| ||
| ||||
|
|
|
| |
5 | |
|
Tip
The

 SETTING/CORRECTING THE CURRENT TIME
Set the current date and time.
1. Move the ä (pointer) to “WEEKLY TIMER” by pressing
the ![]() or
or ![]() button.
button.
2. Press the ![]() or
or ![]() button and set to ON.
button and set to ON.
3. Press the  button.
ÖThe Weekly Timer setting screen is displayed.
4. Press the  button.
ÖThe date/time setting screen is displayed blinking.
5. Set the time of the day.
ÖSet figures in order of year (2 digits), month, day, day of the week, hour, minute and second.
These figures can be input in any of the following two methods.
A. Input using the numeric buttons and the NEXT
(![]() ) button
) button
B. Input using the ![]()
![]() or
or ![]()
![]() button and the EN-
button and the EN-
TER (![]() )button
)button
Ö“A” and “B” in the following description refers respectively to the two operation methods above.
Example) To set to 8:15:00, Wednesday April 29, 1998
A:Press ![]() =
= ![]() =
= ![]() =
= ![]() =
= ![]() *
*![]()
![]() =
= ![]() =
= ![]() =
= ![]() =
= ![]() =
= ![]() =
= ![]() =
=![]() =
=![]() =
= ![]() =
=![]() =
=![]() =
=![]() =
= ![]() =
=![]() =
=![]() =
= ![]() .
.
* The days of the week can be set using the following nu- meric buttons.
MON.: 0, TUE.: 1, WED.: 2, THU.: 3, FRI.: 4, SAT.: 5, SUN.: 6.
B:Press the ![]() or
or ![]() button to select 98 and press
button to select 98 and press
the ![]() item to start the setting of the next set of fig- ures (the month in this case).
item to start the setting of the next set of fig- ures (the month in this case).
Set the month, day, day of the week, hour, minute and
second, and press the ![]() button to complete the set- ting operation.
button to complete the set- ting operation.
To correct the date or time
When the setting screen appears in step 3 above, press the ![]() button so that the figures of the year start to blink. Then press the
button so that the figures of the year start to blink. Then press the ![]() button 4 times so that the figures of hour blink, and set them with the same method as above.
button 4 times so that the figures of hour blink, and set them with the same method as above.
10Weekly Timer operation
<VRB1208>
