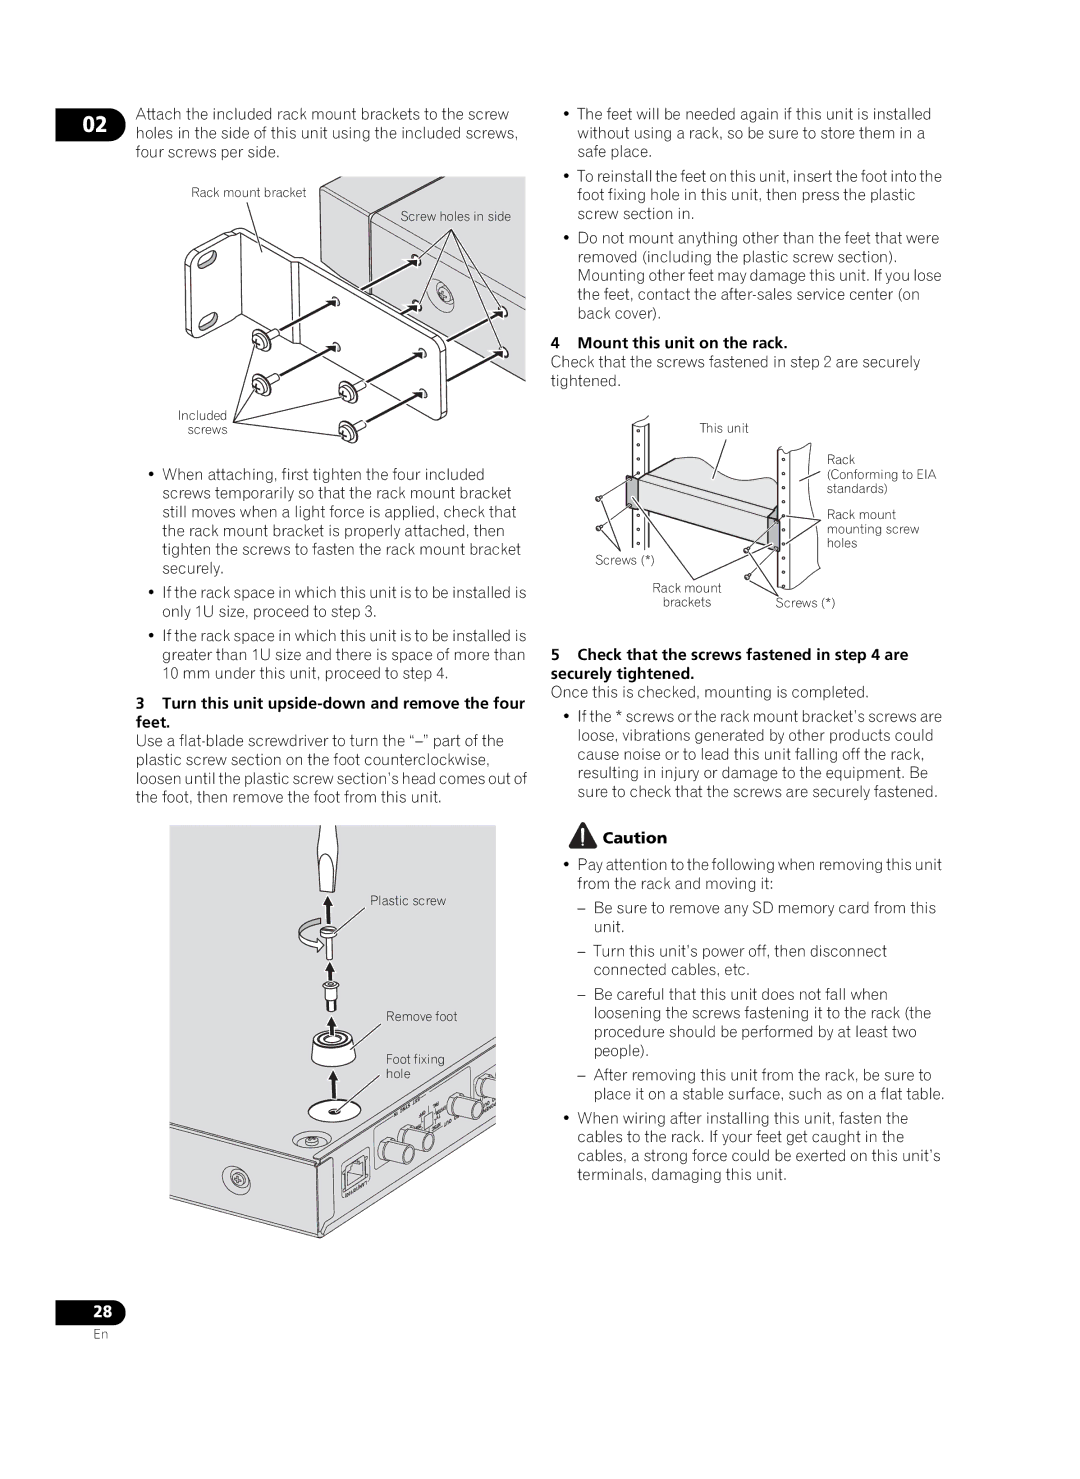
Attach the included rack mount brackets to the screw

02 holes in the side of this unit using the included screws, four screws per side.

Rack mount bracket

Screw holes in side

Included screws

When attaching, first tighten the four included screws temporarily so that the rack mount bracket still moves when a light force is applied, check that the rack mount bracket is properly attached, then tighten the screws to fasten the rack mount bracket securely.

If the rack space in which this unit is to be installed is only 1U size, proceed to step 3.

If the rack space in which this unit is to be installed is greater than 1U size and there is space of more than 10 mm under this unit, proceed to step 4.

3Turn this unit upside-down and remove the four feet.

Use a flat-blade screwdriver to turn the “–” part of the plastic screw section on the foot counterclockwise, loosen until the plastic screw section’s head comes out of the foot, then remove the foot from this unit.

Plastic screw

Remove foot

Foot fixing hole

The feet will be needed again if this unit is installed without using a rack, so be sure to store them in a safe place.

To reinstall the feet on this unit, insert the foot into the foot fixing hole in this unit, then press the plastic screw section in.

Do not mount anything other than the feet that were removed (including the plastic screw section). Mounting other feet may damage this unit. If you lose the feet, contact the after-sales service center (on back cover).

4 Mount this unit on the rack.

Check that the screws fastened in step 2 are securely tightened.

This unit

Rack

(Conforming to EIA standards)

Rack mount

mounting screw holes

Screws (*)

Rack mount


brackets

Screws (*)

5Check that the screws fastened in step 4 are securely tightened.

Once this is checked, mounting is completed.

If the * screws or the rack mount bracket’s screws are loose, vibrations generated by other products could cause noise or to lead this unit falling off the rack, resulting in injury or damage to the equipment. Be sure to check that the screws are securely fastened.

Caution

Pay attention to the following when removing this unit from the rack and moving it:

Be sure to remove any SD memory card from this unit.

Turn this unit’s power off, then disconnect connected cables, etc.

Be careful that this unit does not fall when loosening the screws fastening it to the rack (the procedure should be performed by at least two people).

After removing this unit from the rack, be sure to place it on a stable surface, such as on a flat table.

When wiring after installing this unit, fasten the cables to the rack. If your feet get caught in the cables, a strong force could be exerted on this unit’s terminals, damaging this unit.

28

En

Page 28
Image 28
Pioneer HD-V9000 manual Turn this unit upside-down and remove the four feet, Mount this unit on the rack

HD-V9000 specifications

The Pioneer HD-V9000 is a cutting-edge high-definition video player that has made significant waves in the home entertainment industry since its release. With a sleek design and a host of impressive features, it caters to audiophiles and home theater enthusiasts alike.

One of the standout features of the HD-V9000 is its ability to support a wide range of high-definition formats, including 1080p output, making it an excellent choice for displaying content with stunning clarity. The player is equipped with advanced video processing technology, which ensures that every pixel is displayed with precision. This capability provides a remarkable viewing experience that is rich in detail, texture, and color depth.

The HD-V9000 also excels in its audio performance. It supports various audio formats, including Dolby TrueHD and DTS-HD Master Audio, delivering a cinematic sound experience. The device features high-resolution audio support, which enhances sound quality and ensures that even the most intricate soundtracks are rendered flawlessly.

Connectivity is another strong suit of the Pioneer HD-V9000. The player includes multiple HDMI outputs, which allow for easy integration into any home theater system. It also provides options for digital coaxial and optical outputs, catering to various equipment setups. For those who enjoy streaming, the HD-V9000 is equipped with built-in Wi-Fi, enabling access to popular streaming services and content libraries, ensuring that users have a plethora of entertainment options at their fingertips.

The intuitive user interface of the HD-V9000 enhances the overall user experience. With navigation that is simple and straightforward, users can easily access their favorite media and settings. The player includes customizable settings, allowing users to tailor the audio and video output to their preferences.

Moreover, the build quality of the Pioneer HD-V9000 is exceptional. Its sturdy construction ensures longevity and reliability, which is characteristic of Pioneer products. As a result, users can expect a player that is not only visually appealing but also built to withstand the test of time.

In summary, the Pioneer HD-V9000 is an advanced high-definition video player that combines state-of-the-art technology with user-friendly features. With support for a wide array of audio and video formats, robust connectivity options, and exceptional build quality, it stands out as a top choice for anyone looking to elevate their home entertainment experience to new heights.