INSTALLATION
Notes: Authorized Imaging Software, such as VISIX, supplied by the dealer or other company, must be installed on the computer in order to operate the Polaris System.
A Microsoft® Driver Not Signed statement may appear. If it does, click Continue to proceed with installation.
USB Device Driver Installation - Before connecting the Polaris System to your computer or attempting to use it for the first time, run the Setup program on the Polaris System Drivers and Utilities Disk included with the Polaris System. The supplied CD provides the device drivers needed to communicate between the Polaris System and the associated
Install the Standard Device Drivers by selecting Standard (default option) from the Setup program menu. If full device functionality is not present after the Standard Device Drivers are installed, the Legacy Device Drivers may need to be installed. More information can be found in the Installation Instructions and Notes file on the Polaris System Drivers and Utilities Disk included with the system..
CAMERA PORTABILITY
Do not twist or turn the Handpiece Cable connector. The connector is keyed and mates straight on with Camera Handpiece connector.
CAUTION: Always handle the Polaris Handpiece carefully. Do not drop and make sure to protect the optical window from scratches.
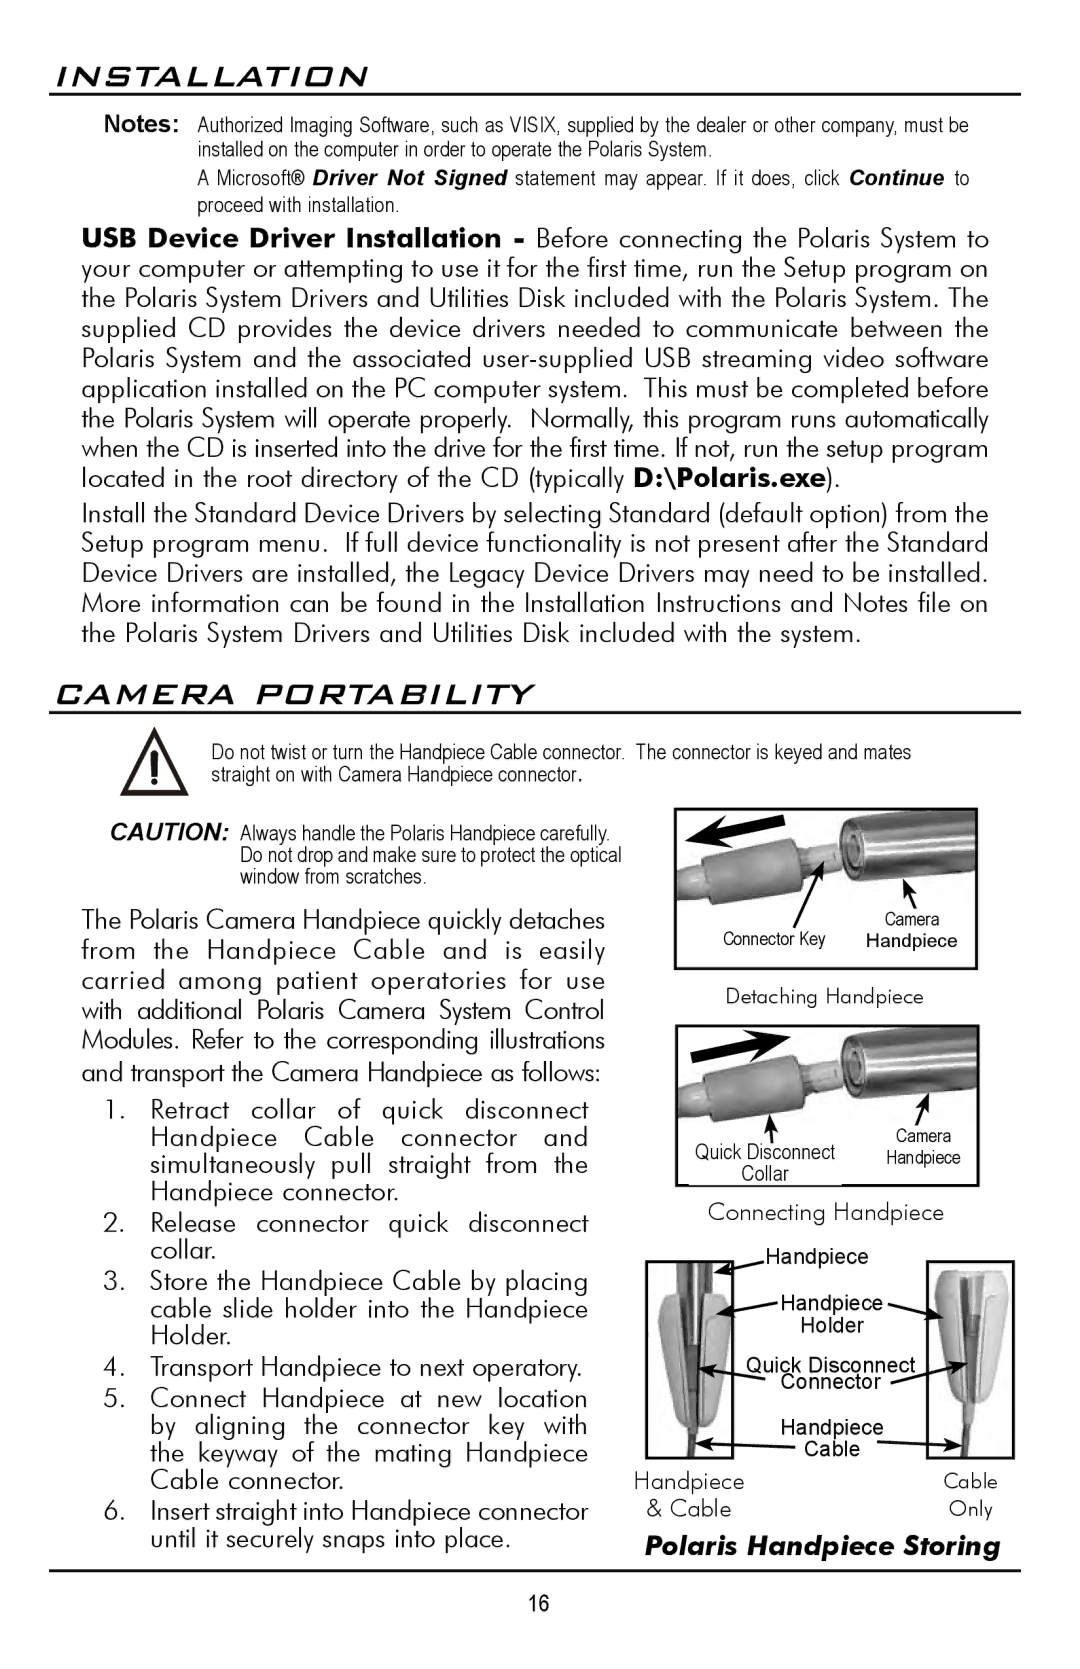
The Polaris Camera Handpiece quickly detaches |
|
|
|
|
|
|
|
|
|
|
|
|
|
|
| ||||
|
|
|
|
|
|
|
|
|
|
| Camera | ||||||||
from the Handpiece Cable and is easily |
|
|
|
| Connector Key |
|
| Handpiece |
|
| |||||||||
|
|
|
|
|
|
|
|
|
|
|
|
|
|
|
|
| |||
carried among patient operatories for use |
|
|
|
|
|
|
|
|
|
|
|
|
|
|
|
|
| ||
|
|
|
| Detaching Handpiece | |||||||||||||||
with additional Polaris Camera System Control |
|
|
|
| |||||||||||||||
|
|
|
|
|
|
|
|
|
|
|
|
|
|
|
|
| |||
Modules. Refer to the corresponding illustrations |
|
|
|
|
|
|
|
|
|
|
|
|
|
|
|
|
| ||
and transport the Camera Handpiece as follows: |
|
|
|
|
|
|
|
|
|
|
|
|
|
|
|
|
| ||
1.. Retract collar of quick disconnect |
|
|
|
|
|
|
|
|
|
|
|
|
|
|
|
|
| ||
Handpiece Cable | connector | and |
|
|
|
|
|
|
|
|
|
|
| Camera |
|
|
| ||
|
|
| Quick Disconnect |
|
|
|
| ||||||||||||
simultaneously pull | straight from | the |
|
|
|
|
|
| Handpiece |
|
|
| |||||||
|
|
|
|
| Collar |
|
|
|
|
|
| ||||||||
|
|
|
|
|
|
|
|
|
|
|
|
|
| ||||||
Handpiece connector.. |
|
|
|
|
|
|
|
|
|
|
|
|
|
|
| ||||
|
|
|
| Connecting Handpiece | |||||||||||||||
2.. Release connector quick disconnect |
|
|
| ||||||||||||||||
|
|
|
|
|
|
|
|
|
|
|
|
|
|
|
|
| |||
collar.. |
|
|
|
|
|
|
|
| Handpiece |
|
| ||||||||
3.. Store the Handpiece Cable by placing |
|
|
|
|
|
| Handpiece |
|
|
|
|
| |||||||
cable slide holder into the Handpiece |
|
|
|
|
|
|
|
| |||||||||||
Holder.. |
|
|
|
|
|
|
|
| Holder |
|
|
|
|
|
|
| |||
|
|
|
|
|
|
|
|
|
|
|
|
|
|
|
|
|
|
| |
4.. Transport Handpiece to next operatory.. |
|
|
|
|
| Quick Disconnect |
|
| |||||||||||
5.. Connect Handpiece at new location |
|
|
|
|
|
| Connector |
|
| ||||||||||
|
|
|
|
|
|
|
|
|
|
|
|
|
|
|
|
| |||
by aligning the connector key with |
|
|
|
|
|
| Handpiece |
|
| ||||||||||
the keyway of the mating Handpiece |
|
|
|
|
|
| Cable |
|
|
|
|
|
|
| |||||
|
|
|
|
|
|
|
|
|
|
|
| ||||||||
Cable connector. |
|
| Handpiece |
|
|
|
|
|
| Cable | |||||||||
6.. Insert straight into Handpiece connector |
| & Cable |
|
|
|
|
|
| Only | ||||||||||
until it securely snaps into place.. |
| Polaris Handpiece Storing | |||||||||||||||||
|
|
|
|
|
|
|
|
|
|
|
|
|
|
|
|
|
|
|
|
16
