Part No. M-1790825
Powermatic
Models WB-25, WB-37, WB-43
model WB-37 shown
Warranty Limitations
1.0 Warranty and Service
Warranty Period
What is Covered
Section
2.0 Table of Contents
16.8.1 Pressure Bar Assembly - Models WB-25, WB-37, WB-43
3.0 Safety warnings
3.0 Safety warnings
SAVE THESE INSTRUCTIONS
Dust Ports
5.0 Specifications
4.0 Introduction
Table Height from Floor in
6.0 Unpacking
6.1 Contents of Shipping Container
7.2 Dust Collection
7.0 Assembly
7.1 Air Supply Connection
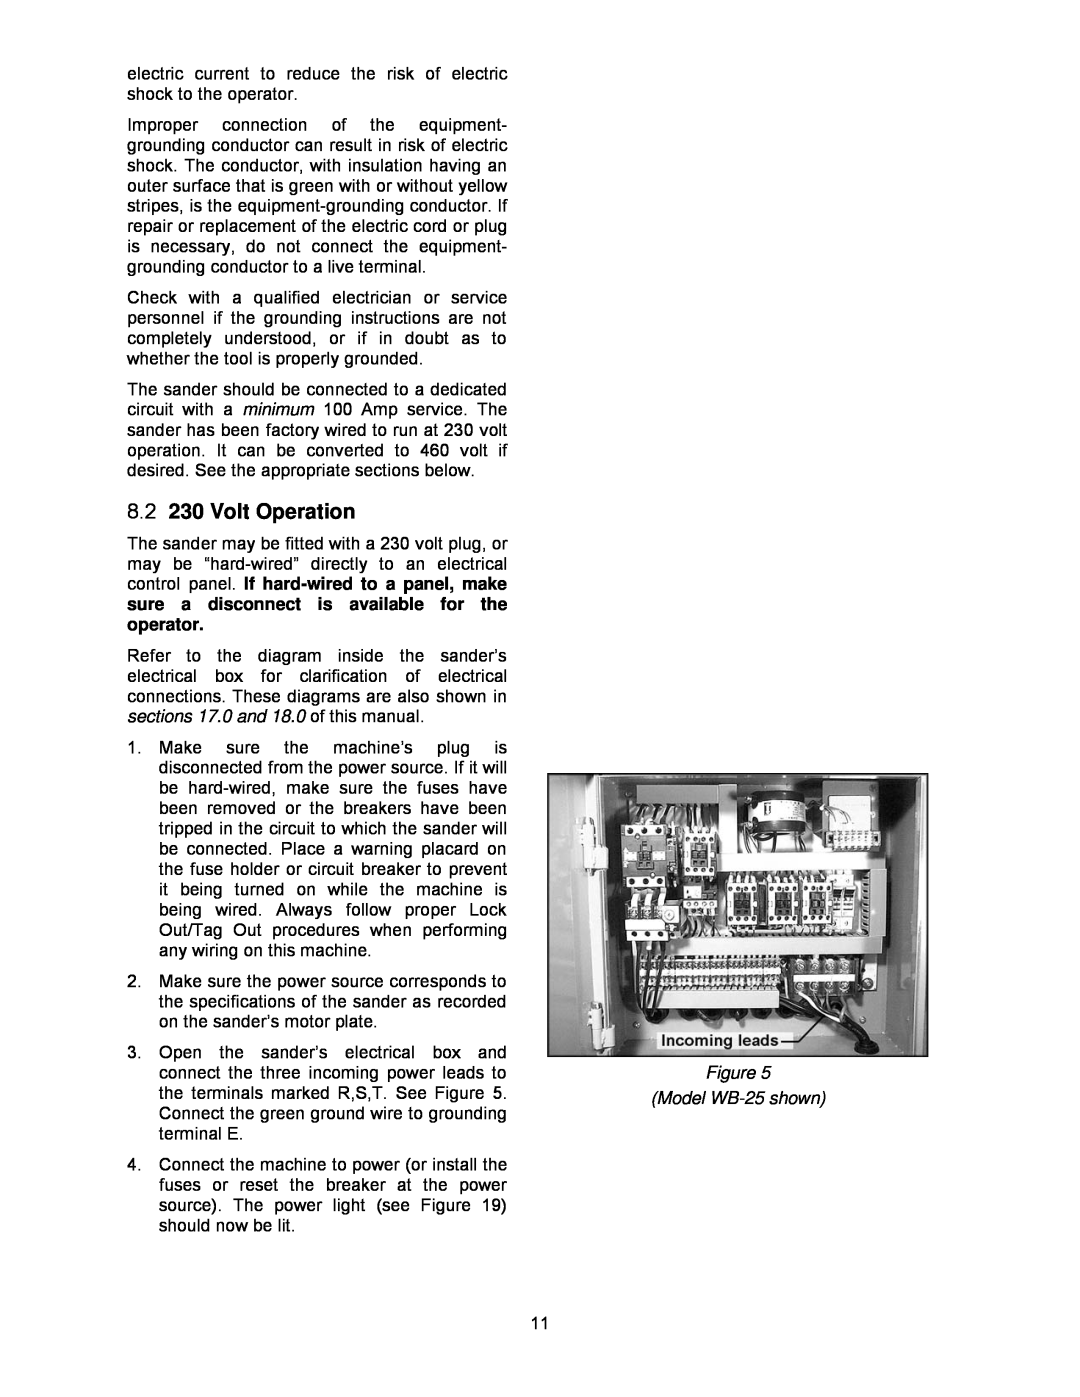
8.1 Grounding Instructions
7.3 Installing/Replacing Sanding Belt
8.0 Electrical
Model WB-25 shown
8.2 230 Volt Operation
9.1 Sanding Belt Tracking and Oscillation
9.0 Adjustments
8.3 460 Volt Conversion
8.4 Extension cords
9.3 Oscillation Speed
9.2 Oscillation Air Flow
9.5 Replacing Graphite and Felt Pad
9.6 V-Belt Tension and Replacement
9.4 Platen Position
Keep hands away from the moving conveyor belt
9.7 Conveyor Belt Tension
9.8 Conveyor Belt Tracking
9.9 Feed Rate
9.10 Pressure Bar Adjustment
9.11 Table Parallelism
10.2 LED Controller and Keypad
10.0 Operating Controls
10.1 Amperage Meter
10.2.1 Calibration
11.0 Operation
11.1 Braking System
10.2.2 Using the LED for Operations
13.0 Dust Port Layout
12.0 Maintenance
Remedy
14.0 Troubleshooting the Sander
Trouble
Probable Cause
Remedy
Trouble
Probable Cause
Probable Cause
15.0 Troubleshooting the LED Unit
16.0 Replacement Parts
Trouble
Parts list on page
16.1.1 Base and Motor Assembly - Model WB-25 ONLY
Size
16.1.2 Parts List Base and Motor Assembly - Model WB-25
Index No. Part No
Description
Parts list on page
16.2.1 Base and Motor Assembly - Model WB-37 ONLY
Size
16.2.2 Parts List Base and Motor Assembly - Model WB-37
Index No. Part No
Description
Parts list on page
16.3.1 Base and Motor Assembly - Model WB-43 ONLY
Size
16.3.2 Parts List Base and Motor Assembly - Model WB-43
Index No. Part No
Description
Parts list on page
16.4.1 Upper Cabinet Assembly - Model WB-25 ONLY
Size
16.4.2 Parts List Upper Cabinet Assembly - Model WB-25
Index No. Part No
Description
Parts list on page
16.5.1 Upper Cabinet Assembly - Models WB-37, WB-43
Description
16.5.2 Parts List Upper Cabinet Assembly - Model WB-37
16.5.3 Parts List Upper Cabinet Assembly - Model WB-43
Index No. Part No
Parts list on page 35 WB-25, page 36 WB-37 and page 37 WB-43
16.6.1 Table Raising Assembly - Models WB-25, WB-37, WB-43
Size
16.6.2 Parts List Table Raising Assembly - Model WB-25
Index No. Part No
Description
Size
16.6.3 Parts List Table Raising Assembly - Model WB-37
Index No. Part No
Description
Size
16.6.4 Parts List Table Raising Assembly - Model WB-43
Index No. Part No
Description
6294333
Parts list on page 40 WB-25, page 41 WB-37 and page 42 WB-43
16.7.1 Table and Conveyor Belt Assembly - Models WB-25, WB-37, WB-43
Size
16.7.2 Parts List Table and Conveyor Belt Assembly - Model WB-25
Index No. Part No
Description
Size
16.7.3 Parts List Table and Conveyor Belt Assembly - Model WB-37
Index No. Part No
Description
Size
16.7.4 Parts List Table and Conveyor Belt Assembly - Model WB-43
Index No. Part No
Description
Description
16.8.1 Pressure Bar Assembly - Models WB-25, WB-37, WB-43
16.8.2 Parts List Pressure Bar Assembly - Model WB-25
Index No. Part No
Description
16.8.3 Parts List Pressure Bar Assembly - Model WB-37
16.8.4 Parts List Pressure Bar Assembly - Model WB-43
Index No. Part No
Description
16.9.1 Platen Assembly - Model WB-25 only
16.9.2 Parts List Platen Assembly - Model WB-25
Index No. Part No
Size
Index No. Part No
Description
Description
16.10.1 Platen Assembly - Models WB-37, WB-43
16.10.2 Parts List Platen Assembly - Model WB-37
Index No. Part No
Size
16.10.3 Parts List Platen Assembly - Model WB-43
Index No. Part No
Description
TS-0060061
Description
16.11.1 Air Regulator Assembly - Models WB-25, WB-37, WB-43
16.11.2 Parts List Air Regulator Assembly - Model WB-25
Index No. Part No
Size
16.11.3 Parts List Air Regulator Assembly - Model WB-37
Index No. Part No
Description
Size
16.11.4 Parts List Air Regulator Assembly - Model WB-43
Index No. Part No
Description
Parts list on page
16.12.1 Sanding Belt and Accessories - Models WB-25, WB-37, WB-43
Index No. Part No
16.12.2 Parts List Sanding Belt and Accessories - Model WB-25
16.12.3 Parts List Sanding Belt and Accessories - Model WB-37
16.12.4 Parts List Sanding Belt and Accessories - Model WB-43
Parts list on page 56 WB-25 and page 57 WB-37
16.13.1 Tension Roller Assembly - Models WB-25 and WB-37 ONLY
Size
16.13.2 Parts List Tension Roller Assembly - Model WB-25
Index No. Part No
Description
Size
16.13.3 Parts List Tension Roller Assembly - Model WB-37
Index No. Part No
Description
WB25-149
Index No. Part No
Description
Size
Parts list on page
16.14.1 Tension Roller Assembly - Model WB-43 ONLY
Size
16.14.2 Parts List Tension Roller Assembly - Model WB-43
Index No. Part No
Description
WB43-163
Index No. Part No
Description
Size
Parts list on page 63 WB-25 and 64 WB-37
16.15.1 Electrical Box Assembly - Models WB-25 and WB-37
Size
16.15.2 Parts List Electrical Box Assembly - Model WB-25
Index No. Part No
Description
Size
16.15.3 Parts List Electrical Box Assembly - Model WB-37
Index No. Part No
Description
Parts list on page
16.16.1 Electrical Box Assembly - Model WB-43 ONLY
Size
16.16.2 Parts List Electrical Box Assembly - Model WB-43
Index No. Part No
Description
17.1 Models WB-25 and WB-37 ONLY
17.0 Electrical Connections
17.2 Model WB-43 ONLY