Manuals
/
Brands
/
Musical Instruments & Equipment
/
Electronic Keyboard
/
Radio Shack
/
Musical Instruments & Equipment
/
Electronic Keyboard
Radio Shack
LK-1261
Fingered Chord Charts
1
40
46
46
Download
46 pages, 3.75 Mb
Fingered Chord Charts
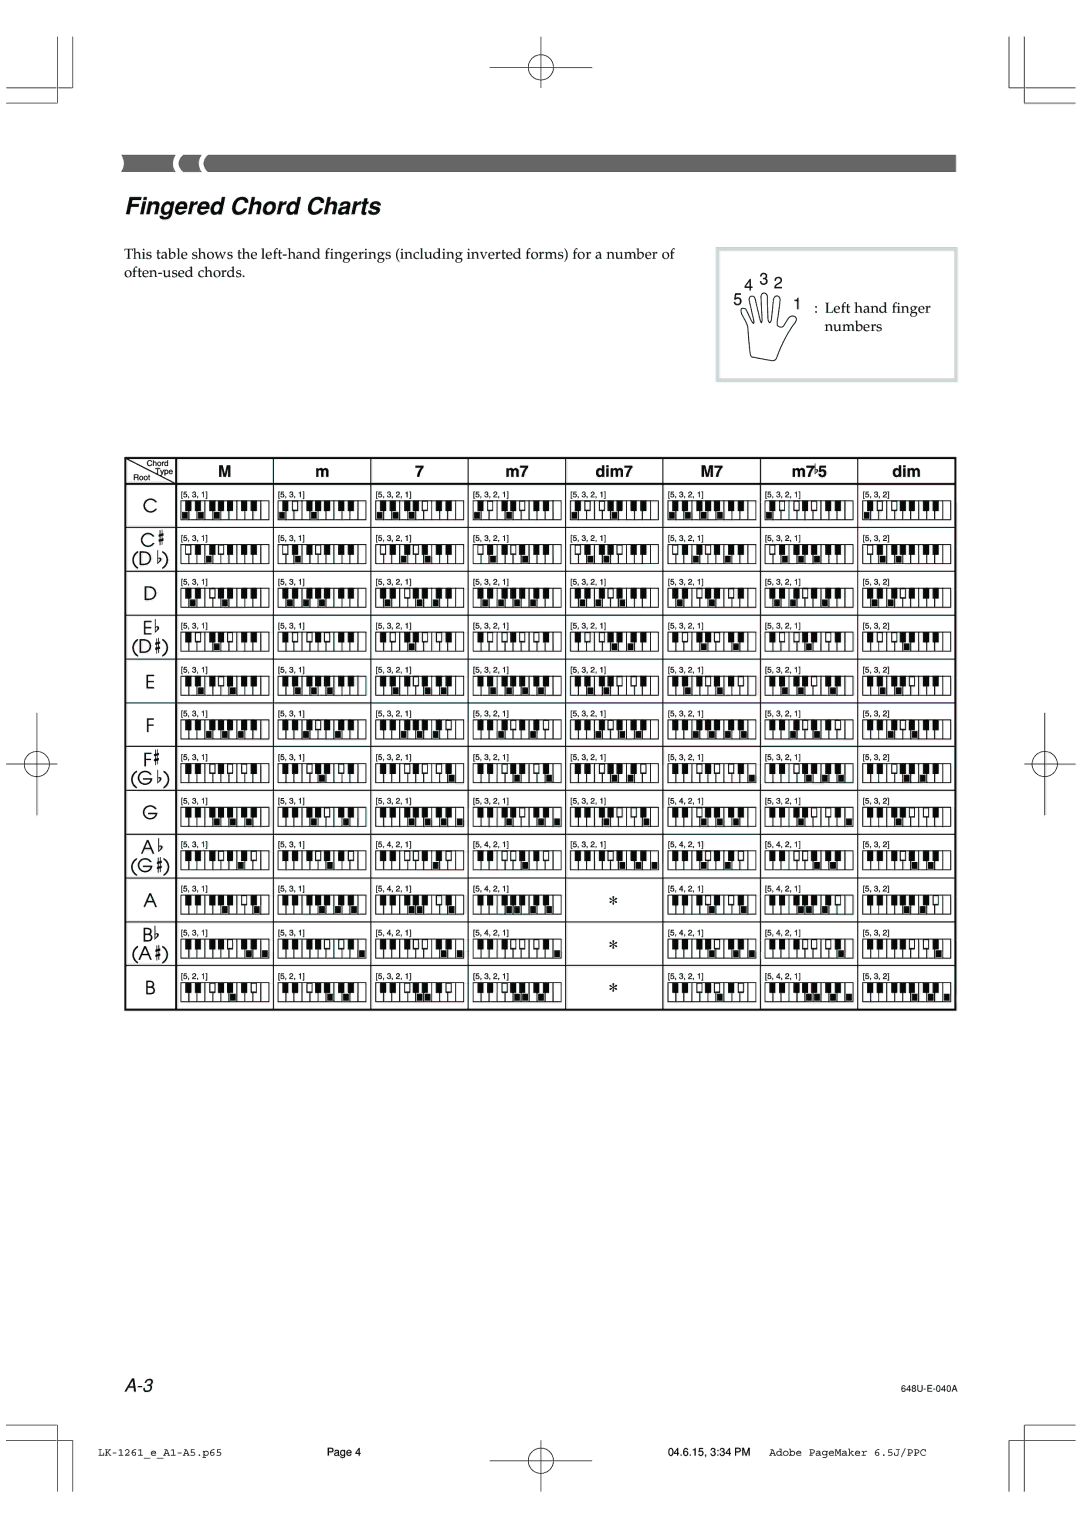
This table shows the left-hand fingerings (including inverted forms) for a number of
often-used chords.
648U-E-040A
A-3
1
2
3
4
5
: Left hand finger
numbers
LK-1261_e_A1-A5.p65
04.6.15, 3:34 PM
Page 4
Adobe PageMaker 6.5J/PPC
Contents
Main
42-4068
Please read before using this equipment.
Owners Manual
LK-1261 Light-Up MIDI Keyboard
Limited One-Year Warranty
RadioShack Corporation Fort Worth, Texas 76102
Mode 1 : OMNI ON, POLY Mode 2 : OMNI ON, MONO
O
LK-1261 MIDI Implementation Chart
Model
Mode 3 : OMNI OFF, POLY Mode 4 : OMNI OFF, MONO
: Yes
X
Safety Precautions
Symbols
DANGER
WARNING
CAUTION
DANGER
WARNING
Page
CAUTION
Page
Main Features
Contents
General Guide
E-9
Accessories and Options
About the Display
Twinkle
E-11
Quick Reference
Tw i n k l e
1 2 3
54 5
kTw i n l e
Power Supply
Using batteries
To load batteries
Remove the battery compartment cover.
Load 6 AA-size batteries into the battery compartment.
Auto Power Off
Power On Alert
To disable Auto Power Off and power on alert
E-14
Connections
Phones/Output Jack
Using the Microphone Jack
Set the MIC VOLUME knob setting so it is on the MIN side.
Turn on the microphones ON/OFF switch.
GrandPno
To switch power on and off
To change tones
Howling (Feedback Noise)
Static Noise
Digital Sampling
Keyboard split tones
E-17
Polyphony
Other Useful Functions
Trans Trans
)
(
To tune the keyboard
Tune
Tune
Playing the demo tunes
To start demo tune play
Switch power on and adjust the volume level.
Press the DEMO button.
Samba
7.
Press the START/STOP button to start play of the rhythm.
Use the TEMPO buttons to adjust the tempo of the rhythm.
To stop rhythm play, press the START/STOP button again.
To play a CONCERT CHORD auto- accompaniment
Using standard fingerings
E-21
To play a FINGERED auto-accompaniment
Improvising with the preset patterns
Using fill-in rhythm
Using Synchro start
E-22
3-Step Lesson System
Twinkle
Press the START/STOP button to start play of the selected tune.
E-23
To stop the tune play, press the START/STOP button again.
To exit the Song Mode, press the SONGS button again.
kTw i n l e
Crossed Finger Indications
Key Lighting During Song Play
Auto-accompaniment Tune
Two-hand Tune
Voice Fingering Guide
To turn voice fingering guide on and off
E-25
Timing Indicator
Using the Timing Indicator
Turning Off Key Lighting
Press the KEY LIGHT button.
Number of Simultaneously Lit Keys
Step 1: Master the timing
Press the STEP 1 button.
Press the ONE KEY PLAY buttons to play each note of the tune.
Try pressing any one of the keyboard keys in place of the ONE KEY PLAY buttons.
E-27
Step 3: Play at normal speed
Press the STEP 3 button.
Play along on the keyboard, following the keys as they light.
Step 2: Master the melody
Press the STEP 2 button.
To practice the left hand part
E-29
MIDI
What is MIDI?
MIDI Connections
MIDI Channels
General MIDI
E-30
NOTE ON/OFF
PROGRAM CHANGE
PITCH BEND
LOCAL CONTROL (Default: on) /GM mapping (Default: off)
Local
To turn on LOCAL CONTROL/To turn off GM mapping
Local
E-32
Technical Reference
Troubleshooting
E-33
E-34
Specifications
E-35
Care of Your Keyboard
Appendix
GM Tone Map List
A-1
Rhythm List
A-2
Fingered Chord Charts
A-3
*
A-4
Page
Page
Page
Page
LK-1261 MIDI Implementation Chart
Model
Version: 1.0