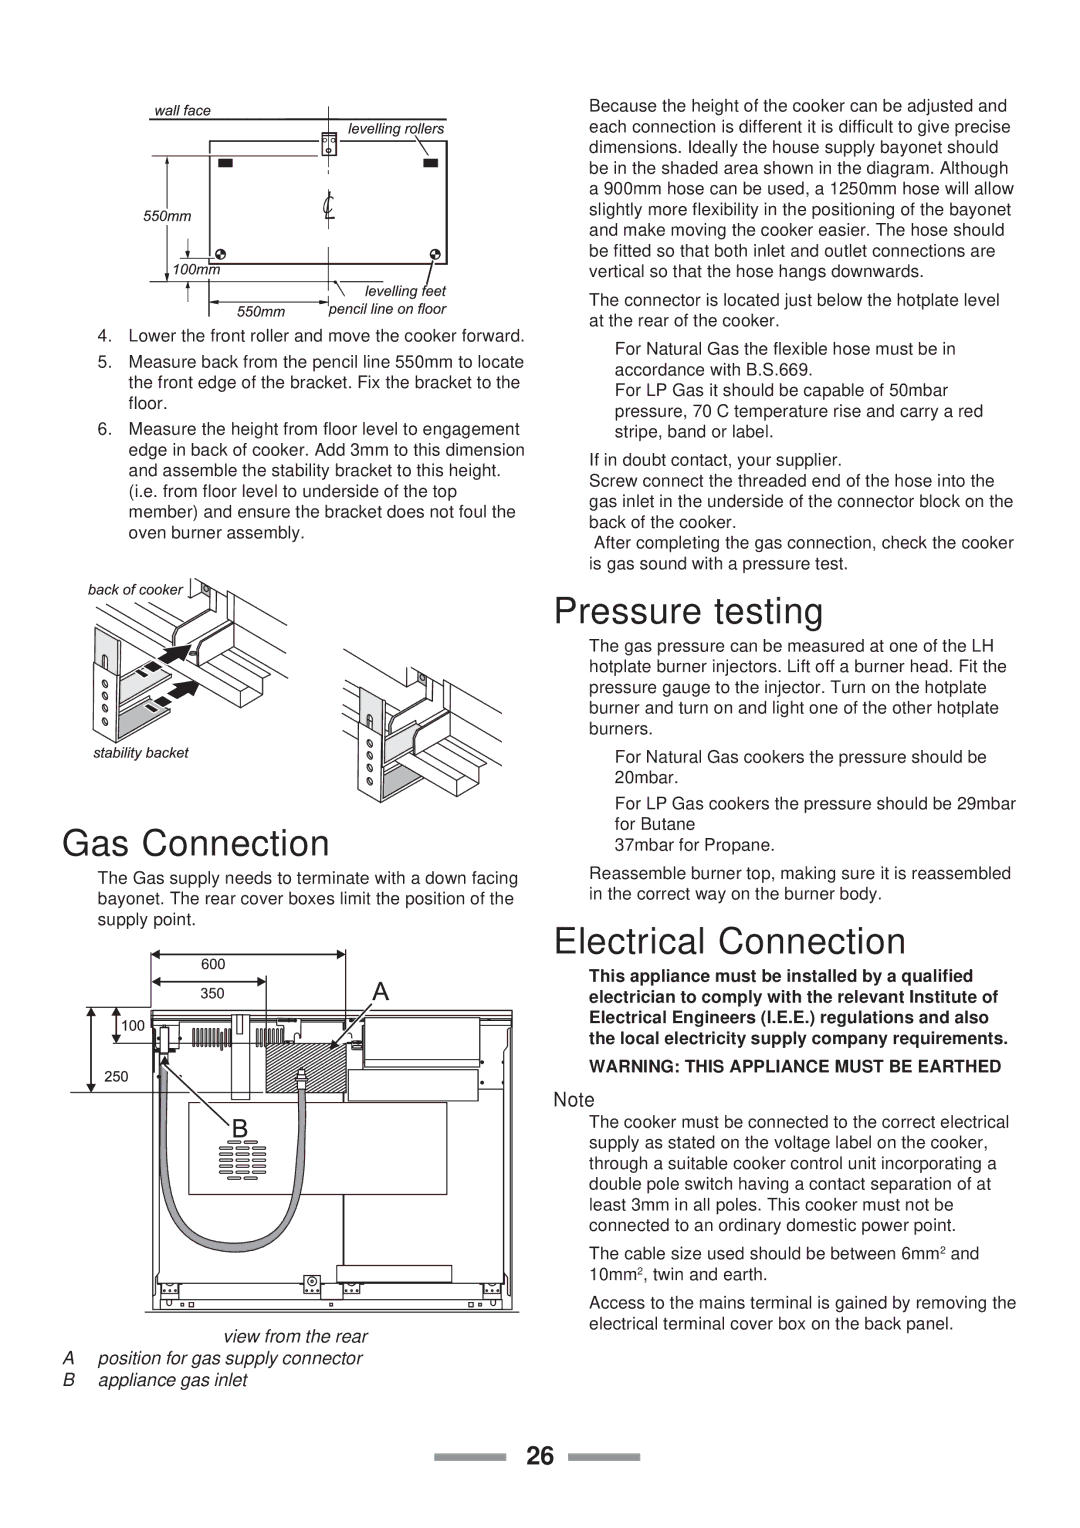
4.Lower the front roller and move the cooker forward.

5.Measure back from the pencil line 550mm to locate the front edge of the bracket. Fix the bracket to the floor.

6.Measure the height from floor level to engagement edge in back of cooker. Add 3mm to this dimension and assemble the stability bracket to this height.

(i.e. from floor level to underside of the top member) and ensure the bracket does not foul the oven burner assembly.

Because the height of the cooker can be adjusted and each connection is different it is difficult to give precise dimensions. Ideally the house supply bayonet should be in the shaded area shown in the diagram. Although a 900mm hose can be used, a 1250mm hose will allow slightly more flexibility in the positioning of the bayonet and make moving the cooker easier. The hose should be fitted so that both inlet and outlet connections are vertical so that the hose hangs downwards.

The connector is located just below the hotplate level at the rear of the cooker.

For Natural Gas the flexible hose must be in accordance with B.S.669.

For LP Gas it should be capable of 50mbar pressure, 70 C temperature rise and carry a red stripe, band or label.

If in doubt contact, your supplier.

Screw connect the threaded end of the hose into the gas inlet in the underside of the connector block on the back of the cooker.

After completing the gas connection, check the cooker is gas sound with a pressure test.

Gas Connection

The Gas supply needs to terminate with a down facing bayonet. The rear cover boxes limit the position of the supply point.

view from the rear

Aposition for gas supply connector

Bappliance gas inlet

Pressure testing

The gas pressure can be measured at one of the LH hotplate burner injectors. Lift off a burner head. Fit the pressure gauge to the injector. Turn on the hotplate burner and turn on and light one of the other hotplate burners.

For Natural Gas cookers the pressure should be 20mbar.

For LP Gas cookers the pressure should be 29mbar for Butane

37mbar for Propane.

Reassemble burner top, making sure it is reassembled in the correct way on the burner body.

Electrical Connection

This appliance must be installed by a qualified electrician to comply with the relevant Institute of Electrical Engineers (I.E.E.) regulations and also the local electricity supply company requirements.

WARNING: THIS APPLIANCE MUST BE EARTHED

Note

The cooker must be connected to the correct electrical supply as stated on the voltage label on the cooker, through a suitable cooker control unit incorporating a double pole switch having a contact separation of at least 3mm in all poles. This cooker must not be connected to an ordinary domestic power point.

The cable size used should be between 6mm2 and 10mm2, twin and earth.

Access to the mains terminal is gained by removing the electrical terminal cover box on the back panel.

26

Page 26
Image 26
Rangemaster 110 installation instructions Gas Connection, Pressure testing, Electrical Connection

110 specifications

The Rangemaster 110 is a remarkable piece of culinary equipment that stands out for its blend of classic design, modern technology, and exceptional performance. Designed for the serious home cook and culinary enthusiast, this range cooker offers a host of features that cater to both functionality and aesthetics.

One of the main characteristics of the Rangemaster 110 is its impressive size. Measuring 110cm wide, it provides ample cooking space, making it an ideal choice for larger kitchens and those who often cook for family and friends. The range features multiple ovens, allowing for versatile cooking modes. Typically, you will find a conventional oven, a fan oven for even heat distribution, and even a separate grill, providing users with the ultimate flexibility in meal preparation.

In terms of cooking technologies, the Rangemaster 110 is equipped with innovative features such as the multifunction oven. This technology enables various cooking methods, including baking, roasting, and grilling, ensuring that every dish comes out perfectly. The dual fuel option is another highlight, offering the efficiency of gas hobs combined with the consistent heat of electric ovens, giving home cooks the best of both worlds.

The design of the Rangemaster 110 is equally impressive. Available in a variety of colors, from traditional cream and black to more contemporary shades, it can seamlessly integrate into any kitchen decor. The elegant finish and classic styling give the cooker a timeless appeal, making it a centerpiece in any cooking space.

Additional features include heavy-duty cast-iron pan supports that provide excellent stability for cookware, and the ergonomic controls that allow for precise adjustments while cooking. A built-in timer and temperature gauge enhance convenience, ensuring that dishes are cooked to perfection every time.

Cleaning is made easier with self-cleaning functions in the ovens, reducing the time and effort needed to maintain the appliance. The Rangemaster 110's commitment to energy efficiency also stands out, as it typically boasts good energy ratings, making it an environmentally friendly choice.

In summary, the Rangemaster 110 is a sophisticated range cooker that combines traditional craftsmanship with modern innovations. Its combination of size, diverse cooking functions, and stylish aesthetics make it an excellent addition to any kitchen, catering to the needs of passionate cooks who demand both performance and elegance.