User Manual
Wired Internet Camera RXS-3323 Wireless Internet Camera RXS-4324
National Restrictions
FCC STATEMENT
FCC RF Radiation Exposure Statement
CE Mark Warning
Chapter 1. Product Overview
Table of Content
Chapter 2. Installation
Chapter 3. Connecting to the Camera
Appendix A Restore Factory Default Settings
Chapter 1. Product Overview
Package Contents
3. Quick Installation Guide
5. RJ 45 Cable 6. 12V/1A Power Adapter 7. Camera Mount Kit
z 2-Way Audio Capability
Product Features
System Requirements
z H2.64, MPEG4, and MJPEG Tri-Codec supported
z Supports Multiple Profiles
z Remote Control Supported
Highlights
z Optimal Viewing
easily
IR LEDs
Introduction of Hardware
Front View
Power and Wireless
Factory Default Reset
Rear View
Power Jack
Antenna Connector
Ceiling Mount
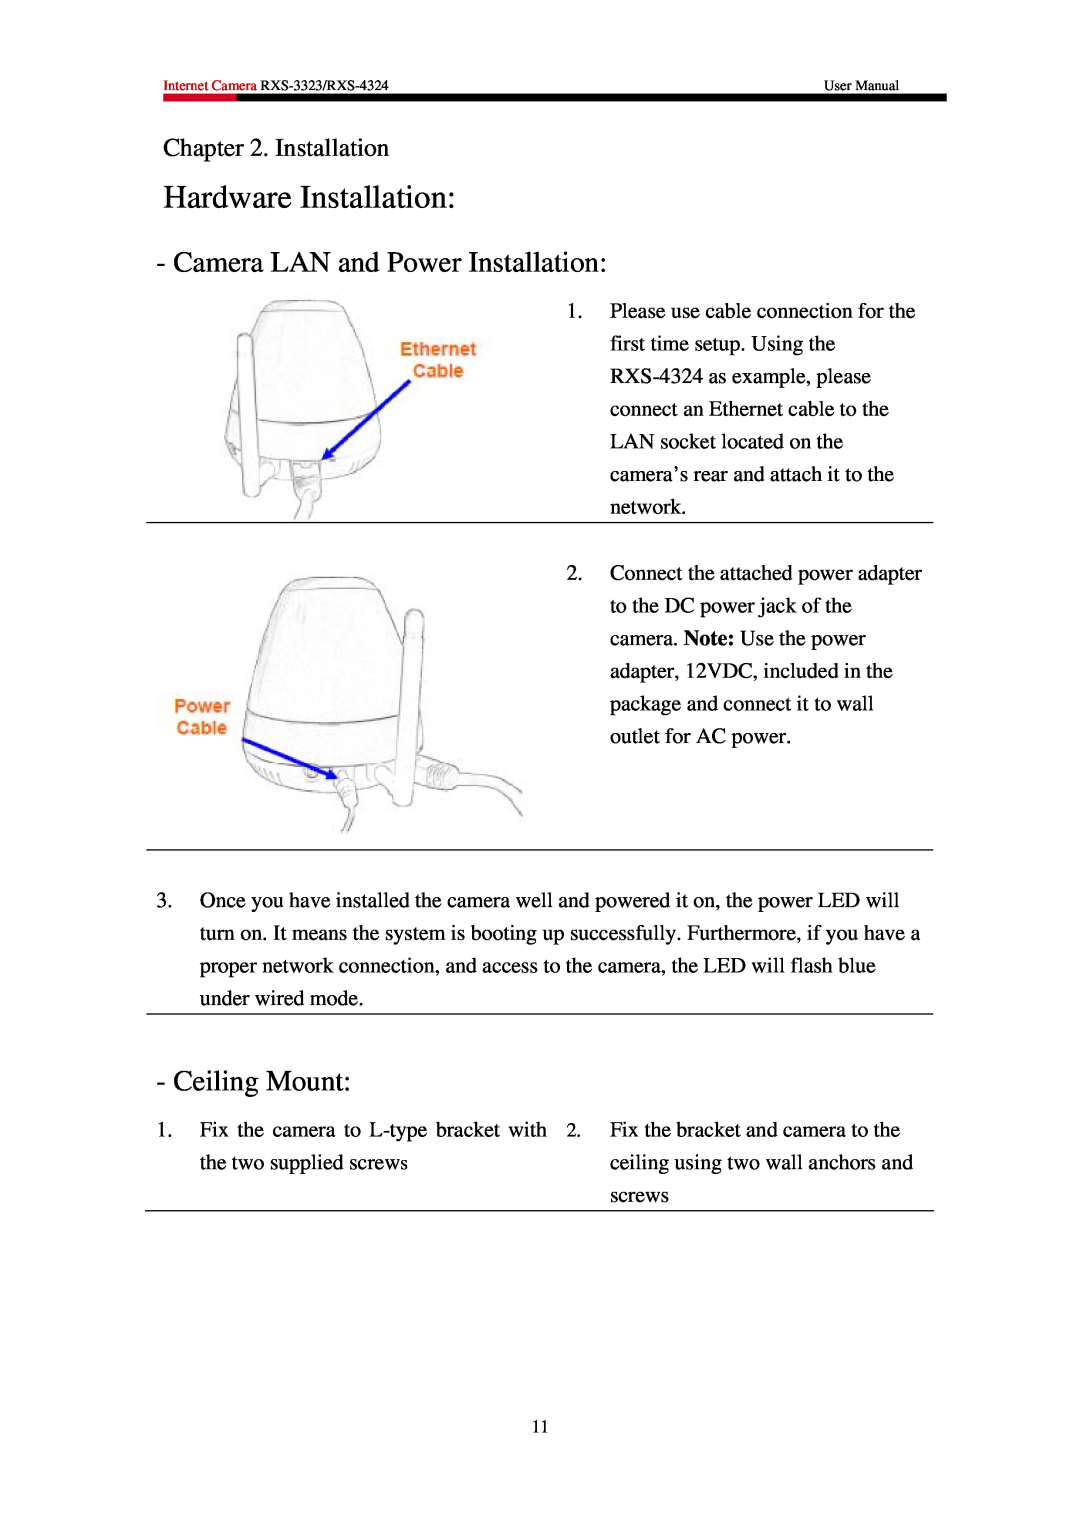
Hardware Installation
Camera LAN and Power Installation
Chapter 2. Installation
Wall Mount
Software Installation
IPWizard II Installation
4.Click on “Run” to continue
3.Please click on “IPWizard” under “Software & Tools” to continue
6.Click on “Next” to continue
7.Click on “Finish” to finish the installation
Double Click on the above information bar will open up the Camera
Using IPWizard
Chapter 3. Connecting to the Camera
management page in your default Web Browser
video from the
9. Wireless
14. WiFi
One click to view the
Wireless
Page
You should see the confirmation Status Window popup as below. Please select “OK” to confirm these settings
User Manual
Opening up UPnP in Win XP
Access the device using IE for the first time
Three ways to access the Camera for the first time
Managing the Camera
z Open Control Panel z Click on Network and Internet
Opening up Network Discovery in Win7
z Click on View Network Computers and devices
Entering into Camera’s Management page via IE
z Upon selecting the “Install This Add-on for All User on This Computer”, you will see an Security Warning Window asking your permission to install the Rosewill Media Control. Please click “Install” to continute
Language
Management Page
Settings
Streaming
11. Statistics
10. Volume
Snapshot
Record
Network
Setting
Network
Chapter 4. Managing the Device
8. Secondary DNS 9. HTTP Port
1. MAC address 2. Obtain IP address automatically DHCP 3. IP address
4. Subnet mask 5. Gateway 6. Obtain DNS from DHCP 7. Primary DNS
4. Interface Select 5. Type
Wireless
1. Setting Easy Installation 2. Site survey 3. MAC address
9. Security mode
6. SSID
7. BSSID
8. Channel
1. DDNS 2. Server name 3. DDNSHost 4. User name 5. Password
DDNS
4. IP address, Subnet mask, and Gateway read only 5. Status
PPPoE
Streaming
1. PPPoE 2. User name 3. Password
1. RTSP Port 2. RTP Port
UPnP
5. External IP address
Bonjour
IP Filter
1. UPnP 2. Friendly Name 3. UPnP NAT Traversal 4. Port Range
1. SMTP Notification e-mail 2. Send To 3. Subject
IP Notification
11. HTTP Login Password 12. Proxy Address 13. Proxy Port
Camera
Picture
8. HTTP Notification 9. URL 10. HTTP Login Name
LED OFF Threshold 0~10000
2. White Balance 3. Exposure Control 4. Color Level 5. Brightness
6. Sharpness 7. Contrast 8. Night Mode 9. White-Light LED
LED ON Threshold 0~10000
10. De-Noise
Preset Setting
Tour Setting
1. DIPS Dynamic IP Service 2. Device ID for DIPS
System
System
1. Tour Name 2. Running 3. Preset 4. Wait Time
3. Device Title 4. Software Version 5. Network LED
Date & Time
6. Power LED Wireless LED 7. Log 8. Reload
3. Adjust
4. Restore Setting
Maintenance
1. Hard Factory Default Include the network setting
2. Factory Default Except the network setting 3. Backup Setting
6. System Restart
5. Firmware Upgrade procedure
1. Text Overlay Setting 2. Video Profile
Video
Common
Video Profile
4. GOP Control
ROI 1 The area size of ROI 1 is H.264 / QVGA, 320 x
ROI 0 The area size of ROI 0 is H.264 / VGA, 640 x
1. Audio 2. Audio Mode 3. Input Gain 4. Output Gain
Audio
User
1. SMTP Server 2. Test 3. SMTP Port 4. SMTP
E-Mail
3. Add, update, and remove of Users account
1. Add and Del 2. Included or Excluded Window 3. Name 4. Object Size
Object Detection
Authentication 5. Authentication User name 6. Authentication Password
7. E-mail To 8. E-mail From 9. E-mail Subject
1. Name 2. FTP Server 3. Test 4. FTP Login name 5. FTP Login Password
Event Server
FTP Server
TCP Server
1. Name
HTTP Server
1. Name 2. TCP Server 3. TCP Port
1. Name 2. SAMBA Server 3. Test 4. SAMBA Login name 5. SAMBA Login
SAMBA Server
2. URL 3. Test 4. HTTP Login name 5. HTTP Login Password
6. Proxy Address 7. Proxy Login name 8. Proxy Login Password
1. Name 2. Enable 3. Type 4. Enable Time 5. Trigger by 6. Action
Setting
Event Schedule
Password 6. SAMBA Path
1. Record File Type 2. Record File Prefix 3. JPEG Picture Numbers
Record
2. PTZ
Adding Preset point
Advance PTZ
2. Please right click on it and select “Temporarily Allow Scripted Windows”
Selecting Tour
Digital Zoom
Snapshot
Record
Volume
Restore the device
Appendix A Restore Factory Default Settings
Question
Appendix B Troubleshooting & FAQ
Features
Install the Device
UPnP Connection
Access the Device
Network Camera’s private IP address
Video Quality of the Device
Miscellaneous
Appendix C Ping IP Address
Average bit rate for
Appendix D Bandwidth Estimation
Image Resolution
Average range of data sizes
Appendix E Specifications
0 ~ 355 180/ second MAX
1 Assign a local/fixed IP address to your device
Appendix F Configure Port Forwarding Manually
2 Access the Router with Your Web browser
Your WAN IP will be listed here
3 Open/set Virtual Server Ports to enable remote image viewing
Port section, click Apply
2 Environment of Dynamic IP Network
Appendix G DDNS Configuration
Process of set up your own Domain Name
1 Environment of Fixed Valid IP Network
a. Username b. E-mail address and confirmation
c. Password and confirmation
3. After the columns show up at the left side, click “Create Account”
4. Fill the application agreement and necessary information
User Manual
9. Click the “ Dynamic DNS ”
8. Click the “Services”
10. Click the “Get Started”
iPhone
Appendix H 3GPP and iPhone