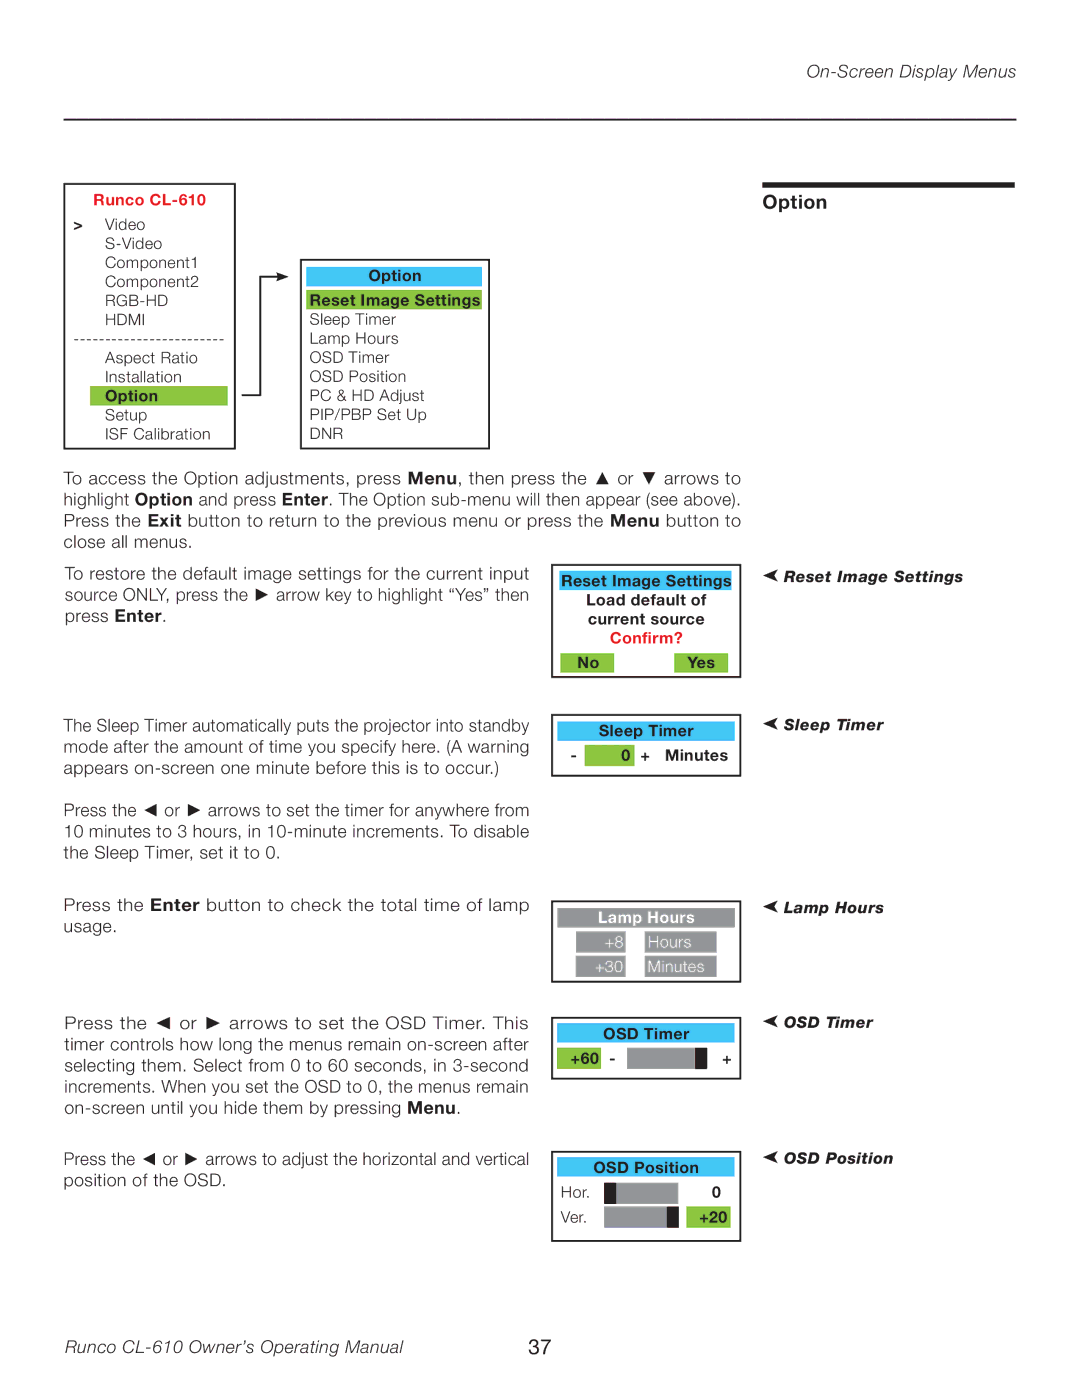
OW N E R ’S OP E R A T I N G MA N U A L
CL-610 and CL-610LT
DLP Projectors
Page
Limited Warranty
Table of Contents
Safety Precautions
Installation
Lamp Replacement
Table of Contents continued
Troubleshooting
RS-232 Setup
WHAT IS NOT COVERED UNDER THE TERMS OF THIS LIMITED WARRANTY
WHAT IS COVERED UNDER THE TERMS OF THIS LIMITED WARRANTY
TWO YEAR LIMITED WARRANTY
For Projectors, Video Processors and Controllers
IMPORTANT WARRANTY REGISTRATION
EFFECTIVE WARRANTY DATE
CONTACT A RUNCO AUTHORIZED SERVICE CENTER TO OBTAIN SERVICE
RIGHTS, LIMITS AND EXCLUSIONS
RUNCO VIDEO PRODUCT INFORMATION
RUNCO INTERNATIONAL, INC Attn Customer Service Department
RETAIN THIS INFORMATION FOR YOUR RECORDS
2900 Faber Street Union City, CA Ph 510 Fax 510
Runco CL-610 Owner’s Operating Manual
Safety Precautions
Features
Overview
Native 169 Aspect Ratio, SuperOnyx TM DMD 1280 x 720p
High Contrast and Picture Quality
Adjust the focus and zoom of image
Access
ceiling installation. See “Runco
Overview
2. AC Power IN Socket 3. AC Power Switch 4. Cable Access Door
1. Connector Panel
8. Front / Rear Adjusters Adjusts the height or projection angle
Overview
This page is intentionally left blank
Overview
Runco CL-610 Owner’s Operating Manual
4. POWER LED
Controls and Functions
Control Panel
1. FOCUS RING
1. S-Video mini DIN 4-pin Y/C S-video signal input
Connector Panel Runco Logo
3. Video RCA Jack Composite video signal input 4. Component RCA Jacks
Controls and Functions
Remote Control
Runco CL-610 Owner’s Operating Manual
Controls and Functions
Remote Control continued
Runco CL-610 Owner’s Operating Manual
Remote Control
Installation
Notes on Remote Control Operation
Notes on Batteries
Installation
Installation Considerations
Front Screen, Floor Mount Installation
Front Screen, Inverted Mount ceiling Installation
Rear screen installations
Installation
Screen size
Runco CL-610 Owner’s Operating Manual
Other considerations and tips that can help improve your installation
Installation
Runco CL-610 Owner’s Operating Manual
Ceiling Installation
Installation
Floor Installation
Adjusting the Projection Angle
Runco CL-610 Owner’s Operating Manual
Installation
Mounting Folded Optics
Connections
Connecting Video Inputs
Runco CL-610 Owner’s Operating Manual
DVD Player
Runco CL-610 Owner’s Operating Manual
Connections
Progressive Component DTV Y/PB/PR
RGBHV DTV RGB
Connections
Connecting a Computer GBRHV Connecting an HDMI Device
HDMI Source DVD player or HD tuner with HDMI or DVI out
Runco CL-610 Owner’s Operating Manual
Power switch
Connecting to AC Power
Connections
Runco CL-610 Owner’s Operating Manual
Adjusting the Zoom and Focus
Turning on the Power
Adjusting Projector Height or Projection Angle
Basic Operation
Selecting Video Memory
Adjusting the Picture
Selecting an Aspect Ratio
Basic Operation
Selecting the Input Source
Setting the Menu
PIP / PBP Function
Basic Operation
Basic Operation
Turning off the Power
Runco CL-610 Owner’s Operating Manual
On-Screen Display Menus
Using the Menu
Main Menu
Runco CL-610 Owner’s Operating Manual
Adjustment
Picture Quality Adjustments
On-Screen Display Menus
Runco CL-610 Owner’s Operating Manual
Color Temperature
NOTE You must enter a passcode in order to enter the Set Up menu
Color Temperature
ICC Selection Store Image Settings Restore Image Settings
On-Screen Display Menus
Aspect Ratio
ANAMORPHIC
LETTERBOX
Installation
Aspect Ratio continued
On-Screen Display Menus
CINEMA
Keystone Adjust
Keystone Adjust Background Color
On-Screen Display Menus
Runco CL-610 Owner’s Operating Manual
To restore the default image settings for the current input
Option
On-Screen Display Menus
source ONLY, press the arrow key to highlight “Yes” then
On-Screen Display Menus
Auto Adjusts the phase, frequency and position automatically
Runco CL-610 Owner’s Operating Manual
Set Up
Setup
Passcode Please Enter Passcode To Access Service Screen
Passcode Please Enter Passcode To Access Service Screen Confirmed
display area
On-Screen Display Menus
Runco CL-610 Owner’s Operating Manual
On-Screen Display Menus
The Amplitude Adjust menu allows you to fine-tune the image
Runco CL-610 Owner’s Operating Manual
On-Screen Display Menus
Reset Lamp Timer Fan Control Return to User OSD
Runco CL-610 Owner’s Operating Manual
Are you sure?
On-Screen Display Menus
Reset Picture Adjust Picture Adjust White Balance Gamma Selection
Runco CL-610 Owner’s Operating Manual
Blue Image
On-Screen Display Menus
For each component color, you can adjust the following
Runco CL-610 Owner’s Operating Manual
Lamp Replacement Contact Your Runco Dealer
This page is intentionally left blank
Lamp Replacement
Runco CL-610 Owner’s Operating Manual
PROBLEM
Troubleshooting
Remote control
red POWER LED
This page is intentionally left blank
Troubleshooting
Runco CL-610 Owner’s Operating Manual
Connecting RS-232 to the Projector
RS-232 Setup
RS-232 Pin Assignments
D-Sub 9-pin female
A carriage return is required after each command
RS-232 Setup
RS-232C Control Codes
All codes are in the ASCII format
continued
RS-232C Control Codes
RS-232 Setup
Code
This page is intentionally left blank
RS-232 Setup
Runco CL-610 Owner’s Operating Manual
Projector Type Native Resolution Aspect Ratios Video Standards
Specifications
DTV Compatibility Scan Frequency Picture Size 169 screens
Throw Distance Factor x Screen Width Horizontal and Vertical Offset
Brightness and Contrast Power Requirements Operating Environment
Specifications
Dimensions Weight including lens
Regulatory Approvals Limited Warranty
Runco CL-610 Owner’s Operating Manual
Dimensions
11.0 in. 279.4 mm 16.5 in. 419.10 mm 14.80 in. 376.0 mm
8.86 in. 225.0 mm
SERIAL NUMBER
RUMA-011115