Basic Connections/Auto Setup
DVD/HDD View
1 |
from antenna |
or cable |
2 |
To TV’s |
Antenna Input |
3
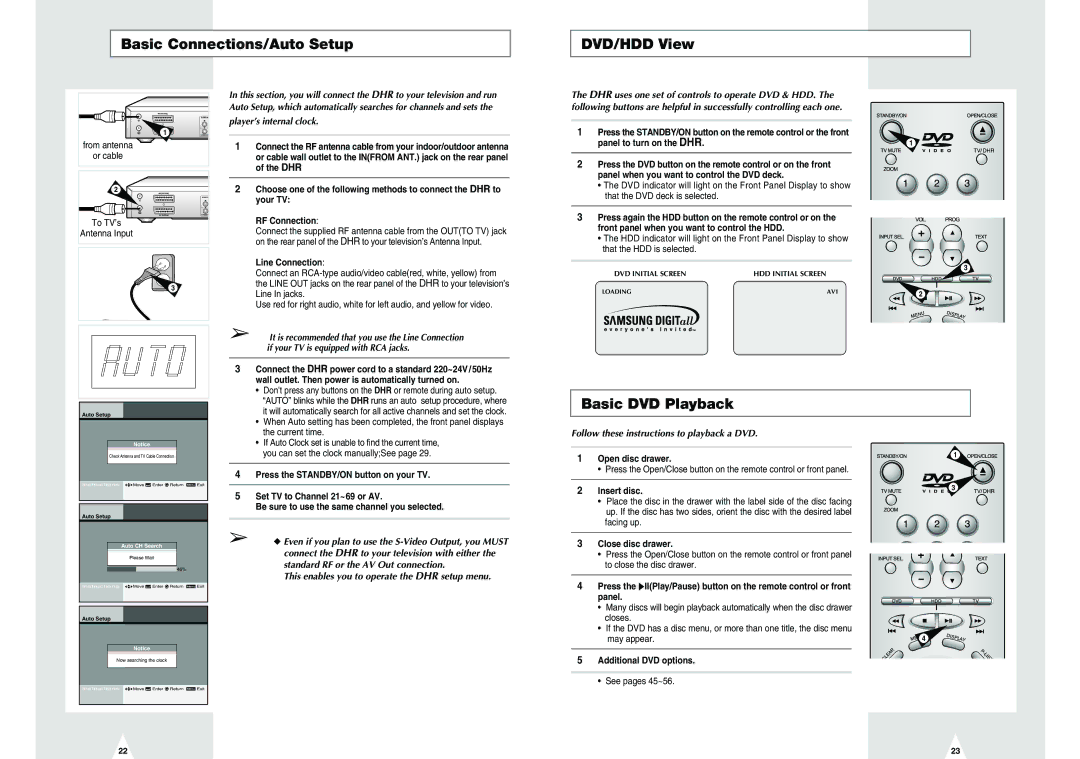
In this section, you will connect the DHR to your television and run Auto Setup, which automatically searches for channels and sets the
player’s internal clock.
1Connect the RF antenna cable from your indoor/outdoor antenna or cable wall outlet to the IN(FROM ANT.) jack on the rear panel of the DHR
2Choose one of the following methods to connect the DHR to your TV:
RF Connection:
Connect the supplied RF antenna cable from the OUT(TO TV) jack on the rear panel of the DHR to your television’s Antenna Input.
Line Connection:
Connect an
Use red for right audio, white for left audio, and yellow for video.
➢It is recommended that you use the Line Connection if your TV is equipped with RCA jacks.
The DHR uses one set of controls to operate DVD & HDD. The following buttons are helpful in successfully controlling each one.
1Press the STANDBY/ON button on the remote control or the front panel to turn on the DHR.
2Press the DVD button on the remote control or on the front panel when you want to control the DVD deck.
•The DVD indicator will light on the Front Panel Display to show that the DVD deck is selected.
3Press again the HDD button on the remote control or on the front panel when you want to control the HDD.
•The HDD indicator will light on the Front Panel Display to show that the HDD is selected.
DVD INITIAL SCREEN | HDD INITIAL SCREEN |
LOADING | AV1 |
1
3
2
Auto Setup
3 | Connect the DHR power cord to a standard 220~24V/50Hz | |
| wall outlet. Then power is automatically turned on. | |
| • | Don’t press any buttons on the DHR or remote during auto setup. |
|
| “AUTO” blinks while the DHR runs an auto setup procedure, where |
|
| it will automatically search for all active channels and set the clock. |
| • | When Auto setting has been completed, the front panel displays |
Basic DVD Playback
Notice
Audio Options
Check Antennas and TV Cable Connection
lnstructions ![]()
![]() Move
Move ![]() Enter
Enter ![]() Return Menu Exit
Return Menu Exit
Auto Setup
|
| Auto CH Search |
| |||
|
| Audio Options |
| |||
|
| DisplayPlease OptionsWait |
| |||
|
|
|
|
|
|
|
|
|
|
|
|
| 46% |
lnstructions | Move |
| Enter Return Menu Exit | |||
| ||||||
Auto Setup
Notice
Audio Options
Now searchingN the clock
| the current time. |
| • If Auto Clock set is unable to find the current time, |
| you can set the clock manually;See page 29. |
|
|
4 | Press the STANDBY/ON button on your TV. |
|
|
5 | Set TV to Channel 21~69 or AV. |
| Be sure to use the same channel you selected. |
|
|
➢◆ Even if you plan to use the
This enables you to operate the DHR setup menu.
Follow these instructions to playback a DVD.
1Open disc drawer.
•Press the Open/Close button on the remote control or front panel.
2Insert disc.
•Place the disc in the drawer with the label side of the disc facing up. If the disc has two sides, orient the disc with the desired label facing up.
3Close disc drawer.
•Press the Open/Close button on the remote control or front panel to close the disc drawer.
4Press the ❿II(Play/Pause) button on the remote control or front panel.
•Many discs will begin playback automatically when the disc drawer closes.
•If the DVD has a disc menu, or more than one title, the disc menu may appear.
5Additional DVD options.
1
![]() 3
3
![]()
![]() 4
4
•See pages 45~56.
lnstructions | Move |
| Enter Return Menu Exit |
22
23