AK68-01370C
HR753/HR756 HR755
No rights are granted for commercial use
Getting Started
English
Important Safety Instructions
Precaution
Maintenance of Cabinet
Handling Cautions
Disc Handling
Disc Storage
Disc Specifications
Holding discs
CD-R/-RW
Audio CD
DVD±R Disc Playback and Recording
DVD-RW Disc Playback and Recording
Using Jpeg disc
Using MP3 disc
Using DivX disc
Disc Copy
Disc compatibility
Do not use the following discs
Contents
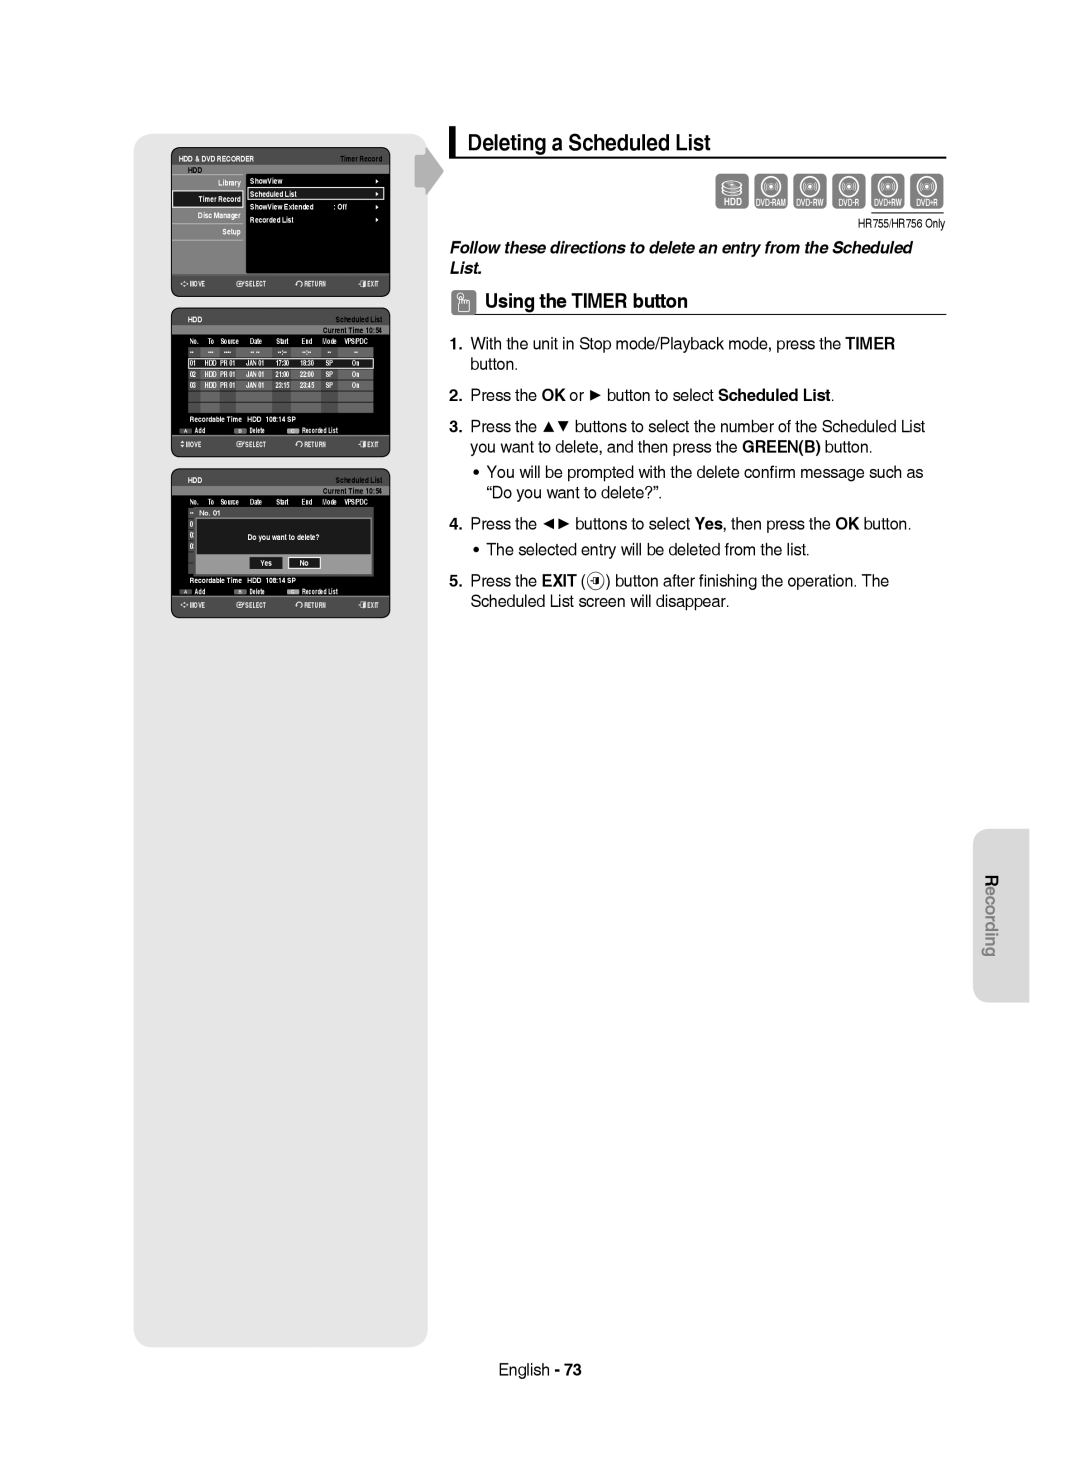
Deleting a Scheduled List
Editing the Scheduled List
Playing Entries in the Playlist
Deleting a Playlist Entry from the Playlist
General Features
Before reading the user’s manual
How to use the HDD & DVD Recorder
Select the disc type or HDD
Playing
Recording
Editing a recorded disc
Finalising & Playing on other DVD components
Preparing the Remote Control
Accessories
Install Batteries in the Remote Control
Unpacking
Button Function
Controllable TV Codes
Front Panel
Description
Front Panel Display
Rear Panel
Fan
Tour of the Remote Control
Connecting the HDD & DVD Recorder Additional connections
Connecting & Setting Up
DVD mode
TV mode
Antenna + HDD & DVD Recorder + External decoder box + TV
Other type of connecting the Video Output cable
Video, Component video and Progressive Output Modes
Connect RF antenna cables as shown
Case 1 Connecting to a Video Composite output jack
Case 2 Connecting to an S-Video output jack
Audio in jacks on TV or AV amplifier
See pages 21~22
Case 1 Connecting to your TV
Other type of connecting the Audio Output cable
Case 3 Component Video output jacks
Case 2 Connecting to a stereo amplifier with AV output jacks
Case 1 Connecting to a TV with Hdmi Jack
Connecting HDMI/DVI to a TV
Case 2 Connecting to a TV with DVI Jack
What is the HDCP?
Connecting to AV 3 IN, DV input jack
Copy protected content cannot be recorded English
Hdmi connection description
Case 2 Connecting a Camcorder to the DV in jack
Plug & Auto Setup
System Setup
On-Screen Menu Navigation
Return button
Auto channel scan will be started
Setting the Clock
Manual Setup
Auto Setup
Refer to following table when selecting your country
Press the OK button to stop the Auto Setup
Select Edit, Delete or Swap
Setting up the Language Options
With the unit in Stop mode, press the Menu button
Auto Power Off Setting
Setting up the System Options
Automatic Chapter Creator
For using Anynet+ Hdmi CEC
EP Mode Time Setting
Anynet+ Hdmi CEC
EZ Record
Anynet+ Hdmi CEC Setup EZ Record
Disc Initialise DVD-V Now, initialising
Finalisation
DivXR Registration
Setting up the Audio Options
Digital Output
Off You can enjoy the movie with the standard Dynamic Range
Mode Compatibility
Off Disc Manager
TV Aspect
Setting up the Video Options
3D Noise Reduction motion adaptive noise reduction
Output selection
Hdmi Resolution
576P 720 x 720P 1280 x 1080i 1920 x
576P 720P
Video Output
Setting up the Progressive scan
Available Video Output Jack
Component
Canceling the Progressive scan
If you forgot your password
Setting up the Parental Lock
Setting the Rating Level
Changing the Password
Region code DVD-Video only
Playback
Logos of Discs that can be played
Disc types that can be played
Discs that cannot be played
Playing a Disc
Press the Play button to start playback
Press the Stop button to stop playback
For DVD-VIDEO Disc
Using the Disc Menu & Title Menu
For HDD/DVD-RAM/±RW/±R Disc
Title List
Searching through a Chapter or Track
Using the playback related buttons
Skipping Chapters, Titles or Markers
If you press the Skip button
Slow Motion Play
Pause mode, press the Search buttons on the remote control
Step Motion Play
If you press the Search button
Moving to a scene directly using the Info
Using the Info button
Selecting the Subtitle Language
Changing the Camera Angle
Selecting the Soundtracks & Audio Channels
Search Subtitle
Playing Repeatedly Repeat Playback
Repeat Play
Repeat A-B
Search Subtitle None Audio 2/0 L+R Repeat Zoom Off
Normal size X2
Zooming-In
X2 normal size
Setting Markers
Using Markers
VR mode
Playing back a marker
Setting Bookmarks
Using the Bookmarks
Playing back a bookmark
Clearing a bookmark
Playing an Audio CDCD-DA
Playing an Audio CD/MP3
Audio CDCD-DA Screen Elements
Music List
Repeat CD CD-DA & MP3
Playing an MP3 Disc
MP3 Screen Elements
Go To Playlist
New Playlist
Playlist
Go To Edit Playlist
Delete the Playlist
Go To Music List
Do you wantE toPLAYLIST01delete?
Select Contents
Using the Sort
Slide Show
Viewing a Picture
Rotate
To stop the Slide Show
Go To Photo List
Zoom
To stop the Zoom
X2 X4 X2 Normal
Playing a DivX
Using the Menu button
DivX Function Description
Function Description
Romanian, SerbianLatin, Slovak, Slovenian
DivX Subtitle Encoding
Afrikaans, Basque, Catalan, Danish, Dutch, English
English, Albanian, Croatian, Czech, Hungarian, Polish
Recordable Discs
Recording
Compatibility between Samsung and Other Company’s Recorder
This HDD & DVD Recorder can record on the following discs
Recording Formats
DVD-RAM/-RWVR mode
DVD-RWV mode/-R
Unformatted Disc Do you want to format this disc? DVD+RW No
Recording Times
Recording Mode
HDD 160GB
HDD 250GB
Content Protection for Recordable Media Cprm
Concerning Copy Control Signals
Signal type Copy-Free Copy-Once Copy-Never Media
DVD-RWVer.1.1 With Cprm VR mode Mode
Before you start
Recording immediately
Recording the current TV programme you are watching
Recording from external equipment you are watching
To stop recording
To pause recording
Press the Input SEL. button to select DV
Copying from a Camcorder
DV device is connected
Making a One Touch Recording OTR
OTR Mode 030
030 100 .. Off
Or press the Stop button again
Using the Title List button
Using the Play button
Simultaneous Recording and Playback
Stopping Playback / Recording
Using the Time Shift function
Time Shift function as a live signal
Buttons on the Remote Control used for Time Shift function
Time Shift Screen Elements
Using the Timer button
Making a Timer Recording
Mode Recording Mode
To exit without saving the current setting
If the timer settings overlap
Press the Exit button
To return to the previous menu
Adding a Scheduled List
Editing the Scheduled List
ShowView
Yes
Deleting a Scheduled List
Date
Using the ShowView Feature
JAN
Go To Recorded List
ShowView Extended
Information about Recorded List
Clear Recorded List
Delete Recorded List
Go to Scheduled List
Current Time
Basic Editing Title List
Editing
Playing the Title
Renaming Labeling a Title
To the locked status
Locking Protecting a Title
SportsA1
Select1 AllSP
Deleting a Title
Splitting a Section of a Title Split
Deleting a Section of a Title Partial Delete
Navigation Menu
Using the Sort function Title List
Time Navigation
Length
Scene Navigation
Select Contents
01 000005 02 000035 03
Creating a Playlist
Advanced Editing Playlist
Play , Search , Skip
Press the Reda button. The Edit menu is displayed
Playing Entries in the Playlist
Using the Play List button
Renaming a Playlist Entry
Playing a Selected Scene
Editing a Scene for the Playlist
Modifying a Scene Replacing a Scene
Search , Skip
Adding a Scene
Moving a Scene Changing the Position of a Scene
Add Scene
Deleting a Scene
Deleting a Playlist Entry from the Playlist
Select7 6AllScenes Unselect All
Copying from HDD to DVD
Using the Sort Playlist
About the Copy Screen
Recorded Video Title
Available 3975MB
Available 4099MB
21%
Title is successfully copied
Available 235993MB
Copying from DVD to HDD
File Copy
Copying MP3, Jpeg or DivX
Folder Copy
DVD-RWFinalise
DiscCD-R/ CD-RW/DVD-RAM/DVD±RFinalise/DVD+RW
New 9Playlist Song 1.mp3
Changing the name of Music/Photo/DivX file
Dream
Editing the Disc Name
Disc Manager
Disc Protection
Delete All Title Lists/DivX Lists /Music Lists/Photo Lists
Delete All Title Lists
Yes Rename
Current media HDD Do you want format?
Formatting a Disc
Delete Format
Delete All Finalise Format
Finalising a Disc
Finalise Format
Finalise Unfinalise
Unfinalising a Disc V/VR mode
Power
Troubleshooting
Reference
Playback
Video
Timer Recording
Sound
Other
Remote Control Unit
Disc Type
Specifications
United Kingdom Republic of Ireland
Region Country Customer Care Centre
Contact Samsung World Wide
English
De kleur van het voorpaneel verschilt per model
Waarschuwing
Aan de slag
Nederlands
Belangrijke veiligheidsinstructies
Voorzorgsmaatregelen
Waarschuwingen voor gebruik
Onderhoud van behuizing
Schijven vasthouden
Gebruik van schijven
DVD-RAM, DVD±RW en DVD±R
Schijven opslaan
DVD-RW’s afspelen en opnemen
DVD±R’s afspelen en opnemen
DVD+RW’s afspelen en opnemen
DVD-RAM’s afspelen en opnemen
Schijfindelingen
Schijf kopiëren
MP3-schijven
JPEG-schijven
Compatibiliteit schijf
Gebruik de volgende schijven niet
Inhoud
Afsluiten van een schijf ongedaan maken
De naam van een muziek-, foto- of DivX-bestand
Algemene kenmerken
Stap 1 Selecteer het schijftype of de vaste schijf HDD
Voordat u de gebruiksaanwijzing leest
Stap 2 De schijf formatteren om de opname te starten
De HDD & DVD-RECORDER gebruiken
Stap 4 Afspelen
Stap 3 Opnemen
Stap 5 Een opgenomen schijf bewerken
Stap 6 Sluiten en op andere DVD- apparaten afspelen
Uitpakken
Accessoires
De afstandsbediening voorbereiden
Batterijen plaatsen in de afstandsbediening
Toets Functie
Instelbare TV-codes
Voorpaneel
Beschrijving
Display voorpaneel
Achterpaneel
Ventilator
De toetsen van de afstandsbediening
Extra aansluitingen
Aansluiten en instellen
De HDD & DVD-RECORDER aansluiten
DVD-modus
Video, componentvideo en progressieve uitvoermodi
Antenne + HDD & DVD-RECORDER + Externe decoderbox + TV
Situatie 1 Aansluiten op een Composite Video-uitgang
Situatie 2 Aansluiten op een S-Video- uitgang
Uitgangen op de HDD & DVD-RECORDER aan te
Sluiten op de audio-ingangen op de TV of AV
Situatie 3 Componentvideo- uitgangen
Situatie 1 Aansluiten op de TV
Gebruik deze aansluiting als uw tv audio-ingangen heeft
Rood Wit
Situatie 1 Aansluiten op een tv met een HDMI-aansluiting
HDMI/DVI aansluiten op een TV
Situatie 2 Aansluiten op een tv met een DVI-aansluiting
Aansluiten op AV 3 IN-of DV-IN Aansluitingen
Recorder
Situatie 2 Een camcorder aansluiten op de DV IN-aansluiting
Menunavigatie op het TV-scherm
Systeem-installatie
Inschakelen en automatisch instellen
CZTsjechië
De klok instellen
Autom. Instal
Zenderinstelling
Handmatig Instal
Zie de onderstaande tabel bij het selecteren van uw land
De taalopties instellen
Instelling voor automatisch uitschakelen
De systeemopties instellen
Hoofdstuk maken
Voor het gebruik van Anynet+ Hdmi CEC
Tijdinstelling EP-modus
Uren
EZ bestand
Anynet+ Hdmi CEC Aan Setup EZ bestand Uit
Automatisch uit Uit Bibliotheek Tijdopname Hoofdstuk maken
Schijf initialiseren DVD-V Bezig met initialiseren
DivXR registratie
De geluidsopties instellen
Digitaal UIT audio
Aan NICAM-modus
Compatib. V-modus
Normaal/Breedbeeld
De video-opties instellen
3D-ruisonderdrukking Motion adaptive ruisonderdrukking
Tijdopname Zenderinstelling
Uitgangselectie
HDMI-resolutie
576P 720 x 720P 1280 x 1080i 1920 x
576P 720P
Beschikbare video-uitgangen
Video-uitvoer
Progressief scannen instellen
Modus Component
Progressief scannen annuleren
Als u uw toegangscode bent vergeten
Het kinderslot instellen
Het classificatieniveau
De toegangscode wijzigen
Regiocode alleen DVD-Video
Afspelen
Kunt de volgende typen schijven afspelen
Logo’s van schijven die kunnen worden afgespeeld
Schijven die niet kunnen worden afgespeeld
Een schijf afspelen
Druk op Play om het afspelen te starten
Voor DVD-Video
Het schijfmenu en het titelmenu gebruiken
Voor HDD/DVD-RAM/±RW/±R-schijven
Titellijst
Zoeken in een hoofdstuk of track
De afspeelknoppen gebruiken
Hoofdstukken, titels of markeringen overslaan
X CD-DA
Stap voor stap afspelen
Vertraagd afspelen
Als u op de toets Search drukt
1/2 1/4 1/8
Taalkeuze ondertiteling
De toets Info gebruiken
Rechtstreeks naar een scène gaan met Info
De camerahoek wijzigen
De geluidssporen en audiokanalen selecteren
Zoeken Ondertitels
Herhaaldelijk afspelen Herhalen
Afspelen herhalen
Herhalen A-B
Zoeken Ondertitels Geen Geluid 2/0 L+R Herhalen Zoom Uit
Normale grootte X2
Inzoomen
X2 normale grootte
Markeringen instellen
Markeringen gebruiken
Een markering afspelen
Een Markeren wissen
Favorieten instellen
Favorieten gebruiken
Een favoriet afspelen
Een favoriet wissen
Een Audio-CD CD-DA afspelen
Een Audio-CD/MP3 afspelen
Onderdelen van het audio-CD-scherm CD-DA
CD CD-DA & MP3 herhalen
Een MP3-schijf afspelen
Onderdelen van het MP3-scherm
Afspeellijst
Nieuwe playlist
Muzieklijst
Afspeellijst
Naar Afspeellijst bewerken
De playlist verwijderen
Naar muzieklijst
Wilt u verwijderen?
Inhoud selecteren
Sort gebruiken
Omvang
Diavertoning
Foto-CD’s afspelen
Draaien
De Diavertoning stoppen
Het zoomen stoppen
Naar fotolijst
X2 X4 X2 Normaal
De toets Menu gebruiken
Een DivX afspelen
DivX Functiebeschrijving
Functie Beschrijving
Druk in de bestandenlijst op de Gele toets C
DivX-ondertitelingscodering
Afrikaans, Baskisch, Catalaans, Deens, Nederlands
Grieks Windows
Opneembare DVD’s
Opnemen
Sluiten
DVD-RAM/DVD-RW VR-modus
Opname-indelingen
DVD-RWV modus/-R
Modus en DVD-video-opname-indeling VR-modus
DVD-HR753 Opnamemodus Duur van opname HDD 160GB
Opnamemodus
HDD 250GB
Beelden die tegen opnemen beveiligd zijn
Kopieerbeveiligingssignalen
Inhoudbeveilliging voor opneembare media Cprm
Het tv-programma opnemen waarnaar u kijkt
Direct opnemen
Opnemen van externe apparaten waarnaar u kijkt
Voordat u begint
De opname Opnemen
De opname tijdelijk onderbreken
De opname beëindigen
Van een camcorder kopiëren
Druk op de toets Input SEL. om DV te selecteren
Het DV-apparaat is aangesloten
030 100 .. Uit
Een OTR One Touch Recording maken
OTR-Modus 030
Afspelen/Opnemen beëindigen
Gelijktijdig opnemen en afspelen
De toets Title List gebruiken
Druk in de opnamemodus op de toets Play
De functie Time Shift gebruiken
De functie Time Shift als live signaal
Onderdelen van het scherm Time Shift
Knoppen op de afstandsbediening voor de functie Time Shift
De toets Timer gebruiken
Een timer-opname maken
Modus
Afsluiten zonder de huidige instelling op te slaan
Als de timer-instellingen elkaar overlappen
Druk op de toets Exit
Terugkeren naar het vorige menu
Een geplande lijst toevoegen
De geplande lijst bewerken
Einde
Jan 18 3 Aan
Nee
De geplande lijst verwijderen
ShowView Bibliotheek Tijdopname
De functie ShowView gebruiken
Informatie over de Opnamelijst
Ga naar de Opnamelijst
Bibliotheek ShowView
Uit Schijfbeheer
Opnamelijst wissen
Opnamelijst verwijderen
Naar de geplande lijst gaan
Druk op de Gele toets C
Basisbewerking Titellijst
Bewerken
De titel afspelen
De naam van een titel wijzigen
Opslaan Blauwe toets D registreert de ingevoerde tekens
Een titel vergrendelen Beveiliging
Druk op de Blauwe toets D om Opslaan te selecteren
Geselecteerde playlist-item
Zijn geselecteerd
Een titel verwijderen
Terug
Een deel van een titel afsplitsen Opspl
Opspl Terug
Afspeeltoetsen Play , Search
Een deel van een titel verwijderen Gedeeltelijk verwijderen
Druk bij het eindpunt op OK
Eindpuntvenster voor sectieverwijdering
Navigatiemenu
De functie Sorteren gebruiken Titellijst
Tijdnavigatie
Scènenavigatie
Inhoud selecteren
Een Afspeellijst maken
Geavanceerd bewerken Afspeellijst
Search , Skip
Nieuwe playlist
De naam van een playlist-item wijzigen
Titels in de playlist afspelen
De toets Play List gebruiken
Alles selecteren
Een geselecteerde scène afspelen
Een scène bewerken voor de playlist
Een scène wijzigen een scène vervangen
Afspeellijst bewerken
Een scène verplaatsen de positie van een scène wijzigen
Een scène toevoegen
Begin Einde Toev Terug
Een scène verwijderen
Een playlist-item uit de playlist verwijderen
Alles7selecteren6 Scènes Deselect.Alle
Sorteren gebruiken Afspeellijst
Van HDD naar DVD kopiëren
Het kopieerscherm
De titel is met succes gekopieerd
Beschikbaar 4099MB
Kopieerbeveiligde titel
Van DVD naar HDD kopiëren
Eenmaal-kopiëren-titel
Bestand kopiëren
Het kopiëren van MP3, Jpeg of Divx
Map kopiëren
Ltemnummer E 1 MP3/ 24
Einde
De naam van een muziek-, foto- of DivX-bestand Wijzigen
De naam van de schijf bewerken
Schijven beheren
Schijfbeveiliging
Alles verw
Hernoemen Beveiliging Alles verw
Alle titellijsten verwijderen
Foto Verw
Nee Verw
Huidige media HDD Wilt u formatteren?
Een schijf formatteren
Hernoemen Beveiliging
Afsluiten
Een schijf afsluiten
Afsluiten
Afsluiten van een schijf ongedaan maken V/VR-modus
Naslag
Problemen oplossen
Stroomvoorziening
Opnemen
Beeld
Timer-opname
Geluid
Afstandsbediening
Andere problemen
Controleer de selectietoets TV/DVD
Ga na of de toets TV is geselecteerd
Audio-uitgang
Specificaties
Schijftype
Nederlandbelgië
Luxembourgbelgique
Comment contacter Samsung dans le monde
Regio Land Klantenservice
Contact opnemen met Samsung Wereldwijd
Correcte verwijdering van dit product