DVD-VR320
Getting Started
FCC Note for U.S.A
Maintenance of Cabinet
Precaution
Important Safety Instructions
Handling Cautions
Disc Specifications
Disc Storage
Protection
Contents
Reference
Variety of functions with easy-to-use user interface
General Features
Before Reading User’s Manual
Classified as a Date Once, Daily or Weekly
Recording mode XP high quality mode, SP stan
Dard quality mode, LP long recording mode, EP extended mode
Step
Description
Front Panel
Rear Panel
Fan
Timer REC Button
Power Button Number Button 100+ Button
TV Power Button AUDIO/TV Mute Button
VCR Button
Connecting & Setting Up
Quick Overview
Method1 Antenna + DVD Recorder VCR + TV No Cable box
Accessories
Unpacking
Method 2 Antenna +Cable box +
Connecting the Video Cable
Video, Component video and Progressive Output Modes
On the TV screen
Method 2 Connecting to an S-video input jack
Method 3 Connecting to Component video input jacksY,PB,PR
Method 1 Connecting to your TV
Method
Method 3 Connecting a Camcorder to the DV in jack
Connecting External Devices
Method 2 Connecting a Camcorder to the AV in 2 jacks
Install Batteries in the Remote Control
If the remote control does not operate properly
Setting the Remote Control
Brand Codes
Enter Button
On-Screen Menu Navigation
…/†,œ /√ Buttons
Time Zone
Auto Clock Set
Clock Data CH
Press the …† buttons to select Auto Clock Set
Press the …† buttons to select Manual Clock
Manual Clock Set
Daylight Saving
Set, then press the Enter or √ button
Channel Set
Auto Channel Memory
Add/Delete, then press the Enter or √ button
RF Output Channel
Press the …† buttons to select Channel
Press the œ √ buttons to select Add or Delete
Press the …† buttons to select the desired
Setting Up Language Options
Press the …† buttons to select Language, then
Language option, press the Enter or √ button
Dynamic Compression
Setting Up the Audio Options
Digital Output
Black Level
TV Aspect
Input Level
3D Noise Reduction
About the Rating Level
Setting Up the Parental Control
Password. Enter your password again,
Press the …† buttons to select Rating Level
VCR Setting
About the Change Password
Auto Play
Video Input
Tape Length
Auto Repeat
Time, then press the Enter or √ button
Press the …† buttons to select DVD EP Mode
Front Display
Press the …† buttons to select 6 Hours or
Automatic Chapter Creator
Will be displayed
Disc types that can be played
Before Playing
Region code DVD-Video only
Discs that cannot be played
Playing a Disc
Using the Search & Skip Functions
Step Motion Play
Moving to a scene directly using the Anykey
Slow Motion Play
Slow Motion Play DVD-VIDEO / DVD-RAM / DVD-RW / DVD-R
Press the …† buttons to select Time
Repeat Play
Playing RepeatedlyRepeat Playback
Press the …† buttons to select Repeat
Repeat is highlighted
To return to normal playback
Press the Anykey button during playback
Disc
Press the Subtitle button during playback
Using the Anykey button Selecting the Audio language
Selecting the Subtitle language
Zooming-In
Using the Angle button
Angle
Press the Clear button to delete the selected bookmark
Playing back a Bookmark
Clearing a Bookmark
Clearing a Marker
Using the Markers
Playing back a Marker
Audio CDCD-DA Screen Elements
Buttons on the Remote Control used for CD playback
Playing an Audio CDCD-DA
Insert an MP3 CD into the disc tray
MP3 Screen Elements
Playing back an MP3 Disc
MP3 menu is displayed and the tracks
Press the œ √ buttons to select Play Option
Play Option Mode
Repeat mode will be highlighted
Playing a picture CD
Press the …† œ √ buttons to select a picture
VHS Playback
Playing the VCR
Tracking
Variable Search System
While a cassette is stopped, press the Anykey
Compatibility between Samsung Other Company’s Recorder
Before Recording
Recordable discs
Unrecordable video
Recording Mode
Recording Formats
DVD-RWVideo mode/-R
Pausing / Resuming
Content Protection for Recordable Media Cprm
Press the REC Speed button repeatedly to select
Enables camcorder control appears on the top of the screen
Recording From External Devices
Recording speedquality
REC button Timer Recording screen are displayed
Press the …† buttons to select Timer Record
You can also set a timer recording via the Timer
Making a One Touch
If the timer settings overlap
Recording mode DVD
Recording mode VCR
To return to the previous menu
Press the …† button to select the number
Press the …† button to select Scheduled Record
List, then press the Enter or √ button
Enter or √ button Edit and Delete items are displayed
Record List, then press the Enter or √ button
Press the Enter button Edit and Delete items are displayed
Press the …† button to select Scheduled
You can not delete programs that are cur- rently recording
Maximum Recording Time SP vs. SLP
Before starting
Features
Special Recording
Direct copy DVD to VCR
Copy to DVD or VCR
To copy from DVD to VCR
With the unit in Stop mode, press the Menu
To copy from VCR to DVD
Direct copy VCR to DVD
Playing the Title List
Using the Title List button
Using the Menu button
Title List Screen Elements
Basic Editing Title List
RenamingLabeling a Title
LockingProtecting a Title
Deleting a Title
Deleting a Section of a Title
You cannot delete a protected title
Section deletion starting point window
Press the Enter button at the starting point
Image and starting point time are displayed
Edit Title List Screen Elements
Creating a Playlist
Advanced Editing
Playlist
Edit Playlist screen is displayed
Playing Titles in the Playlist
Renaming a Playlist Title
Buttons
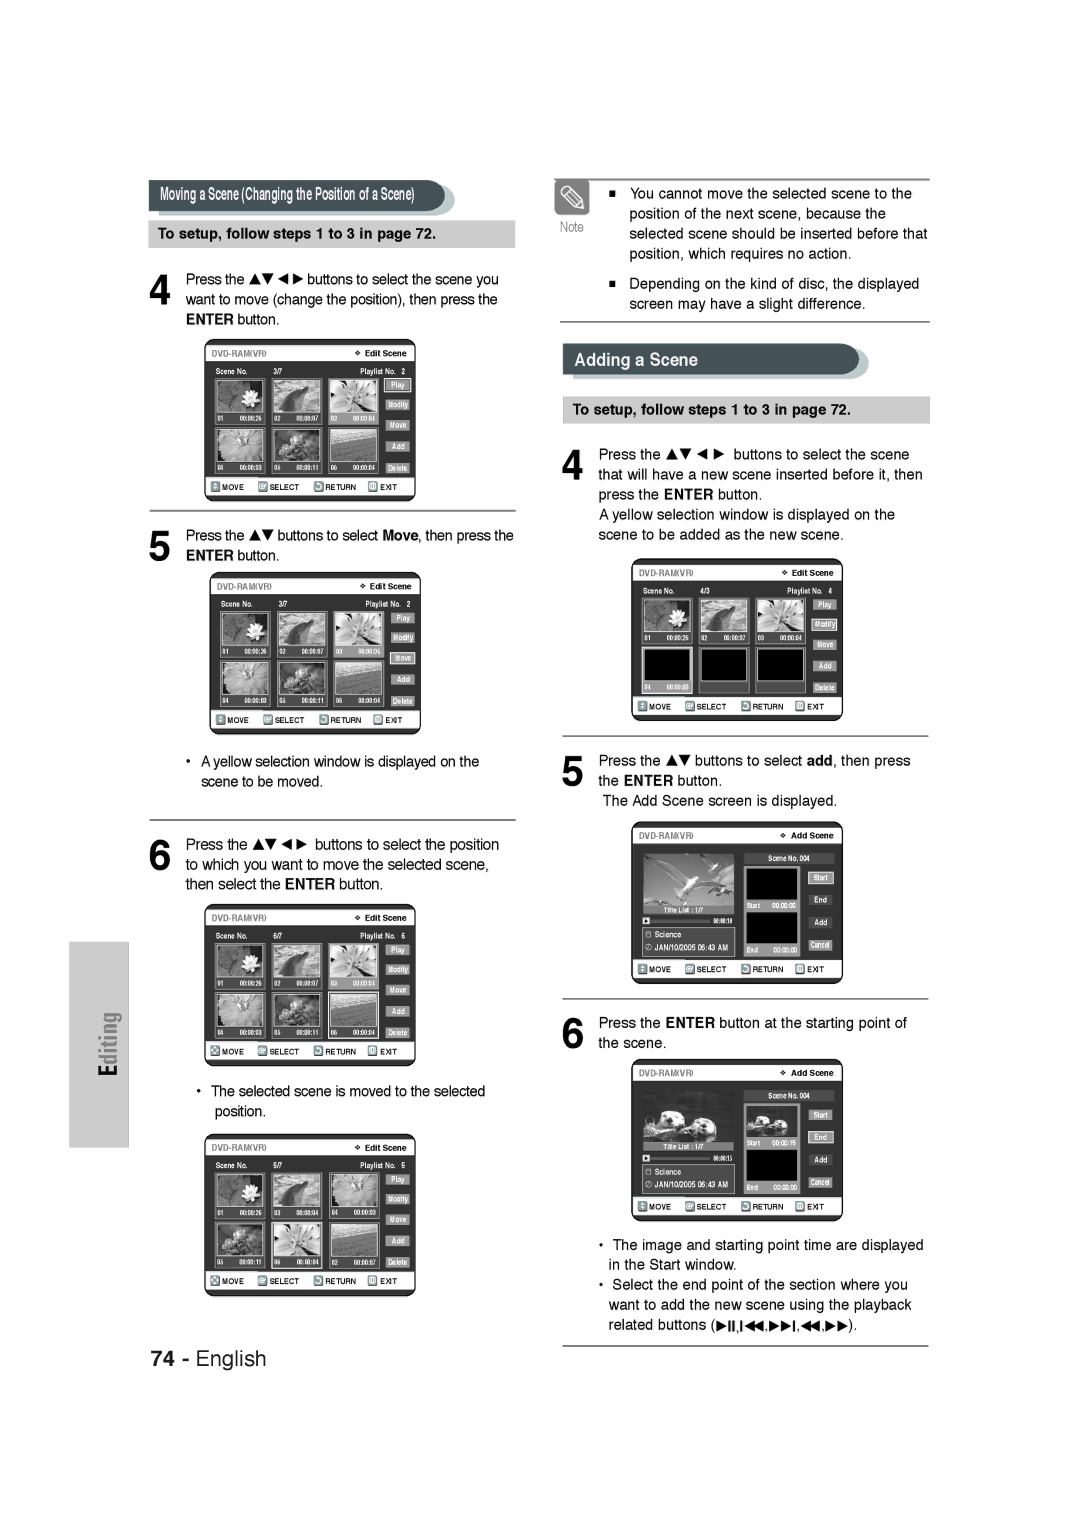
Editing a Scene for the Playlist
Press the Enter button Selected scene will be played back
Press the Enter button
To setup, follow steps 1 to 3
Press the …† buttons to select Change, then
Then select the Enter button
Finished. The menu screen will disappear
Press the …† buttons to select Playlist,
Press the Menu button after the operation has
Playlist can contain up to 99 playlist
After the delete operation has finished
Deleting a Playlist Title from the Playlist
It automatically returned to the Edit Playlist screen
Follow these instructions to give a name to a disc
Disc Manager
Editing the Disc Name
Button
Press the …† buttons to select Disc Format
Disc Protection
Formatting a Disc
Enter button. The disc is formatted
Finalizing a disc
Press the œ √ buttons to select Yes, then press
DVD-VR and DVD-V are defined according to
Delete All Title Lists
Press the …† button to select Disc Unfinalize
Unfinalizing a disc V/VR mode
Disc is unfinalized
Want to unfinalize disc?
Reference
Forget the password
Power turns on Cannot record TV
Timer recording does
Input is displayed
TroubleshootingDVD
TroubleshootingVCR
Input
Specifications
General
Audio Output
Samsung DVD Recorder & VCR
Samsung Electronics AMERICA, INC