Main
DLPTV
BP68-00142A-cover 5/27/03 10:07 AM Page 2
Safety Instructions
Warning! Important Safety Instructions
CAUTION
Thank You for Choosing Samsung
Important Safety Information
SAMSUNG
FCC Information
Safety Instructions
BP68-00142A-1 5/27/03 10:09 AM Page 4
Table of Contents
BP68-00142A-1 5/27/03 10:09 AM Page 6
Page
1
2 3
5
4
Replacing the Lamp
Side Panel Buttons
Side Panel Jacks
List of Features
Checking Parts
BP68-00142A-1 5/27/03 10:09 AM Page 12
Front Panel LED Indicators
Indicator Light Key
Rear Panel Jacks
BP68-00142A-1 5/27/03 10:09 AM Page 14
Installing Batteries in the Remote Control
2
1
3
Remote Control
BP68-00142A-1 5/27/03 10:09 AM Page 16
Page
Connecting VHF and UHF Antennas
1
Antennas with 300-ohm Flat Twin Leads
1
2
Antennas with 75-ohm Round Leads
1
Cable without a Cable Box
2
1
Cable with a Cable Box that Descrambles All Channels
Connecting a Cable Converter Box
Connecting a Cable Converter Box and a VCR
BP68-00142A-2 5/27/03 10:09 AM Page 22
2
Connecting to Y,Pb,Pr
3
2
1
Connecting to audio and video jacks
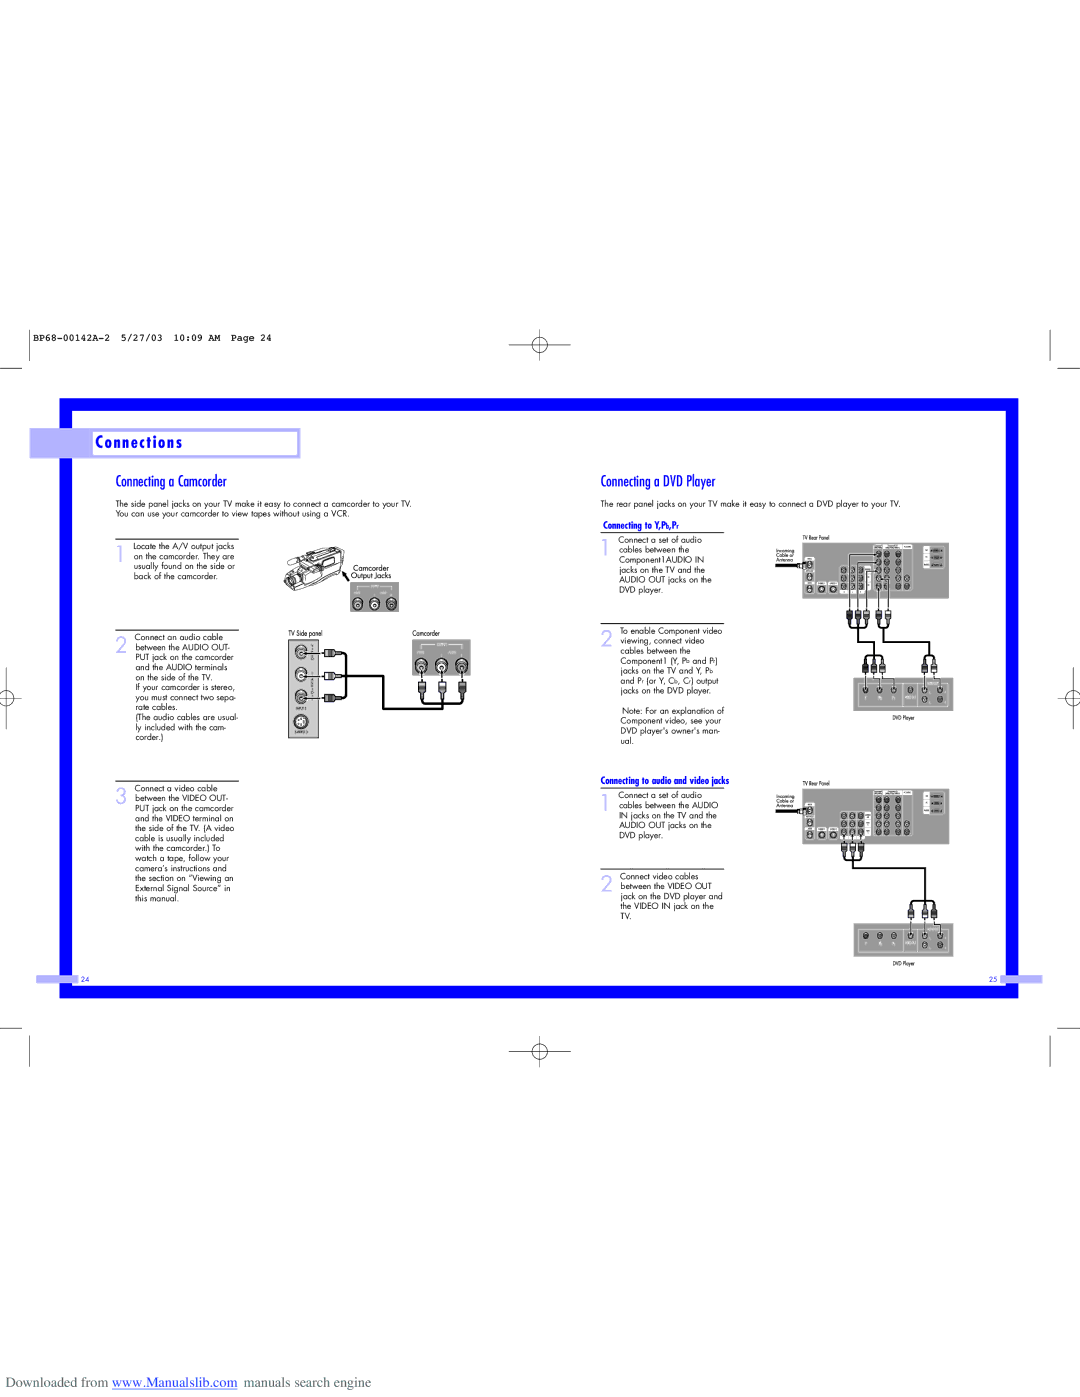
Connecting a Camcorder
BP68-00142A-2 5/27/03 10:09 AM Page 24
Connecting a DTV Set Top Box
Connecting to Y,Pb,Pr
Connecting to DVI (Digital Visual Interface)
Connecting to R,G,B
BP68-00142A-2 5/27/03 10:09 AM Page 26
Page
Turning the TV On and Off
1
Viewing the Menus and Displays
3
2
1
3
2
1
2
Displaying the Menus
Displaying Status Information
Selecting the Menu Language
1
Selecting the Antenna Input
BP68-00142A-3 5/27/03 10:08 AM Page 30
Channel Memory
1
Selecting the Broadcast Source
3
2
1
2
3
2
Storing Channels in Memory Automatically
1
Adding and Erasing Channels
BP68-00142A-3 5/27/03 10:08 AM Page 32
Selecting Your Favorite Channels
2
To Store Your Favorite Channels:
4
To View Your Favorite Channels:
Changing Channels
1
Labeling the Channels
5
4
3
1
Customizing the Picture
2
4
3
3
4
1
2
1
1
Setting the On/Off Timer
5
4
3
1
5
2
1
8
7
6
Selecting the Signal Source
1
3
2
Remote Control VCR/DVD Buttons
Setting the Sleep Timer
Page
Setting Up Your Remote Control
Setting Up the Remote to Operate Your VCR
1
3
4
Note on Using Remote Control Modes: VCR
Setting Up the Remote to Operate Your Cable Box
1
Note on Using Remote Control Modes: Cable Box
BP68-00142A-4 5/27/03 10:08 AM Page 48
Setting Up the Remote to Operate Your DVD
1
DVD Codes
3
4
Note on Using Remote Control Modes: DVD
1
Setting the Film Mode
5
4
1
Fine Tuning Channels
3
2
1
BP68-00142A-4 5/27/03 10:08 AM Page 52
DNIeTM (Digital Natural Image engine)
1
Guide to DNIe Settings
Digital Noise Reduction
3
1
BP68-00142A-4 5/27/03 10:08 AM Page 54
Changing the Screen Size
1
Wide
Panorama
Zoom1
Zoom2
Special Audio Options
MTS Settings: Choosing a Soundtrack
Guide to MTS Settings
BP68-00142A-4 5/27/03 10:08 AM Page 58
Page
Viewing Closed Caption Information
1
Closed Captions
4
3
2
3
Viewing Picture-in-Picture
2
Selecting a PIP Screen
3
NOTES
BP68-00142A-4 5/27/03 10:08 AM Page 64
Swapping the Contents of the PIP and Main image
3
Selecting a Signal Source (Antenna or Cable) for PIP
3
BP68-00142A-4 5/27/03 10:08 AM Page 66
Changing the Picture-in-Picture Channel
Changing the Size of the PIP image
BP68-00142A-4 5/27/03 10:08 AM Page 68
Using the V-Chip
3
1
Setting Up Your Personal ID Number (PIN)
3
2
4
2
1
How to Enable/Disable the V-Chip
2
3 4
5
2
1
6
Page
Using Your TV as a Computer (PC) Display
How to connect Your PC to the TV
How to Set up Your PC Software (Windows only)
BP68-00142A-5 5/27/03 10:08 AM Page 78
Display Modes
1
How to Set up Your TV as a PC display
3
2
BP68-00142A-5 5/27/03 10:08 AM Page 80
1
2
4
2
To Initialize the Screen Position and Picture Quality Adjustment
1
Frequency Adjustment
Fine tuning
BP68-00142A-5 5/27/03 10:08 AM Page 82
Changing the Screen Size (PC mode)
Wide (TV)
Wide (PC)
Expand
Normal
Page
Appendix
Troubleshooting
Specifications
Care and Maintenance
Placement