Free Standing Appliance
Thank you for purchasing a Samsung product
Safety Information
Safety information
Regard to safe disposal of this product
Unplug the power plug
Failing to do so may result in fire or explosion
Do not attempt
Severe Warning Warning Signs for
Severe Warning Warning Signs for Installation
This refrigerator must be properly installed
Pipe, or telephone line
This may result in an electric shock or fire
Otherwise there is a risk of fire
Allow the appliance to stand for 2 hours after installation
Severe Warning Warning Signs for Using
Do not sit on the Freezer door. -- The door may be broken
Safety information
Otherwise, there is a risk of electric shock
Wipe excess moisture from the inside and leave the doors
To get best performance from the product
Maintenance
Severe Warning Warning Signs for Disposal
Additional Tips for Proper Usage
Bad easily at low temperature, such as bananas, melons
Setting up your refrigerator
Contents
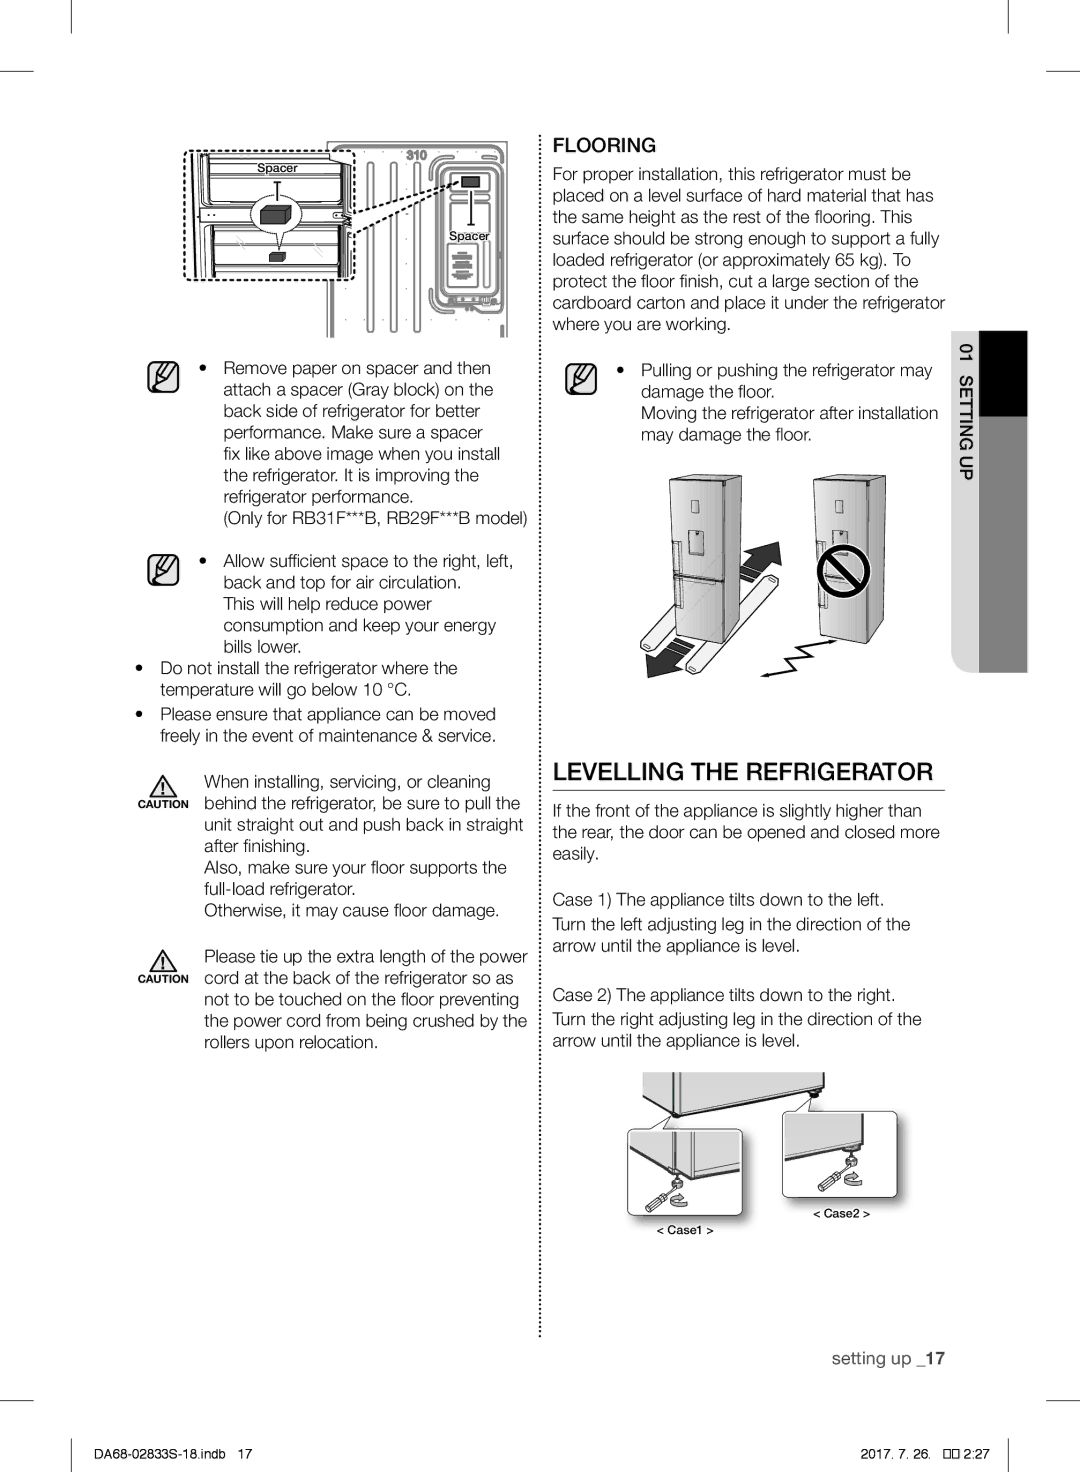
Levelling the Refrigerator
Where you are working
Required Tools
Setting UP the Refrigerator
Reversing the Door Optional
Setting up
Before After
Assembling procedure of the Door
Assemble the Middle hinge by the Phillips Head
Be careful not to injure yourself during
Assemble step
Setting up
Operating your refrigerator
Using the Control Panel
Freezer
Fridge
Temperature Alarm Only for Coolselect zone function model
Features of the Freezer Compartment
Additional Shelf
Coolselect Zone
Packing food correctly
Freezing food
Shelf life of frozen food
Purchasing and storing deep-frozen food
Removing the Interior Parts
Using the Water Dispenser Optional
Replacing the LED Lamp
Cleaning the Refrigerator
Troubleshooting
+16 to +32
+10 to +32
+16 to +38
+16 to +43
Country Call Website
Appareil au sol
Merci davoir acheté un produit Samsung
Consignes DE Sécurité
Consignes de sécurité
Remarque
Ne tentez Rien Ne démontez Rien Ne touchez à Rien
Consignes
Importantes Pour ’INSTALLATION
’alimentation
Sur la tête risque de mourir par étouffement
Importantes Pour ’UTILISATION
Cela risquerait de provoquer un incendie ou une explosion
’endommagez pas le circuit de réfrigération
’utilisez pas de ventilateur
La butée de clayette pourrait ne pas fonctionner
Raison de la chute de la clayette en verre
En cas d’éclaboussures, vous
Aliments dans un environnement domestique
Le rebord coupant pourrait vous blesser
’obstruez pas les orifices de ventilation
Vous éviterez ainsi l’apparition d’odeurs et de moisissures
Peuvent disparaître
Ces produits risquent de rayer ou d’endommager le matériau
De nettoyage ou de maintenance
Évitez de stocker des denrées
Conseils Supplémentaires Pour UNE Bonne Utilisation
Conseils Pour Économiser L’ÉNERGIE
Ne recongelez jamais des aliments déjà décongelés
Préparation DE Linstallation
Installation de votre réfrigérateur
Choix du lieu dinstallation
Table des matières
Mise À Niveau DU Réfrigérateur
Installation
Outils nécessaires
Installation DU Réfrigérateur
Installation
Posez le réfrigérateur avec précaution
Procédure de montage de la porte
Avant Après
Veillez à ne pas vous blesser durant Attention l’opération
Étapes du montage
Installation
Fonctionnement du réfrigérateur
Utilisation DU Panneau DE Commande
Freezer Congélateur
Fridge Réfrigérateur
Panneau de la porte
Symbole des produits congelés sur le
Clayette Supplémentaire
Emballer les aliments correctement
Congélation daliments
Achat et conservation daliments congelés
Décongélation des aliments congelés
Retrait DES Éléments Intérieurs
Utilisation DU Distributeur D’EAU EN Option
Première utilisation
Porte du réfrigérateur
Nettoyage DU Réfrigérateur
Remplacement DE LA DEL
Dépannage
De +16 à +32
De +10 à +32
De +16 à +38
De +16 à +43
Zambia
Aparelho autónomo
Manual do utilizador
Obrigado por adquirir um produto da Samsung
Informações DE Segurança
Informações de segurança
NÃO tente
Práticas perigosas ou
NÃO desmonte
NÃO toque
Existe o risco de incêndio ou de choque elétrico
Instalação
Peças do circuito de refrigeração é danificada
Possa entrar em contacto com água
Não utilize aerossóis próximo do frigorífico
Plástico ou linha telefónica
Caso contrário, existe o perigo de incêndio
Isto poderá resultar em incêndio ou explosão
Utilização
Não danifique o circuito de refrigeração
Caso contrário, poderão ocorrer ferimentos graves
Deixe as crianças entrarem para o interior do frigorífico
Batente da prateleira não funcionaria
Não tente reparar, desmontar ou modificar o aparelho
Não bloqueie os orifícios de ventilação
Sinais DE Cuidado
Sinais DE Cuidado Para
Provocar um incêndio
Sinais DE Aviso
Estes podem riscar ou danificar o material
Aviso Importantes Para Eliminação do Aparelho
Sugestões Adicionais Para USO Adequado
Horas, retire todos os alimentos congelados
Sugestões para poupar energia
Temperaturas como, por exemplo, bananas ou melões
No aparelho
Não deixe a porta do aparelho
Preparar a Instalação do Frigorífico
Índice
Preparar o seu frigorífico
Que está a trabalhar Puxar ou empurrar o frigorífico poderá
Nivelar O Frigorífico
Apenas nos modelos RB31F***B e RB29F***B
Ferramentas necessárias
Preparar O Frigorífico Para USO
Inverter a Posição DA Porta Opcional
Preparação
Antes Após
Procedimento para montagem da porta
Etapas de montagem
Preparação
Utilizar O Painel DE Controlo
Funcionamento do seu frigorífico
Congelador
Fridge frigorífico
Prateleira Adicional
Alarme de temperatura Apenas para o modelo Coolselect zone
Características do
Marca dos alimentos congelados no
Embalar os alimentos corretamente
Congelar os alimentos
Prazo de validade dos alimentos congelados
Compra e armazenamento de alimentos ultracongelados
Remover AS Peças Interiores
Utilização do Dispensador DE Água Opção
Substituir a Lâmpada LED
Limpar O Frigorífico
Resolução de problemas
+16 a +32
+10 a +32
+16 a +38
+16 a +43
Mena Algeria
تنرتنلإا ىلع انعقوم ةرايزب مق وأ لصتا دلبلا
ملاعلا لوح نجوسماسب لاصتلاا
ةلصفنم عيمتج ةمظنأ ىلع يوتتح يتلا نادلبلا يف قبطم
ةيوئملا ةجردلاب ةطيحملا ةرارحلا ةجرد قاطن زمرلا ةئفلا
اهحلاصإو لاطعلأا فاشكتسا
اهفلت يف ببستت وأ ةجلاثلا نول ىلع رثؤت
وأ ففرلأا سكعت لا دقف.فلخلا نم اهبكرت ةيبنت طوقسلل ضرعتت
مث لماكلاب جراخلل جاردلأا بحسب مق
اهتلازلإ قفرب اهعفرا
هايملا نازخ يف ةيفاصلا
هجولا ىلع نازخلا لمع مدع ىلإ هبحساو هايملا نازخ عفرب مق
ءاطغلا قلغ دنع ضيفي دقف ،كلذ نم
ءاملا دادترا يدافتل عزوملل يجاجزلا بوكلا ةاذاحم نم دكأت
ةمعطلأا فيلغتل ةبسانم ةيلاتلا تاجتنملا
ةمعطلأا فيلغتل ةبسانم ريغ ةيلاتلا تاجتنملا
ةفلغملا ةمعطلأا قلغل ةبسانم ةيلاتلا تاجتنملا
ماعطلا ممست
ةقاطلا عاطقنا
تاءارجإ ةيأ ذيفنت نع فقوتي ديربتلا
نيزختل اهب حومسملا نيزختلا ةدم ىلإ
وأ جاتنلإا خيرات ىلإ رظنا ،ةدمجملا ةيحلاصلا
ةجلاثلا ليغشت
دادعلإا
ةيولعلا ةلصفملا دومع طبر دعأ مث ،ةيولعلا ةلصفملا بلقا
بيكرتلا تاوطخ
راسيلا
ىطسولا
لبق دعب
هذه ءانثأ ةباصلإل ضرعتت لا ىتح رذحلا لماك خوت ةيلمعلا ةيبنت
19 دادعلإا
ةيئاذغلا داوملا نم ةغراف اهنأو ةقاطلاب دادملإل يسيئرلا
ءلامعلا اهلمحتي ةددحم تاقفن لباقم ةلاحلا هذه
ليدعتلا اذه
لقلأا ىلع ةدحاو ةعاس ةدمل رظتنا نكلو ،ةرشابم بابلا
دادعلإا
ةجلاثلا دادعإ
تايوتحملا
ةجلاثلا دادعإ
ةجلاثلا ليغشت
لماكلا نابوذلل تعضخ
ةجلاثلا ةرتفل احوتفمً ةجلاثلا باب ءاقب بنجت
ةملاسلا تامولعم
اهريغ وأ ةجلاثلا هذه نم صلختلا دنع
دنع ىعارت ةيريذحت تاملاع هيبنت ةجلاثلا نم صلختلا
فيظنتلاب ةصاخلا هيبنتلا تاملاع
مادختسلااب ةصاخلا هيبنتلا تاملاع هيبنت
تباث ريغ وأ فلات ذخأم وأ فلات ةمدص ثودح ىلإ كلذ يدؤي دقف
ةيلزنملا ةمعطلأا ةقاطلا سبقم سمل نود روفلا ىلع
ةيوهتلل حوارملا مادختسا بنجت لافطلأا وأ عضرلا لوخد نم سرتحا
قيرح بوشن يف كلذ ببستي دقف ،لاإو
ةنايصلا زكرمب لصتا مث ،روفلا ىلع
ةجلاثلا قوف
ءاملاب ةءولمم ةيعوأ ةيأ عضو بنجت
نيزنبلا ــ لاعتشلال ةلباقلا وأ ةرياطتملا
نابوربلا زاغو ناهدلا فيفخت لئاسو
ةيدسج تاباصإ وأ ةيئابرهك ةمدص
وأ عينصتلا ةهج لبق نم ةرشابم
لفسلأ يلدتم كلسلا نوكي ةغرافلا ةحاسملا يف هئاقلإ وأ ،نيئيش
اطرفم اعافترا
بيكرتلاب ةصاخلا
ىلإ تاميلعتلا هذه عابتا مدع يدؤي دق
بيبانلأا نم قفدتملا ديربتلا زاغل نكميو
راجفنا عوقو وأ قيرح علادنا
لثم راجفنلال ةلباقلا داوملا نيزختب مقت لا
ةملاسلا تامولعم
ةملاسلا تامولعم
اهتاذب ةمئاق ةجلاث
Samsung جتنم كئارشل اركشً