INSTALLATION AND BASIC ADJUSTMENTS
Screen Size and Projection Distance
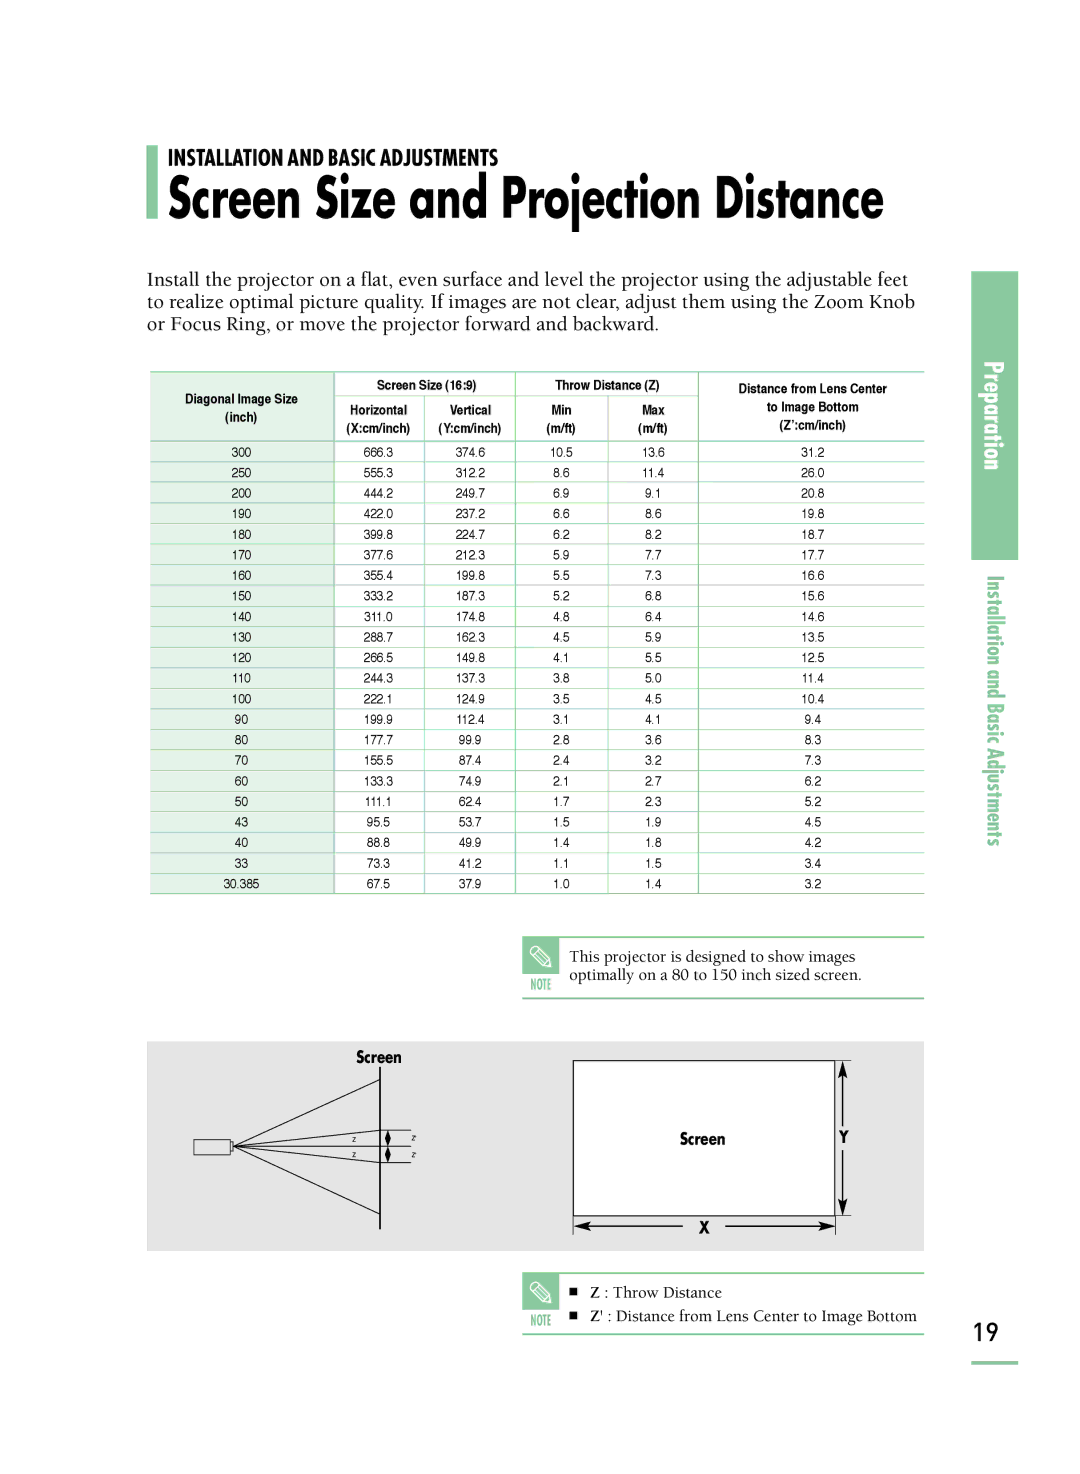
Install the projector on a flat, even surface and level the projector using the adjustable feet to realize optimal picture quality. If images are not clear, adjust them using the Zoom Knob or Focus Ring, or move the projector forward and backward.
Diagonal Image Size | Screen Size (16:9) | Throw Distance (Z) | Distance from Lens Center | |||
Horizontal | Vertical | Min | Max | to Image Bottom | ||
(inch) | ||||||
(X:cm/inch) | (Y:cm/inch) | (m/ft) | (m/ft) | (Z’:cm/inch) | ||
| ||||||
300 | 666.3 | 374.6 | 10.5 | 13.6 | 31.2 | |
250 | 555.3 | 312.2 | 8.6 | 11.4 | 26.0 | |
200 | 444.2 | 249.7 | 6.9 | 9.1 | 20.8 | |
190 | 422.0 | 237.2 | 6.6 | 8.6 | 19.8 | |
180 | 399.8 | 224.7 | 6.2 | 8.2 | 18.7 | |
170 | 377.6 | 212.3 | 5.9 | 7.7 | 17.7 | |
160 | 355.4 | 199.8 | 5.5 | 7.3 | 16.6 | |
150 | 333.2 | 187.3 | 5.2 | 6.8 | 15.6 | |
140 | 311.0 | 174.8 | 4.8 | 6.4 | 14.6 | |
130 | 288.7 | 162.3 | 4.5 | 5.9 | 13.5 | |
120 | 266.5 | 149.8 | 4.1 | 5.5 | 12.5 | |
110 | 244.3 | 137.3 | 3.8 | 5.0 | 11.4 | |
100 | 222.1 | 124.9 | 3.5 | 4.5 | 10.4 | |
90 | 199.9 | 112.4 | 3.1 | 4.1 | 9.4 | |
80 | 177.7 | 99.9 | 2.8 | 3.6 | 8.3 | |
70 | 155.5 | 87.4 | 2.4 | 3.2 | 7.3 | |
60 | 133.3 | 74.9 | 2.1 | 2.7 | 6.2 | |
50 | 111.1 | 62.4 | 1.7 | 2.3 | 5.2 | |
43 | 95.5 | 53.7 | 1.5 | 1.9 | 4.5 | |
40 | 88.8 | 49.9 | 1.4 | 1.8 | 4.2 | |
33 | 73.3 | 41.2 | 1.1 | 1.5 | 3.4 | |
30.385 | 67.5 | 37.9 | 1.0 | 1.4 | 3.2 | |
Preparation
Installation and Basic Adjustments
NOTE
Screen
This projector is designed to show images optimally on a 80 to 150 inch sized screen.
Screen | Y |
X |
■ Z : Throw Distance
NOTE ■ Z' : Distance from Lens Center to Image Bottom
19