DVR setup
CONTINUOUS/MOTION RECORDING
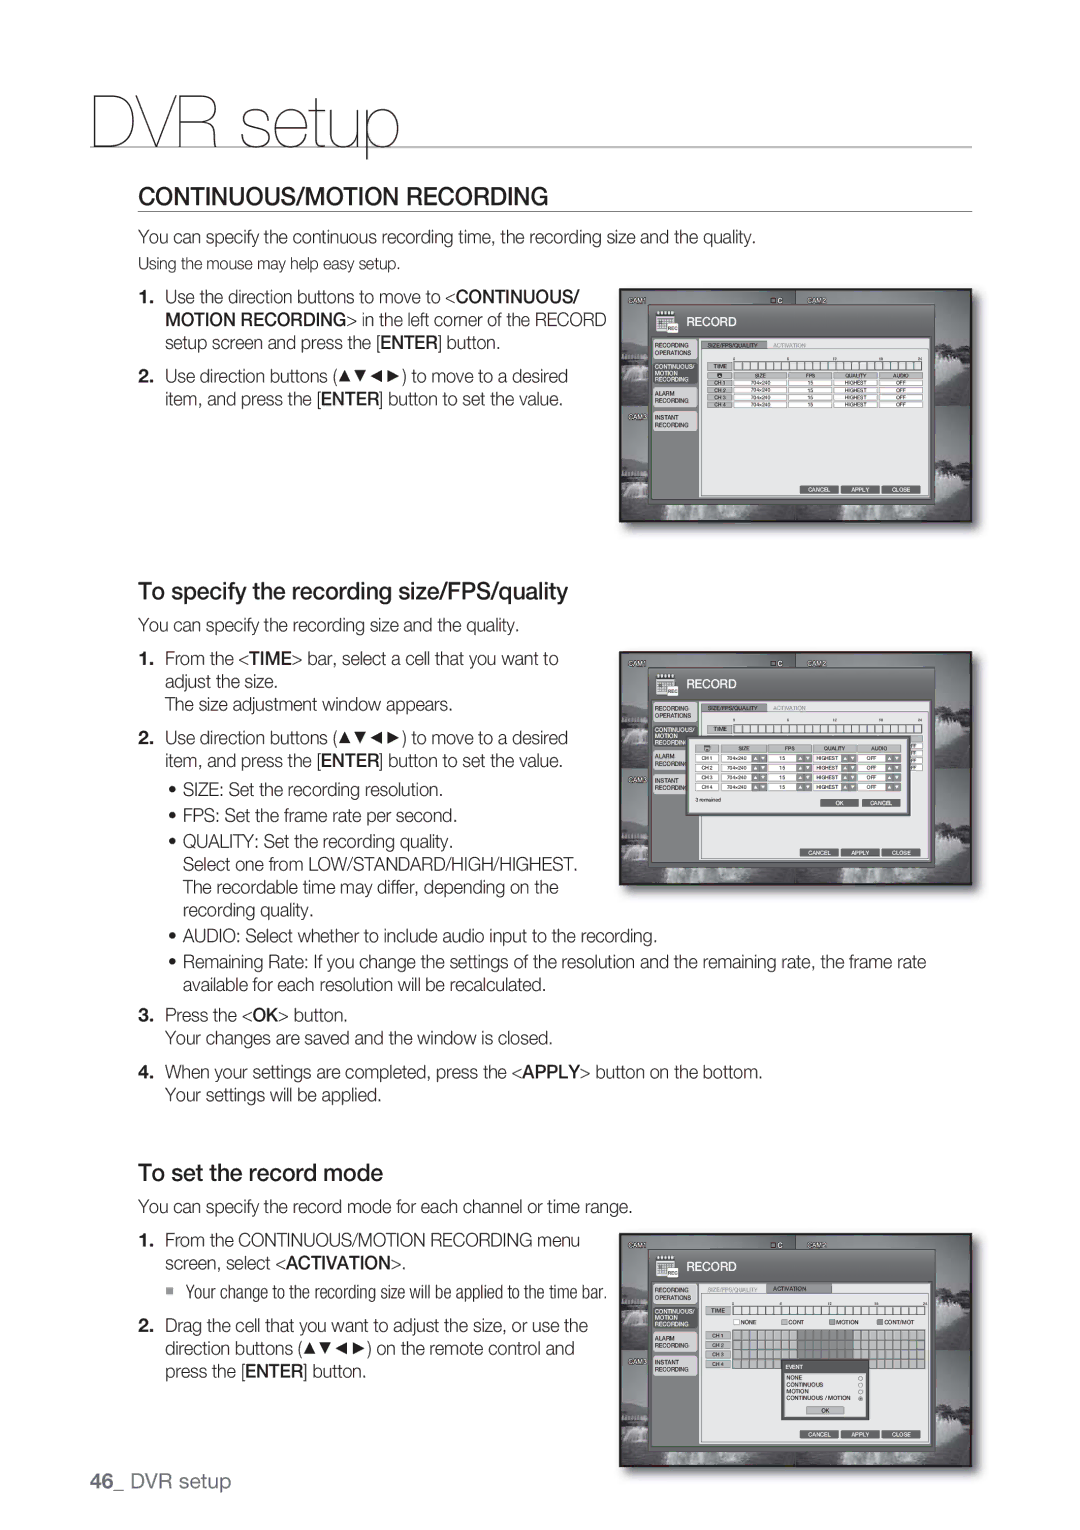
You can specify the continuous recording time, the recording size and the quality.
Using the mouse may help easy setup.
1.Use the direction buttons to move to <CONTINUOUS/ MOTION RECORDING> in the left corner of the RECORD setup screen and press the [ENTER] button.
2.Use direction buttons (▲▼◄►) to move to a desired item, and press the [ENTER] button to set the value.
RECORD |
|
|
|
|
| |
RECORDING | SIZE/FPS/QUALITY | ACTIVATION |
|
|
| |
OPERATIONS | 0 |
| 6 | 12 | 18 | 24 |
CONTINUOUS/ | TIME | SIZE | FPS | QUALITY |
| AUDIO |
MOTION | CH 1 |
| ||||
RECORDING | 704×240 | 15 | HIGHEST |
| OFF | |
ALARM | CH 2 | 704×240 | 15 | HIGHEST |
| OFF |
CH 3 | 704×240 | 15 | HIGHEST |
| OFF | |
RECORDING | CH 4 | 704×240 | 15 | HIGHEST |
| OFF |
INSTANT |
|
|
|
|
|
|
RECORDING |
|
|
|
|
|
|
|
|
| CANCEL | APPLY |
| CLOSE |
To specify the recording size/FPS/quality
You can specify the recording size and the quality.
1.From the <TIME> bar, select a cell that you want to adjust the size.
The size adjustment window appears.
2.Use direction buttons (▲▼◄►) to move to a desired item, and press the [ENTER] button to set the value.
•SIZE: Set the recording resolution.
•FPS: Set the frame rate per second.
•QUALITY: Set the recording quality.
Select one from LOW/STANDARD/HIGH/HIGHEST. The recordable time may differ, depending on the recording quality.
RECORD
RECORDING |
| SIZE/FPS/QUALITY | ACTIVATION |
OPERATIONS
0 | 6 | 12 | 18 | 24 |
CONTINUOUS/ |
| TIME |
|
|
|
|
MOTION |
|
|
|
|
|
|
RECORDING |
| SIZE | FPS | QUALITY | AUDIO | OFF |
ALARM | CH 1 | 704×240 | 15 | HIGHEST | OFF | OFF |
OFF | ||||||
RECORDING | CH 2 | 704×240 | 15 | HIGHEST | OFF | OFF |
INSTANT | CH 3 | 704×240 | 15 | HIGHEST | OFF |
|
RECORDING | CH 4 | 704×240 | 15 | HIGHEST | OFF |
|
3 remained
OKCANCEL
CANCEL APPLY CLOSE
•AUDIO: Select whether to include audio input to the recording.
•Remaining Rate: If you change the settings of the resolution and the remaining rate, the frame rate available for each resolution will be recalculated.
3.Press the <OK> button.
Your changes are saved and the window is closed.
4.When your settings are completed, press the <APPLY> button on the bottom. Your settings will be applied.
To set the record mode
You can specify the record mode for each channel or time range.
1.From the CONTINUOUS/MOTION RECORDING menu screen, select <ACTIVATION>.
Your change to the recording size will be applied to the time bar.
2.Drag the cell that you want to adjust the size, or use the direction buttons (▲▼◄►) on the remote control and press the [ENTER] button.
RECORD |
|
|
|
| |
RECORDING | SIZE/FPS/QUALITY | ACTIVATION |
|
| |
OPERATIONS | 0 | 6 | 12 | 18 | 24 |
CONTINUOUS/ | TIME |
|
|
|
|
MOTION | NONE |
| CONT | MOTION | CONT/MOT |
RECORDING |
| ||||
ALARM | CH 1 |
|
|
|
|
RECORDING | CH 2 |
|
|
|
|
INSTANT | CH 3 |
|
|
|
|
CH 4 |
| EVENT |
|
| |
RECORDING |
|
|
|
| |
|
|
| NONE |
|
|
|
|
| CONTINUOUS |
|
|
|
|
| MOTION |
|
|
|
|
| CONTINUOUS / MOTION |
| |
|
|
| OK |
|
|
|
|
| CANCEL | APPLY | CLOSE |
46_ DVR setup