Preparation (Continued)
First Installation
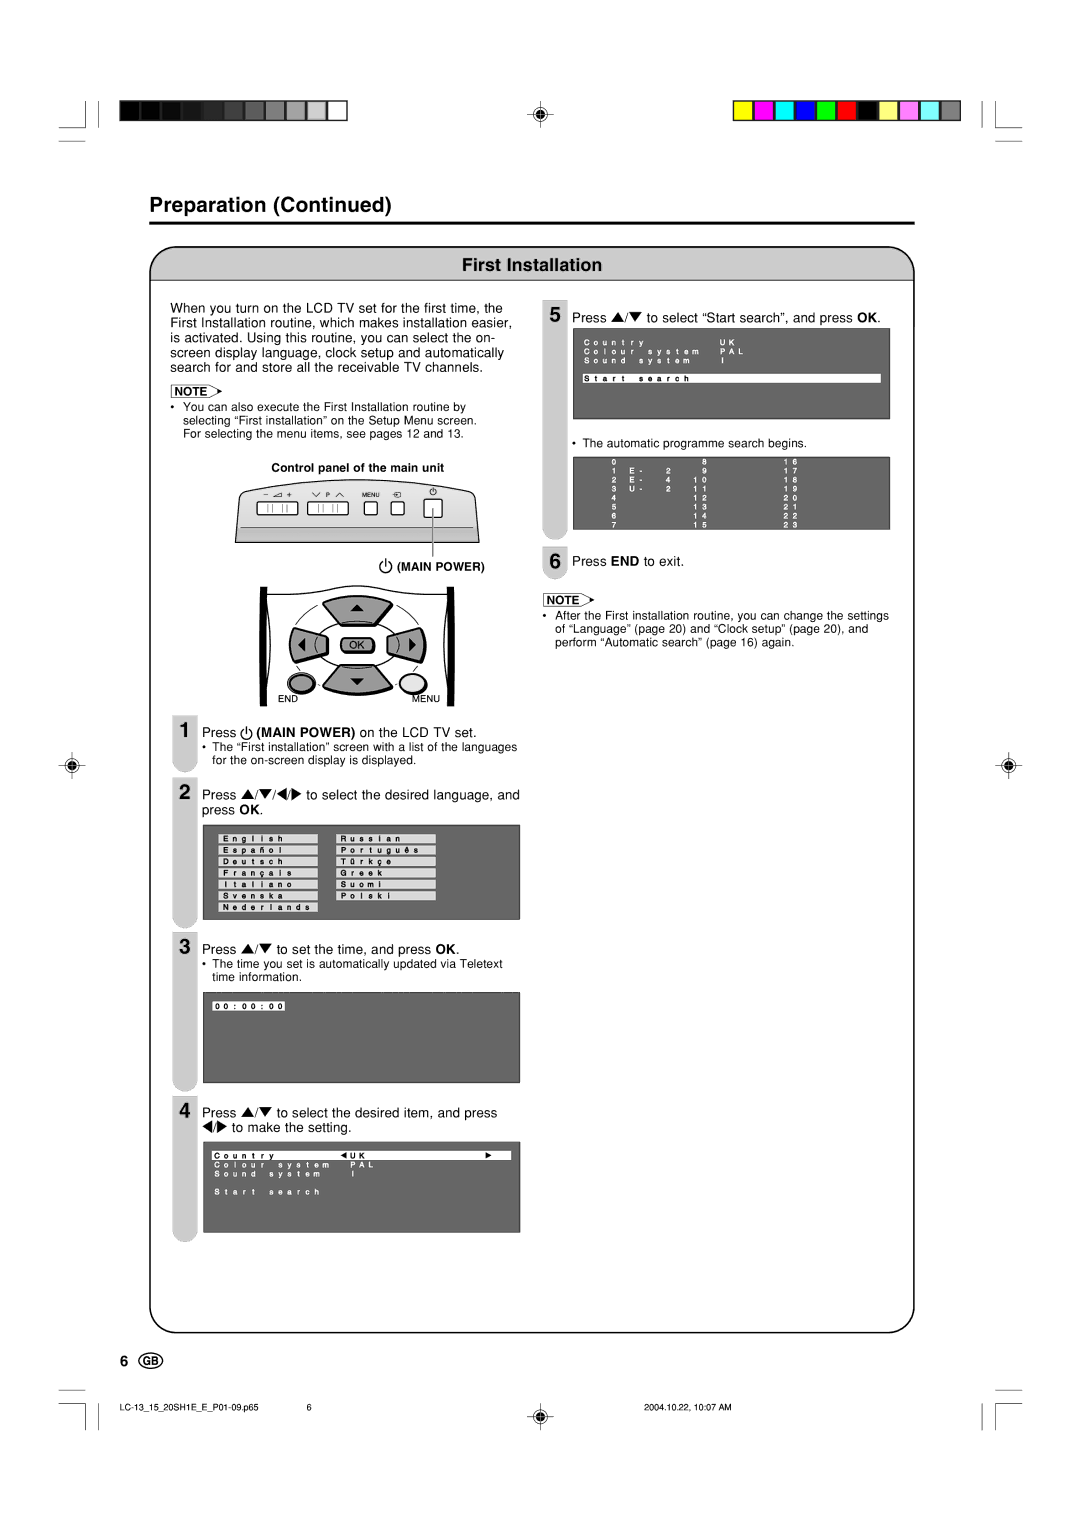
When you turn on the LCD TV set for the first time, the | 5 | Press '/" to select “Start search”, and press OK. | ||||||
First Installation routine, which makes installation easier, | ||||||||
|
|
|
|
|
|
| ||
is activated. Using this routine, you can select the on- |
|
|
| C o u n t r y | U K |
| ||
screen display language, clock setup and automatically |
|
|
| C o l o u r s y s t e m | P A L |
| ||
|
|
|
|
| ||||
search for and store all the receivable TV channels. |
|
|
| S o u n d s y s t e m | I |
| ||
|
|
|
|
|
|
| ||
NOTE |
|
|
| S t a r t s e a r c h |
|
|
| |
|
|
|
|
|
|
| ||
• You can also execute the First Installation routine by |
|
|
|
|
|
|
| |
selecting “First installation” on the Setup Menu screen. |
|
|
|
|
|
|
| |
|
|
|
|
|
|
| ||
For selecting the menu items, see pages 12 and 13. |
| • The automatic programme search begins. | ||||||
|
| |||||||
Control panel of the main unit
0 |
|
| 8 | 1 6 |
1 | E - | 2 | 9 | 1 7 |
2 | E - | 4 | 1 0 | 1 8 |
3 | U - | 2 | 1 1 | 1 9 |
4 |
|
| 1 2 | 2 0 |
5 |
|
| 1 3 | 2 1 |
6 |
|
| 1 4 | 2 2 |
7 |
|
| 1 5 | 2 3 |
(MAIN POWER) | 6 Press END to exit. |
NOTE
• After the First installation routine, you can change the settings of “Language” (page 20) and “Clock setup” (page 20), and perform “Automatic search” (page 16) again.
1 Press  (MAIN POWER) on the LCD TV set.
•The “First installation” screen with a list of the languages for the
2 Press '/"/\/to select the desired language, and press OK.
E n g l i s h E s p a ñ o l D e u t s c h F r a n ç a i s I t a l i a n o S v e n s k a
N e d e r l a n d s
R u s s i a n
P o r t u g u ê s T ü r k ç e
G r e e k
S u o m i
P o l s k i
3 Press '/" to set the time, and press OK.
•The time you set is automatically updated via Teletext time information.
0 0 : 0 0 : 0 0
4 Press '/" to select the desired item, and press \/to make the setting.
|
|
|
|
|
| C o u n t r y | U K |
| |
| C o l o u r s y s t e m | P A L | ||
| S o u n d | s y s t e m | I | |
| S t a r t | s e a r c h |
|
|
|
|
|
|
|
6
6 | 2004.10.22, 10:07 AM |
