Useful adjustment settings
HDMI Setup | NOTE |
HDMI
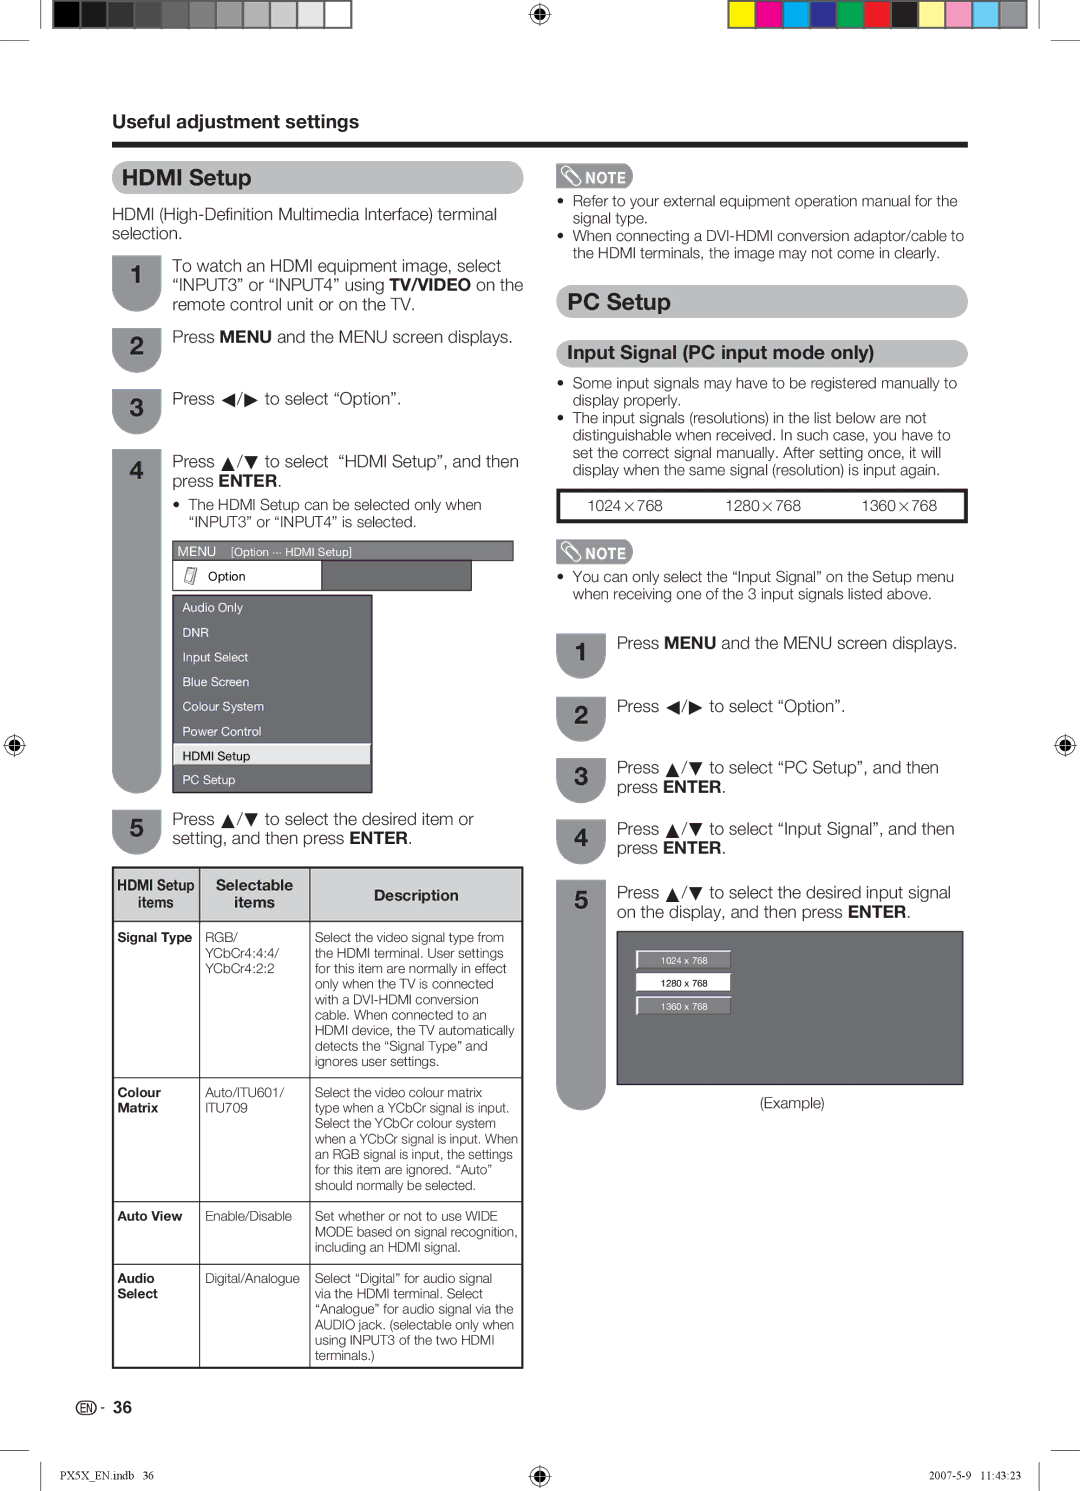
1To watch an HDMI equipment image, select “INPUT3” or “INPUT4” using TV/VIDEO on the remote control unit or on the TV.
2Press MENU and the MENU screen displays.
3Press c/d to select “Option”.
4Press a/b to select “HDMI Setup”, and then press ENTER.
•The HDMI Setup can be selected only when “INPUT3” or “INPUT4” is selected.
MENU [Option ... HDMI Setup]
Option |
Audio Only
DNR
Input Select
Blue Screen
Colour System
Power Control
HDMI Setup
PC Setup
5Press a/b to select the desired item or setting, and then press ENTER.
HDMI Setup | Selectable | Description | |
items | items | ||
| |||
|
|
| |
Signal Type | RGB/ | Select the video signal type from | |
| YCbCr4:4:4/ | the HDMI terminal. User settings | |
| YCbCr4:2:2 | for this item are normally in effect | |
|
| only when the TV is connected | |
|
| with a | |
|
| cable. When connected to an | |
|
| HDMI device, the TV automatically | |
|
| detects the “Signal Type” and | |
|
| ignores user settings. | |
|
|
| |
Colour | Auto/ITU601/ | Select the video colour matrix | |
Matrix | ITU709 | type when a YCbCr signal is input. | |
|
| Select the YCbCr colour system | |
|
| when a YCbCr signal is input. When | |
|
| an RGB signal is input, the settings | |
|
| for this item are ignored. “Auto” | |
|
| should normally be selected. | |
|
|
| |
Auto View | Enable/Disable | Set whether or not to use WIDE | |
|
| MODE based on signal recognition, | |
|
| including an HDMI signal. | |
|
|
| |
Audio | Digital/Analogue | Select “Digital” for audio signal | |
Select |
| via the HDMI terminal. Select | |
|
| “Analogue” for audio signal via the | |
|
| AUDIO jack. (selectable only when | |
|
| using INPUT3 of the two HDMI | |
|
| terminals.) | |
|
|
|
•Refer to your external equipment operation manual for the signal type.
•When connecting a
PC Setup
Input Signal (PC input mode only)
•Some input signals may have to be registered manually to display properly.
•The input signals (resolutions) in the list below are not distinguishable when received. In such case, you have to set the correct signal manually. After setting once, it will display when the same signal (resolution) is input again.
1024g768 1280g768 1360g768
![]() NOTE
NOTE
•You can only select the “Input Signal” on the Setup menu when receiving one of the 3 input signals listed above.
1Press MENU and the MENU screen displays.
2Press c/d to select “Option”.
3Press a/b to select “PC Setup”, and then press ENTER.
4Press a/b to select “Input Signal”, and then press ENTER.
5Press a/b to select the desired input signal on the display, and then press ENTER.
1024 x 768
1280 x 768
1360 x 768
(Example)
![]()
![]() 36
36
PX5X_EN.indb 36
