Product description
12
|
|
|
|
|
|
|
|
|
|
|
|
|
|
|
| 7 | 8 | 9 | 10 | 11 |
|
|
|
|
|
|
|
|
|
|
|
|
|
|
|
| |||||
|
|
|
|
|
|
|
|
|
|
|
|
|
|
|
| |||||
| 6 | 1 |
| 2 |
|
| 3 |
| 4 | 5 |
|
| 6 |
|
|
|
| |||
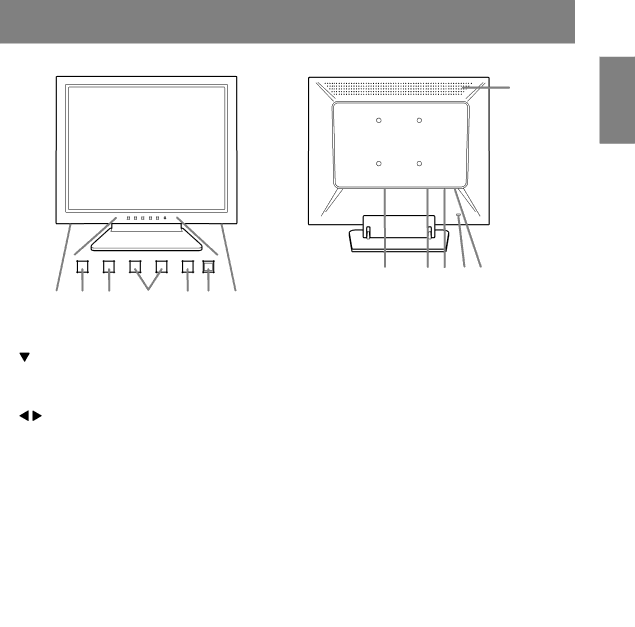
1. | MENU button |
|
|
|
|
| This button is used to | |||||||||||||
|
|
|
|
|
|
|
|
|
| Display) Menu. |
|
|
|
| ||||||
2. | / MODE button |
|
|
| When the OSD Menu is displayed: |
|
|
|
| |||||||||||
|
|
|
|
|
|
|
|
|
|
|
| This button is used to select menu options. |
|
|
| |||||
|
|
|
|
|
|
|
|
|
| When the OSD Menu is not displayed: |
|
|
|
| ||||||
|
|
|
|
|
|
|
|
|
|
|
| This button is used to set DISPLAY MODE. |
|
|
| |||||
3. | buttons |
|
|
|
|
|
| When the OSD Menu is displayed: |
|
|
|
| ||||||||
|
|
|
|
|
|
|
|
|
|
|
| These buttons are used to select an option or adjust the value of the | ||||||||
|
|
|
|
|
|
|
|
|
|
|
| selected option. |
|
|
|
| ||||
|
|
|
|
|
|
|
|
|
| When the OSD Menu is not displayed: |
|
|
|
| ||||||
|
|
|
|
|
|
|
|
|
|
|
| These buttons are used to adjust backlight brightness and speaker | ||||||||
|
|
|
|
|
|
|
|
|
|
|
| volume. |
|
|
|
| ||||
4. | Power button |
|
|
|
|
|
| Pressing this button turns the power on. (After turning the power on, it | ||||||||||||
|
|
|
|
|
|
|
|
|
| may take a little time before an image appears on the screen.) | ||||||||||
|
|
|
|
|
|
|
|
|
| Press the button again to turn the power off. |
|
|
| |||||||
5. | Power LED | ............................... |
|
|
|
|
|
|
| This LED is lit green when in use and orange when in | ||||||||||
|
|
|
|
|
|
|
|
|
| mode. |
|
|
|
|
| |||||
6. | Speakers |
|
|
|
|
|
|
|
| Audio entering via the external device connected to the monitor can be | ||||||||||
|
|
|
|
|
|
|
|
|
| heard. |
|
|
|
|
| |||||
7. | Power terminal |
|
|
|
|
|
|
|
|
|
|
|
|
|
|
|
|
| ||
8. | Analog RGB input terminal | ..... | The analog signal cable is connected here. The analog signal cable | |||||||||||||||||
|
|
|
|
|
|
|
|
|
| included should be used. |
|
|
|
| ||||||
9. | Audio input terminal |
|
|
| A computer's audio output terminal can be connected here. The audio | |||||||||||||||
|
|
|
|
|
|
|
|
|
| cable included should be used. |
|
|
|
| ||||||
10. Security lock anchor |
|
|
| By connecting a security lock (commercially available) to the security | ||||||||||||||||
|
|
|
|
|
|
|
|
|
| lock anchor, the monitor is fixed so that it cannot be transported. | ||||||||||
|
|
|
|
|
|
|
|
|
| The security slot works in conjunction with Kensington Micro Saver | ||||||||||
|
|
|
|
|
|
|
|
|
| Security Systems. |
|
|
|
| ||||||
11. Headphone terminal |
|
|
| Headphones (commercially available) can be connected here. | ||||||||||||||||
12. Ventilation openings |
|
|
| Note: Never block the ventilation openings as this may lead to | ||||||||||||||||
|
|
|
|
|
|
|
|
|
| overheating inside the monitor and result in malfunction. | ||||||||||
English
9
