THREAD TENSION
Having selected the correct needle and thread combination for the fabric being used, it may be necessary to adjust the tension of the sewing machine to ensure a well balanced stitch.
A
Your machine has an adjustable top tension dial. This control exerts tension on the top and under thread as they pass through the machine to form a stitch.
Too much tension will produce a tight stitch which will cause puckered seams. Too little tension will produce a loose stitch.
When an even amount of tension is exerted on both threads, a smooth even stitch, known as a
Notice the machine tension dial is marked from 1 through 9, and that the settings of 3, 4 and 5 are further distinguished by a small square. The settings of 3, 4 and 5 represent the general range at which most of your sewing will be done.
How Does Tension Work?
To help understand the effect of tension on fabric and thread, try this simple test. Take 2 pieces of a medium weight woven fabric in a solid, light color about 6” long. Place a 2020 size 14 needle in the machine.
Thread the top of the machine with an
Set the machine for Stitch #3, one of the Straight Stitch selections.
Seam the two pieces of fabric together starting with the top tension control at 1. As you continue to sew, slowly turn the tension dial from 1 through 9.
Sew another row, turning the dial back to 1. You should see a balanced stitch on each row about midway between the start and finish.
The different colored threads will help you see the effect that tension has on the top and bottom threads.
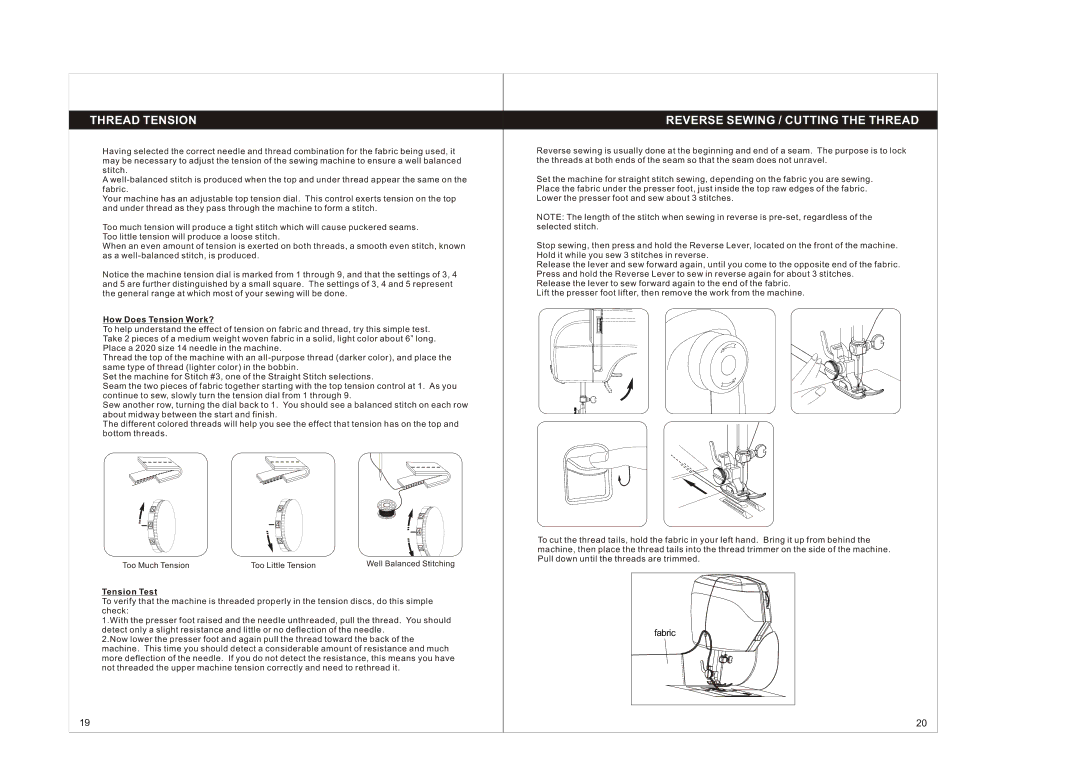
Too Much Tension | Too Little Tension | Well Balanced Stitching |
Tension Test
To verify that the machine is threaded properly in the tension discs, do this simple check:
1.With the presser foot raised and the needle unthreaded, pull the thread. You should detect only a slight resistance and little or no deflection of the needle.
2.Now lower the presser foot and again pull the thread toward the back of the machine. This time you should detect a considerable amount of resistance and much more deflection of the needle. If you do not detect the resistance, this means you have not threaded the upper machine tension correctly and need to rethread it.
REVERSE SEWING / CUTTING THE THREAD
Reverse sewing is usually done at the beginning and end of a seam. The purpose is to lock the threads at both ends of the seam so that the seam does not unravel.
Set the machine for straight stitch sewing, depending on the fabric you are sewing. Place the fabric under the presser foot, just inside the top raw edges of the fabric. Lower the presser foot and sew about 3 stitches.
NOTE: The length of the stitch when sewing in reverse is
Stop sewing, then press and hold the Reverse Lever, located on the front of the machine. Hold it while you sew 3 stitches in reverse.
Release the lever and sew forward again, until you come to the opposite end of the fabric. Press and hold the Reverse Lever to sew in reverse again for about 3 stitches.
Release the lever to sew forward again to the end of the fabric. Lift the presser foot lifter, then remove the work from the machine.
To cut the thread tails, hold the fabric in your left hand. Bring it up from behind the machine, then place the thread tails into the thread trimmer on the side of the machine. Pull down until the threads are trimmed.
fabric |
19 | 20 |