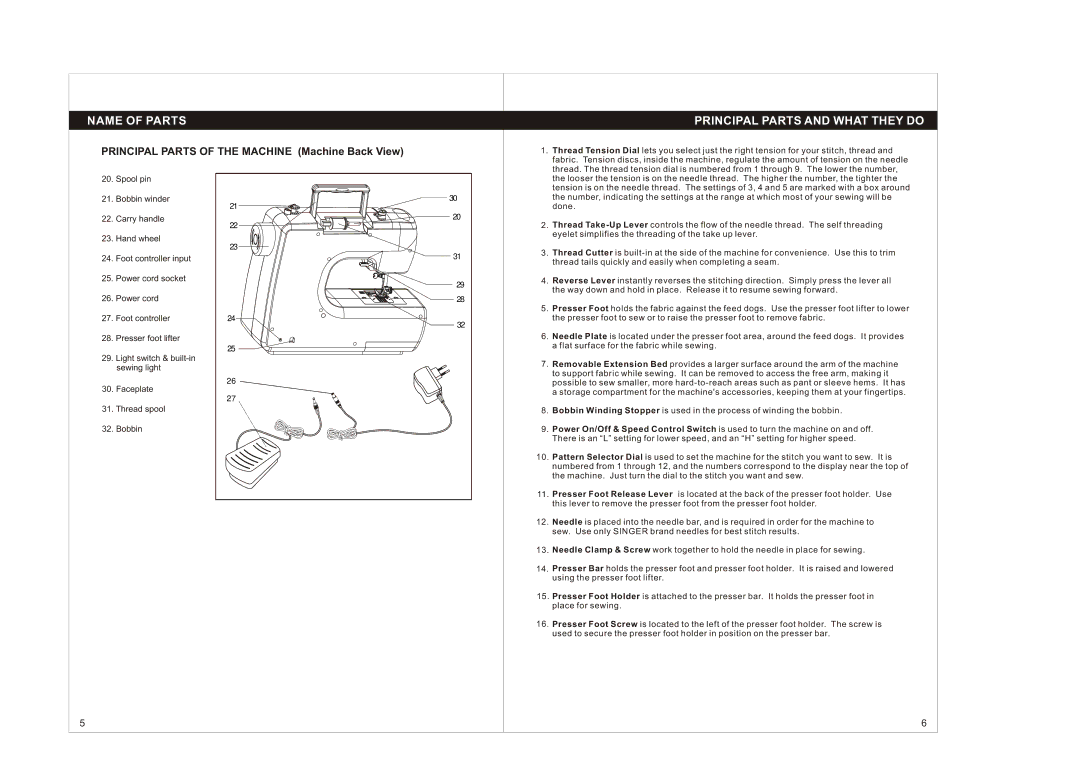
NAME OF PARTS
PRINCIPAL PARTS OF THE MACHINE (Machine Back View)
PRINCIPAL PARTS AND WHAT THEY DO
1. Thread Tension Dial lets you select just the right tension for your stitch, thread and |
fabric. Tension discs, inside the machine, regulate the amount of tension on the needle |
thread. The thread tension dial is numbered from 1 through 9. The lower the number, |
20.Spool pin
21.Bobbin winder
22.Carry handle
23.Hand wheel
24.Foot controller input
25.Power cord socket
26.Power cord
27.Foot controller
28.Presser foot lifter
29.Light switch &
30.Faceplate
31.Thread spool
32.Bobbin
30 |
21 |
20 |
22 |
23 |
31 |
29 |
28 |
24 |
32 |
25 |
26 |
27 |
| the looser the tension is on the needle thread. The higher the number, the tighter the |
| tension is on the needle thread. The settings of 3, 4 and 5 are marked with a box around |
| the number, indicating the settings at the range at which most of your sewing will be |
| done. |
2. | Thread |
| eyelet simplifies the threading of the take up lever. |
3. | Thread Cutter is |
| thread tails quickly and easily when completing a seam. |
4. | Reverse Lever instantly reverses the stitching direction. Simply press the lever all |
| the way down and hold in place. Release it to resume sewing forward. |
5. | Presser Foot holds the fabric against the feed dogs. Use the presser foot lifter to lower |
| the presser foot to sew or to raise the presser foot to remove fabric. |
6. | Needle Plate is located under the presser foot area, around the feed dogs. It provides |
| a flat surface for the fabric while sewing. |
7. | Removable Extension Bed provides a larger surface around the arm of the machine |
| to support fabric while sewing. It can be removed to access the free arm, making it |
| possible to sew smaller, more |
| a storage compartment for the machine's accessories, keeping them at your fingertips. |
8. | Bobbin Winding Stopper is used in the process of winding the bobbin. |
9. | Power On/Off & Speed Control Switch is used to turn the machine on and off. |
| There is an “L” setting for lower speed, and an “H” setting for higher speed. |
10. | Pattern Selector Dial is used to set the machine for the stitch you want to sew. It is |
| numbered from 1 through 12, and the numbers correspond to the display near the top of |
| the machine. Just turn the dial to the stitch you want and sew. |
11. | Presser Foot Release Lever is located at the back of the presser foot holder. Use |
| this lever to remove the presser foot from the presser foot holder. |
12. | Needle is placed into the needle bar, and is required in order for the machine to |
| sew. Use only SINGER brand needles for best stitch results. |
13. | Needle Clamp & Screw work together to hold the needle in place for sewing. |
14. | Presser Bar holds the presser foot and presser foot holder. It is raised and lowered |
| using the presser foot lifter. |
15.Presser Foot Holder is attached to the presser bar. It holds the presser foot in place for sewing.
16.Presser Foot Screw is located to the left of the presser foot holder. The screw is used to secure the presser foot holder in position on the presser bar.
5
6