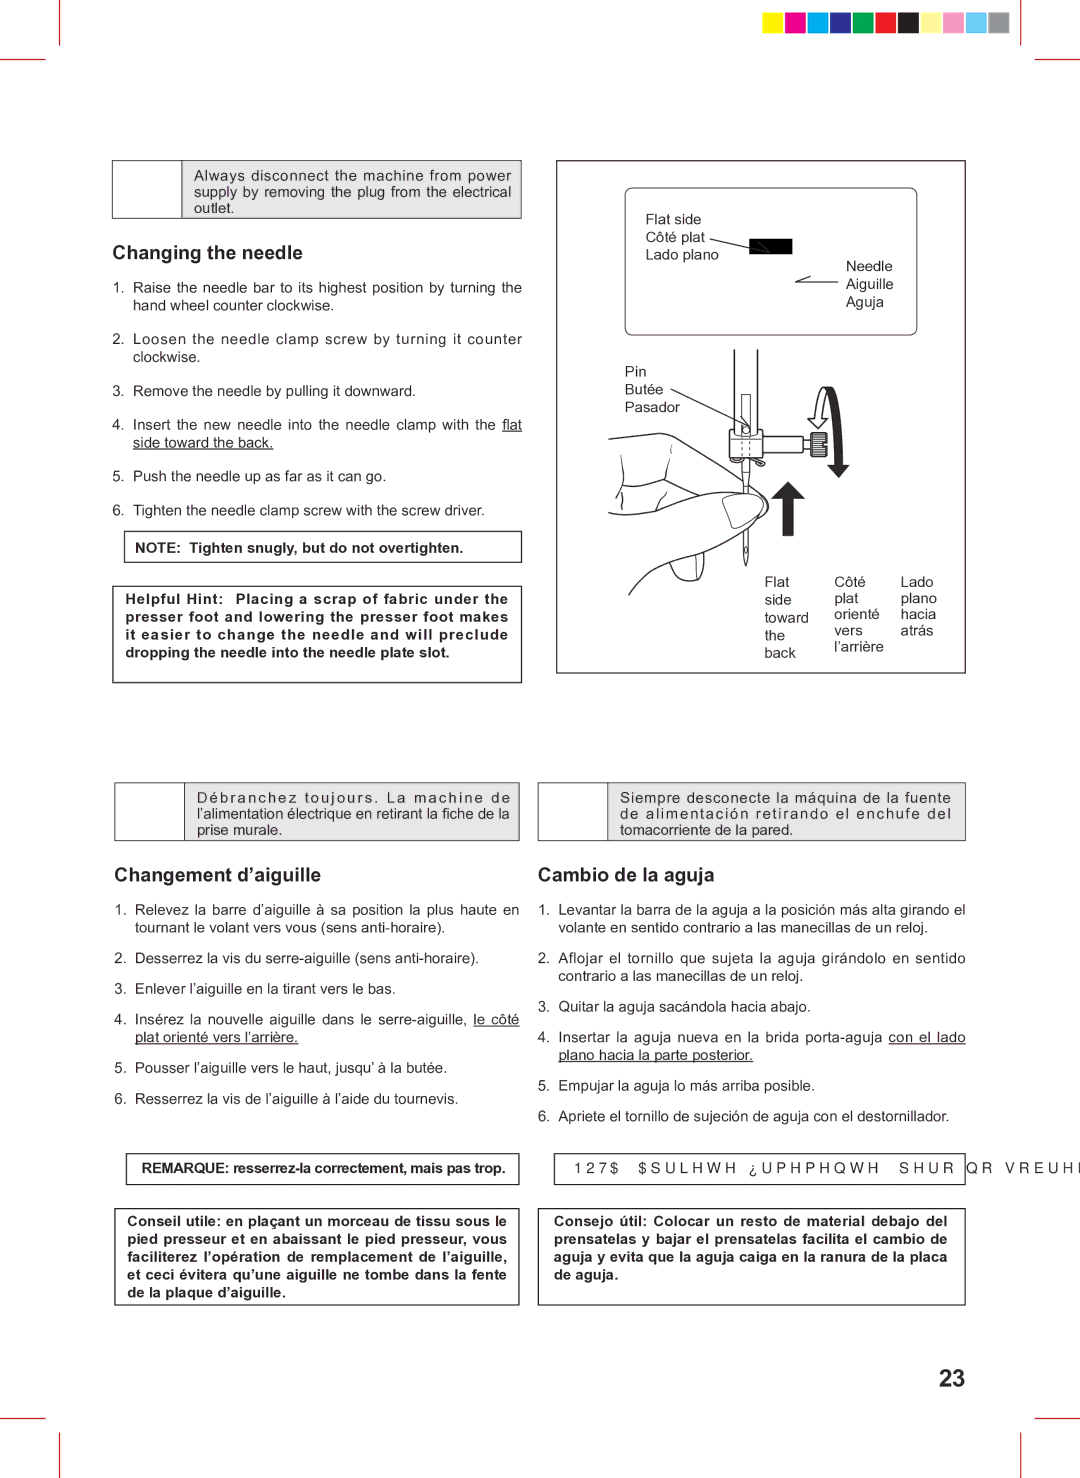
Singer 160 instruction manual Changing the needle

Models: 160

1 60
Download 60 pages 42.04 Kb
Page 25
Image 25

Always disconnect the machine from power supply by removing the plug from the electrical outlet.

Changing the needle

1.Raise the needle bar to its highest position by turning the hand wheel counter clockwise.

2.Loosen the needle clamp screw by turning it counter clockwise.

3.Remove the needle by pulling it downward.

4.Insert the new needle into the needle clamp with the flat side toward the back.

5.Push the needle up as far as it can go.

6.Tighten the needle clamp screw with the screw driver.

NOTE: Tighten snugly, but do not overtighten.

Helpful Hint: Placing a scrap of fabric under the presser foot and lowering the presser foot makes it easier to change the needle and will preclude dropping the needle into the needle plate slot.

Flat side


Côté plat


Lado plano

Needle


Aiguille


Aguja


Pin


Butée


Pasador


Flat

Côté

Lado

side

plat

plano

toward

orienté

hacia

the

vers

atrás

back

l’arrière


D é b r a n c h e z t o u j o u r s . L a m a c h i n e d e l’alimentation électrique en retirant la fiche de la prise murale.

Siempre desconecte la máquina de la fuente de alimentación retirando el enchufe del tomacorriente de la pared.

Changement d’aiguille

1.Relevez la barre d’aiguille à sa position la plus haute en tournant le volant vers vous (sens anti-horaire).

2.Desserrez la vis du serre-aiguille (sens anti-horaire).

3.Enlever l’aiguille en la tirant vers le bas.

4.Insérez la nouvelle aiguille dans le serre-aiguille, le côté plat orienté vers l’arrière.

5.Pousser l’aiguille vers le haut, jusqu’ à la butée.

6.Resserrez la vis de l’aiguille à l’aide du tournevis.

Cambio de la aguja

1.Levantar la barra de la aguja a la posición más alta girando el volante en sentido contrario a las manecillas de un reloj.

2.Aflojar el tornillo que sujeta la aguja girándolo en sentido contrario a las manecillas de un reloj.

3.Quitar la aguja sacándola hacia abajo.

4.Insertar la aguja nueva en la brida porta-aguja con el lado plano hacia la parte posterior.

5.Empujar la aguja lo más arriba posible.

6.Apriete el tornillo de sujeción de aguja con el destornillador.

REMARQUE: resserrez-la correctement, mais pas trop.

Conseil utile: en plaçant un morceau de tissu sous le pied presseur et en abaissant le pied presseur, vous faciliterez l’opération de remplacement de l’aiguille, et ceci évitera qu’une aiguille ne tombe dans la fente de la plaque d’aiguille.

NOTA: Apriete firmemente, pero no sobreapriete.

Consejo útil: Colocar un resto de material debajo del prensatelas y bajar el prensatelas facilita el cambio de aguja y evita que la aguja caiga en la ranura de la placa de aguja.

23

Page 25
Image 25
Singer 160 instruction manual Changing the needle

160 specifications

The Singer 160 is a remarkable sewing machine that pays homage to the rich legacy of Singer sewing as it celebrates its 160th anniversary. This versatile sewing machine combines traditional craftsmanship with modern technology, making it an ideal choice for both beginners and experienced sewers.

One of the standout features of the Singer 160 is its robust metal frame, which ensures durability and stability during operation. This substantial construction minimizes vibrations, allowing for precise stitching even at high speeds. The machine boasts a powerful motor that delivers a maximum sewing speed of 750 stitches per minute, making it capable of handling various sewing projects efficiently.

The Singer 160 comes equipped with 23 built-in stitches, including essential utility stitches, decorative stitches, and an automatic 1-step buttonhole function. This wide array of stitch options provides sewers with the creative freedom to tackle projects ranging from simple repairs to intricate designs. The stitch selection is easy to navigate, thanks to a user-friendly dial positioned on the front of the machine.

Another notable characteristic of the Singer 160 is its adjustable stitch length and width, which allows users to customize their stitches based on project requirements. This feature is particularly useful for creating professional-looking hems or intricate appliqués. Additionally, the machine includes a drop-in bobbin system that simplifies threading and makes it easy to monitor thread supply.

The Singer 160 also incorporates modern technological advancements that enhance user experience. One of these is the automatic needle threader, which saves considerable time and frustration, especially for those new to sewing. The machine is also equipped with an LED sewing light that illuminates the sewing area, providing better visibility for detailed projects.

For convenience, the Singer 160 comes with a variety of presser feet to facilitate different sewing tasks. These include the all-purpose foot, zipper foot, buttonhole foot, and more, allowing users to tackle an extensive range of sewing applications with ease. Moreover, the machine's compact and lightweight design makes it easily portable, ideal for quilters or sewers who attend classes or workshops.

In summary, the Singer 160 celebrates sewing tradition while integrating modern features that cater to today’s sewing enthusiasts. Its durability, range of built-in stitches, ease of use, and additional features make it a standout choice in the sewing machine market. Whether you are mending clothes, creating home décor, or embarking on more complex sewing projects, the Singer 160 provides the reliability and performance needed to bring your creative visions to life.