Operating Instructions DAV-HDX589W /HDX686W
DVD Home Theatre System
About the surround amplifier
Precautions
For the customers in the U.S.A
For the wireless transceiver EZW-RT10/EZW-RT10A
Important Safety Instructions
For the wireless transceiver EZW-RT10/EZW-RT10A
Notice for the customers in Canada
Copyrights
About These Operating Instructions
About the S-AIRfunction
Step 1: Installing the System
Table of Contents
Step 2: Connecting the System
Step 3: Setting up the Wireless
Playable Discs
Note about CD-R/CD-RW/DVD-R/DVD-RW/DVD+R/DVD+RW
Example of discs that the system cannot play
About Multi Session CD
Notes on discs
Region code
Getting Started
Unpacking
10US
Getting Started
DAV-HDX686W
11US
Getting Started
Getting Started
12US
Inserting batteries into the remote
Positioning the system
Step 1: Installing the System
Getting Started
Getting Started
14US
Attaching the foot pads to the subwoofer
Remove the foot pads from the protective cover
15US
Assembling the speakers
Getting Started
Getting Started
16US
A B C D
Getting Started
17US
Getting Started
18US
4 Connect the speaker cords to the speaker
5 Attach the post to the base
Fully-assembledillustration DAV-HDX589W
Adjust the length of the cord
Getting Started
6 Take up any speaker cord slack
Getting Started
20US
DAV-HDX686W
21US
Installing the speakers on a wall
Getting Started
DAV-HDX686W
DAV-HDX589W
2 Fasten the screws to the wall
Getting Started
3 Hang the speakers on the screws
Getting Started
5 mm 7/32 inch 10 mm 13/32 inch
Rear of the speaker
Connecting the speakers
Step 2: Connecting the System
Getting Started
To connect speaker cords to the unit
To connect speaker cords to the speaker
Rear of the speaker Connector–
Getting
Started
26US
Connecting the TV Video connection
Started
Getting
27US
Connecting the TV Audio connection
Getting
Started
28US
Connecting the other components
Getting Started
If your TV has multiple audio/video inputs
29US
Getting Started
30US
Connecting the antenna aerial
Getting Started
To assemble the AM loop antenna aerial
31US
Inserting the wireless transceiver
Getting Started
About the demonstration
Connecting the AC power cords mains leads
Setting the demonstration mode to on/off
4 Press X/x to select a setting
Getting Started
33US
1 2 3
Step 3: Setting up the Wireless System
To enjoy sound by using headphones
When you use multiple S-AIRproducts
To attach the cover to the surround amplifier
Step 4 Performing the Quick Setup
Getting Started
4 Press without inserting a disc
36US
7 Press X/x to select the setting, then press
Getting Started
5 Press X/x to select a language, then press
To recall the Quick Setup display
To quit the Quick Setup
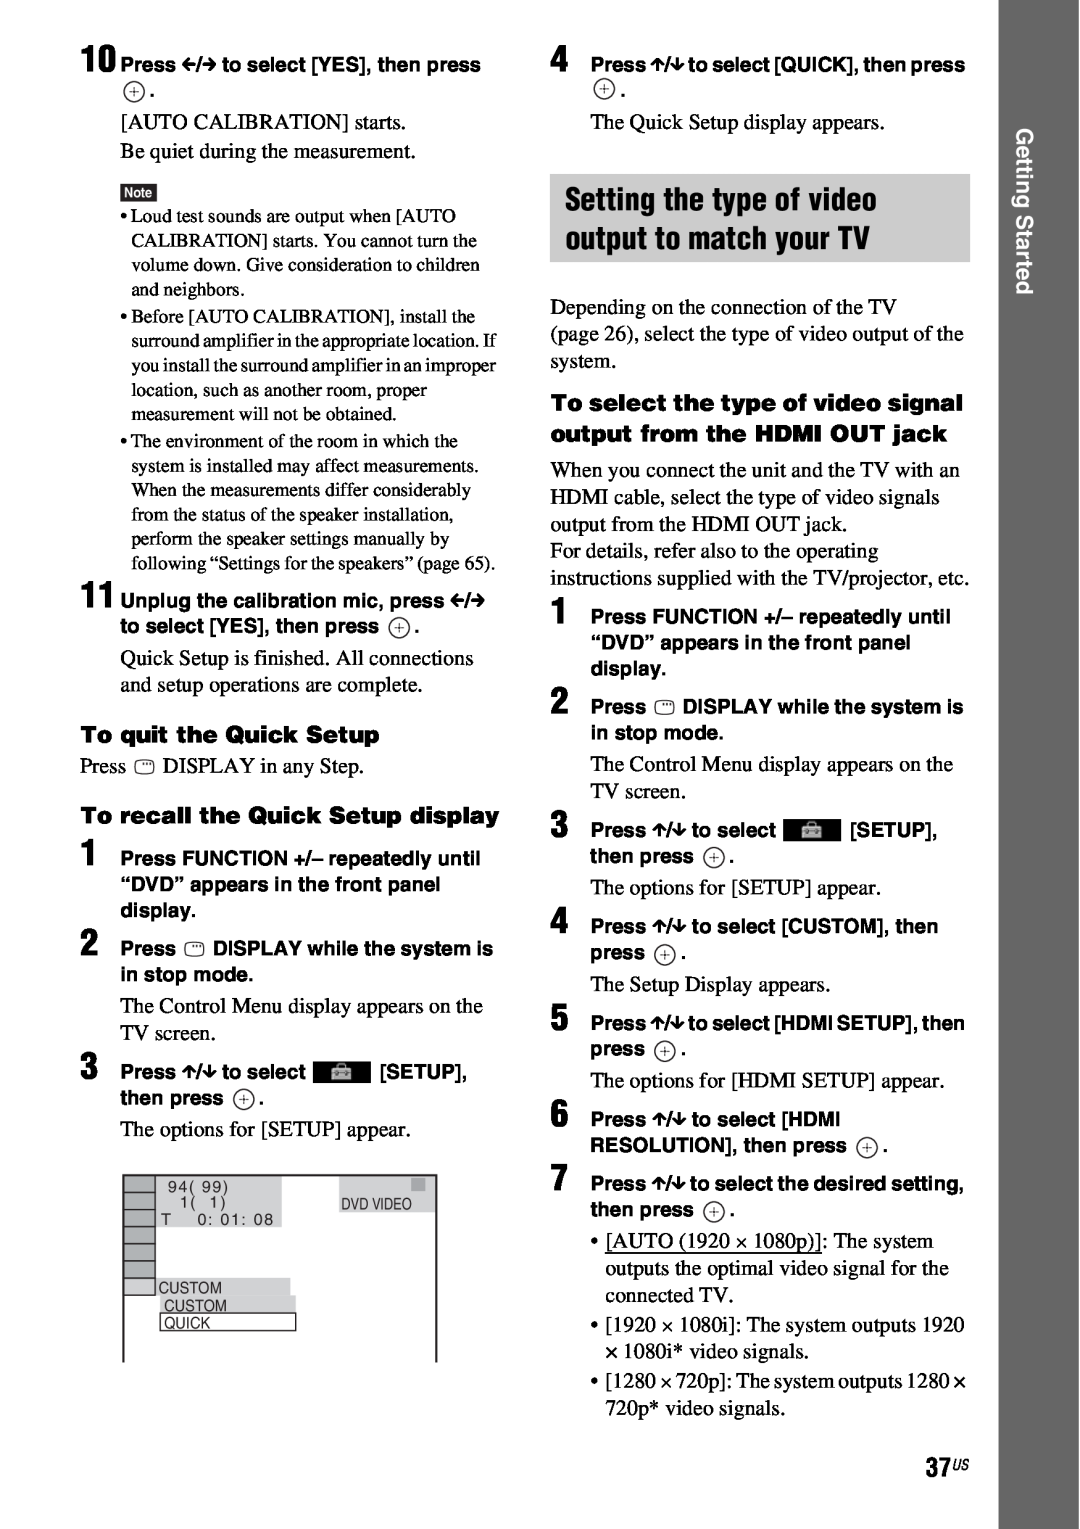
3 Press X/x to select SETUP, then press
Getting Started
Press C/c to select START, then press
Getting Started
Press C/c to select YES, then press
39US
Step 5: Selecting the Source
Getting Started
Getting Started
Step 6 Enjoying Surround Sound
1 Press SYSTEM MENU
or c
About speaker output
41US
Getting Started
4 Press
Getting Started
42US
To turn the surround effect off
“HP VIRTUAL”
Disc
Playing a Disc
Adjust the volume by using VOLUME +
– on the remote or the VOLUME control
To use the headphones
To save power in standby mode
44US
To turn the system off
Changing the sound
Displaying multi-anglesand subtitles
3 Press X/x to select a setting
To change the angles
Selecting a playback area for a Super Audio CD
Checking the audio signal format
Example
Example
xWhen the current layer is the CD layer
Playing a VIDEO CD with PBC functions Ver.
Disc
1 Press DISPLAY while the system is in stop mode
1 While playing a disc, press x to stop playback
48US
2 Press H
Multi-discResume
Creating your own program
Using Play Mode
To change or cancel a program
To return to normal play
Playing repeatedly
Playing in random order
To return to normal play
To turn off the Control Menu display
Using the DVD’s menu
Searching/Selecting Disc Contents
To return to normal play
To turn off the Control Menu display
3 Press X/x to select a setting
To search for a scene using the time code
3 Input the time code using the number buttons
1 Press DISPLAY while the system is in stop mode
Selecting an MP3 file or folder
Playing MP3 Files/JPEG Image Files
Disc
4 Press
Selecting a JPEG image file or folder
4 5 6
MENU. When other than PHOTO is
To play the next or previous MP3 file
To play the next or previous JPEG image file
Playing a slide show with sound
To rotate a JPEG image file
To stop playback
Selecting playback priority of the file type
Displaying a list of MP3 files/ JPEG image files
Adjusting the Delay Between the Picture and Sound
5 Press X/x to select a setting
3 Press X/x to select a setting
3 Press X/x to select SETUP, then press
Restricting Playback of the Disc
5 Press X/x to select SYSTEM SETUP, then press
xIf you have not entered a password
If you make a mistake entering your password
Changing the password
3 Press X/x to select SETUP, then press
5 Press X/x to select SYSTEM SETUP, then press
To reset all of the SETUP settings
Setting the display or sound track language
3 Press X/x to select SETUP, then press
5 Press X/x to select the setup item, then press
VIDEO SETUP
Settings for the display
Disc
xOSD On-ScreenDisplay
HDMI SETUP
Settings for HDMI
xHDMI RESOLUTION
3 Press C/c to select YES, then press
xJPEG RESOLUTION
xVOLUME LIMIT
Disc
xCONTROL FOR HDMI
Other Settings
Settings for the audio
AUDIO SETUP
SYSTEM SETUP
xRESET
Settings for the speakers
SPEAKER SETUP
Disc
xDISTANCE SURROUND
TONE to OFF after adjusting the speaker level
xLEVEL FRONT
xLEVEL SURROUND
Tuner
Presetting Radio Stations
To change the preset number
6 Press X/x to select the preset number you want
Listening to the Radio
Naming preset stations
To listen to non-presetradio stations
3 Adjust the volume by pressing VOLUME +/–
Tuner
If you make a mistake
7 Press
8 Press SYSTEM MENU
Control for HDMI/External Audio Device
Preparing the Control for HDMI function
Control for HDMI - Easy Setting
To set the CONTROL FOR HDMI function to on/off
Watching a DVD by a single button press
Using the Theater Mode
Turning the system off in sync with the TV
3 Press X/x to select SETUP, then press
Setting the Maximum Volume Level of the System
Using the DIGITAL MEDIA PORT Adapter
Volume Limit
Language Follow
73US
Using an S-AIRProduct
About S-AIRproducts
Control for HDMI/External Audio Device
3 Press POWER on the surround amplifier
ID setting
To set the ID of the unit
To set the ID of the surround amplifier
3 Press X/x to select the desired setting
Enjoying the system’s sound in another room
xWhen “PARTY” is set
xWhen “SEPARATE” is set
3 Press X/x to select the desired setting
To perform pairing
xBefore pairing
xAfter pairing
If sound transmission is unstable
3 4 5 6 7
To cancel pairing
Start pairing of the S-AIRsub unit
1 2 3 4
Changing the RF output power
Only when using the EZW-RT10Awireless transceiver
Press X/x to select the desired setting
7 8 9
Getting Optimal Surround Sound for a Room
Other Operations
3 Press X/x to select SETUP, then press
Automatically
Calibrating the Appropriate Settings
3 Press X/x to select SETUP, then press
5 Press X/x to select AUDIO SETUP, then press
81US
Controlling the TV with the Supplied Remote
Other Operations
xThe measurement is not OK
Enjoying the sound at low volume
Using the Sound Effect
Reinforcing bass frequencies
Enhancing compressed sound
Enjoying Multiplex Broadcast Sound
Selecting the Effect to Suit the Source
DUAL MONO
Other Operations
To cancel the sleep timer function
Using the Sleep Timer
To set the sleep timer using the system menu
4 Press X/x to select a setting
Viewing Information About the Disc
of the Front Panel Display
Changing the Brightness
Other
To check DVD/Super Audio CD/CD text
Checking the play information of the disc
To check DATA CD/DATA DVD MP3 file text
1 Press DISPLAY during playback
Returning the SETUP settings to the default
Returning to the Default Settings
3 Press X/x to select SETUP, then press
Other Operations
6 Press X/x to select RESET and press c
5 Press X/x to select SYSTEM SETUP, then press
88US
7 Press C/c to select YES
Additional Information
Precautions
On power sources
On placement
On cleaning
Notes about the Discs
90US
About S-AIRfunction
Power
Troubleshooting
91US
Additional Information
Picture
92US
Sound
93US
Additional Information
Operation
94US
Additional Information
95US
The S-AIRfunction
96US
Surround amplifier operation
97US
Additional Information
When letters/numbers appear in the display
Self-diagnosisFunction
When the version number appears on the TV screen
98US
AUDIO POWER SPECIFICATIONS for the U.S. model
Specifications
Additional Information
Amplifier Section
Center SS-CT91
Speakers Front SS-TS95
Surround
DAV-HDX589W SS-TS92
Wireless transceiver EZW-RT10/EZW
Glossary
Additional Information
RT10A
Dolby Surround Pro Logic
xMusic mode
HDMI High-DefinitionMultimedia Interface
Interlace format Interlaced scanning
Additional Information
103US
104US
Playback priority of file types
Additional Information
Language Code List
Code Language
Code Language
Front panel
Index to Parts and Control
B DISC 1-5buttons/indicators
E MOVIE/MUSIC indicator
Additional Information
Rear panel
ASPEAKER jacks BEZW-RT10slot CCOAXIAL 75Ω FM jack
DAM terminal ETV/VIDEO AUDIO IN R/L jacks
BFlashes when the sleep timer is set.
Front panel display
DLights up when a station is received. Radio only
ILights up when a Super Audio CD/CD is loaded.
APHONES jack BPOWER ON/OFF
Surround amplifier
CPOWER / ON LINE indicator 34, DPAIRING indicator
EPAIRING
110US
Remote control
Control Menu display
Guide to the Control Menu Display
Additional Information
Press DISPLAY repeatedly
List of Control Menu items
To turn off the display
0: 04:
ALL DISCS
Additional Information
113US
Numerics
Index
Page
Sony Corporation Printed in China
![10 Press C/c to select [YES], then press](/images/new-backgrounds/25846/2584673x1.webp)
 DISPLAY while the system is in stop mode.
 [SETUP], then press
 ![3 Press X/x to select [SETUP], then press .](/images/new-backgrounds/25846/2584673xi7.webp) .
.