Handycam Handbook
Refer to PMB Guide stored on the supplied CD-ROM
On using the camcorder
Read this before operating your camcorder
Types of Memory Stick you can use with your camcorder
About the Carl Zeiss lens
About changing the language setting
On recording
About this Handbook
On the drop sensor
When the camcorder is connected to a computer
Save all your recorded image data
Do not apply shock or vibration to your camcorder
Table of contents
Troubleshooting
Flowers in close-up
Subject examples and solutions
Dubbing to other devices p
Selecting the media p
View Images category
Settings category
Home and Option Taking advantage of two types of menus
Camera category
To hide the Home Menu screen
Using the Home Menu
Touch Help again in step
Using the Option Menu
To deactivate the Help
Touch the item you want to learn more about
Items supplied with your camcorder
Checking supplied items
Make sure that you have the following
Charging the battery pack
For DCR-SR65/SR85
To remove the battery pack
To use a wall outlet wall socket for the power source
To check the remaining battery Battery Info
Playback time
Charging time
Recording time
On the battery pack
CLOCK/ Lang CLOCK SET
Turning the power on, and setting the date and time
Turn the Power switch to OFF CHG
Changing the language setting
To turn off the power
Opening the Lens Cover manually
Adjusting the LCD panel
Slide the Lens Cover switch to open
Fastening the grip belt
Media is changed
To confirm the media setting
Media setting screen appears
Select the media you want to set Touch YES
Inserting the Memory Stick PRO Duo
To remove the Memory Stick PRO Duo
Insert a Memory Stick PRO Duo
Touch YES
Press START/STOP or to start recording
Recording and playback with ease Easy Handycam operation
Recording movies
Recording still images
Start playback. Movies
Playing back recorded movies/still images
Recording/Playback
Touch the tab and the movie to be played back
Still images
To cancel Easy Handycam operation
Menu settings during Easy Handycam operation
Invalid buttons during Easy Handycam operation
Recording
Been recorded
Recording movies Recording still images
To stop recording, press START/STOP again
Appears beside When
Close view Telephoto
Zooming
Starting shooting quickly Quick on
Wider range of view
Recording in mirror mode
Playback
Viewing still images
To adjust the volume of movies
Playing movies
Playback starts from the selected scene
Searching for desired scene by face Face Index
Visual Index screen appears on the LCD screen
Touch Film Roll Index
Touch / to select the date of the desired image, touch
Using PB zoom
Searching for desired images by date Date Index
Recording dates of images are displayed on the screen
Playing back a series of still images Slide show
To cancel, touch
Playing the image on a TV
A/V connecting cable supplied
A/V connecting cable with S Video optional
Connect the yellow plug of the A/V
When your TV is connected to a VCR
Connecting cable to the video input jack
Saving images
Using a computer
Connecting your camcorder to other devices
Deleting movies
Others category
Deleting images
Item list
To delete all still images at one time
Deleting still images
To delete all movies at one time
Editing
Photo Capture
Capturing a still image from a movie
To continue capturing
To finish capturing
Touch YES
Dubbing movies
Movie DUB
Select the movie to be dubbed
Select the still image to be copied
Copying still images
Photo Copy
Touch the type of copying
Play and pause toggles as you press
Dividing a movie
Playlist Edit
Creating the Playlist
Playing the Playlist
To add all the movies recorded on the same day at one time
To change the order within the Playlist
To erase unnecessary movies from the Playlist
Touch the image from which you want to play back
Dubbing to other devices
Connecting with the A/V connecting cable
Camcorder, according to your setup
Insert the recording media in the recording device
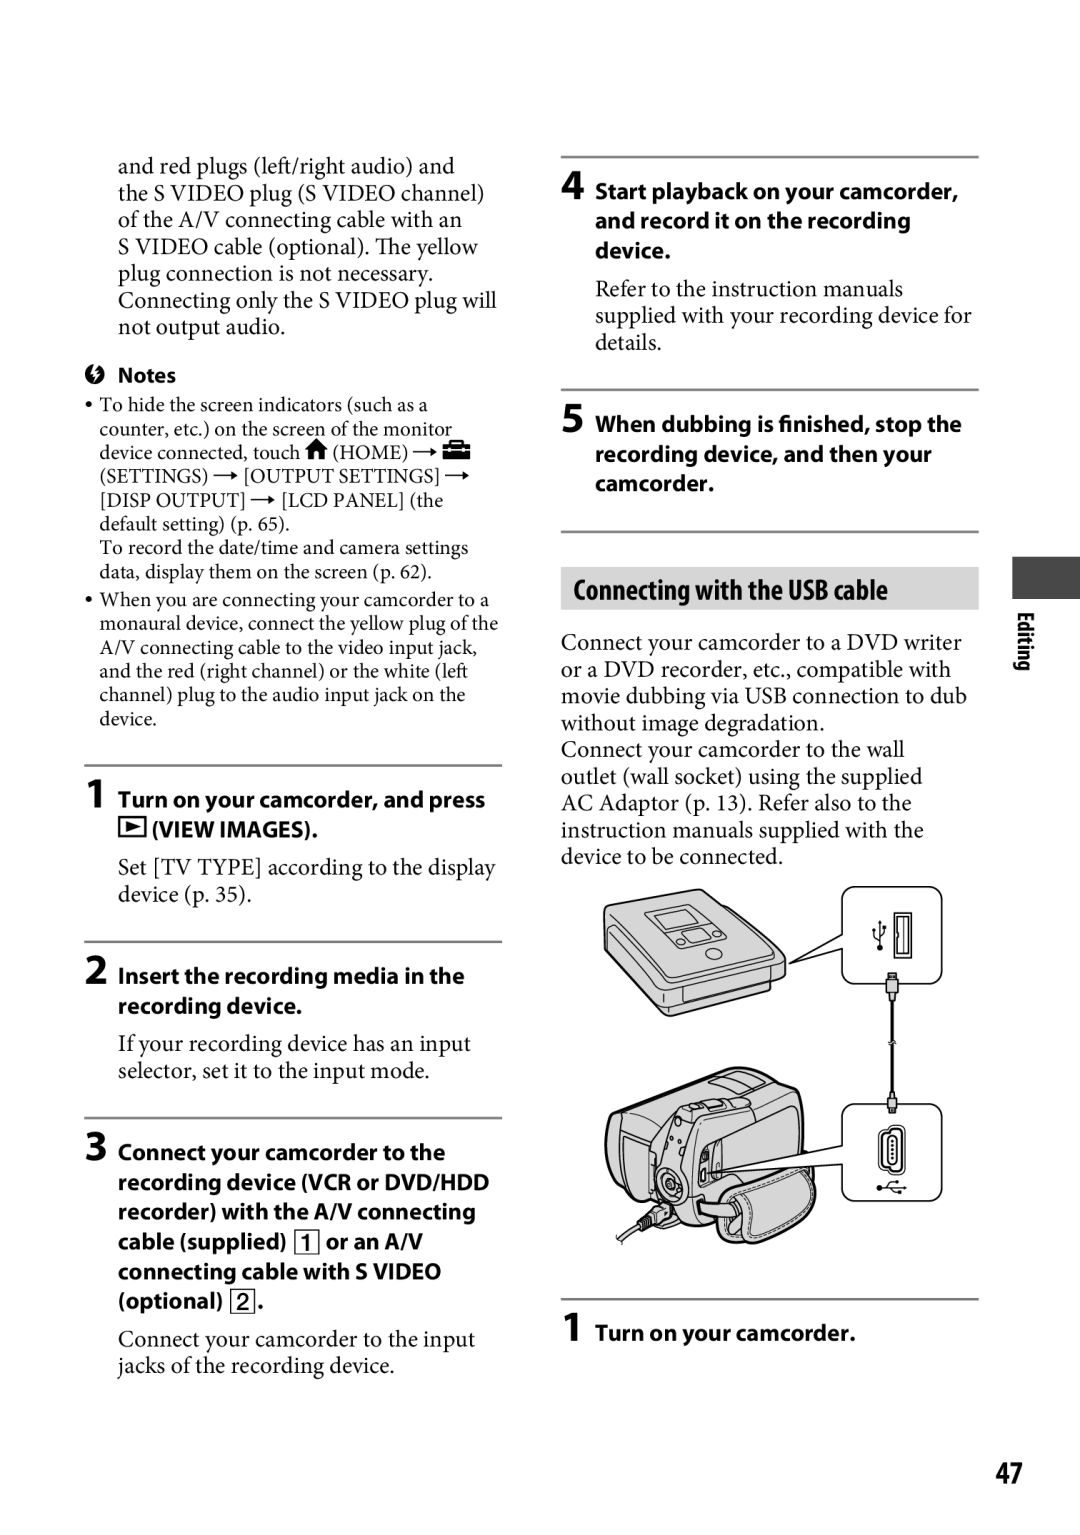
Connecting with the USB cable
Turn on your camcorder, and press View Images
Set TV Type according to the display device p
After dubbing is complete, touch END YES, then disconnect
USB Select screen appears automatically
USB cable
For DCR-SR65/SR85 Connect the USB jack
Printing recorded still images PictBridge compliant printer
Touch Print
You can select a still image on the screen
Touch on the screen in step
To finish printing
Touch Exec YES
Still image selection screen appears again
Utilizing recording media
To turn off the display
Touch Home Manage Media MEDIA Info
Media MEDIA Format
Deleting all images Formatting
Formatting the hard disk
Formatting the Memory Stick PRO Duo
Format screen appears
Empty screen appears
Turn on your camcorder
HDD
Touch Home Manage Media REPAIR IMG.DB F.
Repairing the image database file
Touch YES When Completed. appears, touch
HDD or Memory Stick
Customizing your camcorder
Touch the desired setup item
Touch Settings
Turn on your camcorder, then press Home
List of the Settings category items
Recordable time on Memory Stick PRO Duo approx
REC Mode
How to set
Nightshot Light
Guideframe
Wide Select
Digital Zoom
Steadyshot
Auto
Remaining SET
Index SET
on
For DCR-SR65/SR85 1.0M
Image Size
Items for recording still images
For DCR-SR45/SR46 VGA0.3M
Redeye Reduc DCR-SR65
Flash Mode DCR-SR65/SR85
File NO. File number
Flash Level DCR-SR65/SR85
Camera Data
Data Code
Items to customize the display
DATE/TIME
12IMAGES
Display
Zoom Link
6IMAGES
LCD BL Level
Volume
Beep
LCD Bright
LCD Panel
Items for when connecting other devices
TV Type
Disp Output
Language SET
Clock SET
Area SET
DST SET/SUMMERTIME
Drop Sensor
Demo Mode
Calibration
Shut OFF Auto shut off
Page
While using your camcorder, touch Option on the screen
Change the setting, then touch Customizing your camcorder
Viewing items on the Option Menu
Tele Macro
Functions set in the Option Menu
Focus
Spot Focus
Scene Selection
Exposure
White BAL. White balance
White Fader
If you press START/STOP, the setting is canceled
Nightshot PLS Super NightShot plus
Fader
PICT.EFFECT Picture effect
SELF-TIMER
Effect Digital effect
Buttons do not work
Troubleshooting
Power does not turn on
Menu settings have changed automatically
CHG charge lamp does not
Batteries/Power sources
Power abruptly turns off
Your camcorder gets warm
Recording
LCD screen
Memory Stick PRO Duo
Auto focus does not function
Troubleshooting
Recording angle looks different
Recording stops
Playing back
Functions that cannot be used simultaneously
Dubbing/Connecting to other devices
Editing images on your camcorder
White BAL
Low temperature warning Fast flashing
Self-diagnosis display/Warning indicators
Battery level warning Slow flashing
High temperature warning Slow flashing
If messages appear on the screen, follow the instructions
HDD format error
Description of warning messages
Media
PictBridge compliant printer
Data protected
Other
No further selection is possible
Additional Information
Using your camcorder abroad
Power supply
On TV color systems
World time difference
Setting to the local time
Still image files Jpeg files
Image management files
Movie files MPEG2 files
Folder name goes up 101PNV01 102PNV01
On a Memory Stick PRO Duo
Maintenance and precautions
About the Memory Stick
On the Memory Stick Duo adaptor
On image data compatibility
To charge the battery pack
To use the battery pack effectively
About the InfoLITHIUM battery pack
About handling of your camcorder On use and care
About storage of the battery pack
About battery life
About the remaining battery time indicator
LCD screen
Moisture condensation
About care and storage of the lens
On charging the pre-installed rechargeable battery
Procedures
On handling the casing
On GNU GPL/LGPL applied software
On trademarks
Numbers in are reference pages
Movie/ Still mode lamps START/STOP button
Identifying parts and controls
Quick Reference
Page
For DCR-SR65/SR85 Handycam Station
Data Code button
To change the battery of the Remote Commander
101
Indicators displayed during recording/playback
Data code during recording
Thumbnail
Glossary
Fragmentation
105
Index
106
107

 (VIEW IMAGES).