– 10 –
4 Press Vor vto select CHANNEL ERASE/ADD,
and press ![]() .
.
The CHANNEL ERASE/ADD menu appears.
CHANNEL ERASE/ADD
33
ERASE ADD
MENU |
|
Use[0 – 9]or |
|
to select the channel. |
|
Use | Exit MENU |
5 Erase and/or add channels:
To erase an unwanted channel
(1)Make sure the cursor (z) is beside ERASE.
(2)Press CH +/– or the 0 – 9 buttons to select the channel you want to erase, and press ENTER.
CH |
|
|
| Selected channel number | |
|
|
|
|
| |
| 1 | 2 | 3 | CHANNEL ERASE/ADD | |
| ERASE | 33 | |||
or | 4 | 5 | 6 |
| |
MENU |
| ||||
|
|
|
| ADD |
|
| 7 | 8 | 9 | Use[0 – 9]or |
|
|
| 0 | ENTER | to select the channel. |
|
|
|
| Use | Exit MENU | |
|
|
|
| ||
(3)Press ![]() .
.
The
To add a channel that you want
(1)Press Vor vto move the cursor (z) to ADD.
(2)Press the 0 – 9 buttons to select the channel you want to add, and press ENTER.
|
|
| Selected channel number | |
1 | 2 | 3 | CHANNEL ERASE/ADD | |
4 | 5 | 6 | ERASE | 33 |
| ||||
ADD |
| |||
7 | 8 | 9 | MENU |
|
|
| |||
| 0 | ENTER |
|
|
|
|
|
| |
|
|
| Use | Exit MENU |
(3)Press ![]() .
.
The “+” indication appears beside the channel number, showing that the channel is added to the preset memory.
16-EN Getting Started
6 To erase and/or add other channels, repeat step 5.
7 Press MENU to return to the original screen.
MENU
Notes
•If you erase or add a VHF or UHF channel, the cable TV channel with the same number is also erased or added, and vice versa.
•Erasing and adding channels is also available for the AUX input.
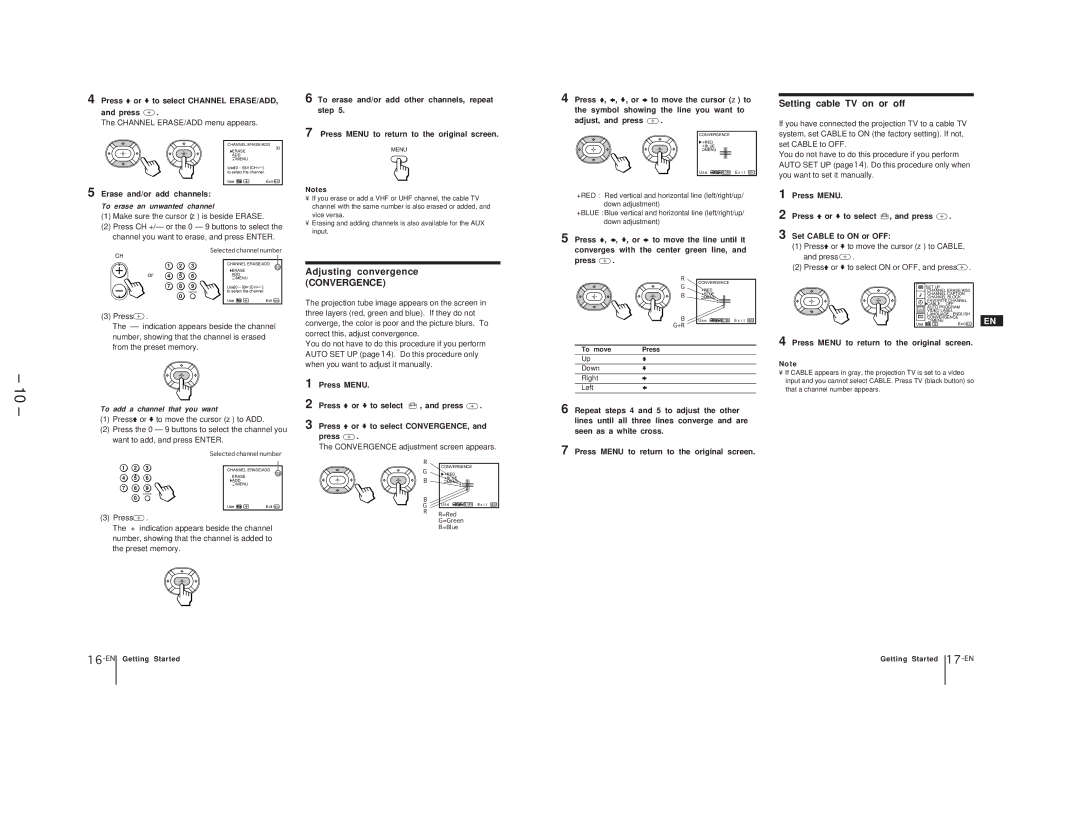
Adjusting convergence
(CONVERGENCE)
The projection tube image appears on the screen in three layers (red, green and blue). If they do not converge, the color is poor and the picture blurs. To correct this, adjust convergence.
You do not have to do this procedure if you perform AUTO SET UP (page 14). Do this procedure only when you want to adjust it manually.
1 Press MENU.
2 Press Vor vto select  , and press
  .
.
3 Press Vor vto select CONVERGENCE, and
press ![]() .
.
The CONVERGENCE adjustment screen appears.
R |
|
|
|
|
G | CONVERGENCE | |||
+RED |
|
|
| |
B | +BLUE |
|
|
|
MENU |
|
|
| |
B |
|
|
|
|
|
|
|
| |
|
|
|
| |
G | Us e | RETURN E x i t MENU | ||
R | R=Red |
|
|
|
|
|
|
| |
G=Green
B=Blue
4 Press V, B, v, or bto move the cursor (z) to the symbol showing the line you want to
adjust, and press ![]() .
.
CONVERGENCE
![]() +RED +BLUE
+RED +BLUE ![]() MENU
MENU
Us e | RETURN E x i t MENU |
+RED : Red vertical and horizontal line (left/right/up/ down adjustment)
+BLUE :Blue vertical and horizontal line (left/right/up/ down adjustment)
5 Press V, B, v, or b to move the line until it converges with the center green line, and
press ![]() .
.
R
CONVERGENCE
G
+RED
B +BLUE
MENU ![]()
B | Us e | RETURN E x i t MENU |
G+R
To move | Press |
Up | V |
Down | v |
Right | b |
Left | B |
6 Repeat steps 4 and 5 to adjust the other lines until all three lines converge and are seen as a white cross.
7 Press MENU to return to the original screen.
Setting cable TV on or off
If you have connected the projection TV to a cable TV system, set CABLE to ON (the factory setting). If not, set CABLE to OFF.
You do not have to do this procedure if you perform AUTO SET UP (page 14). Do this procedure only when you want to set it manually.
1 | Press MENU. |
|
|
|
|
|
2 | Press Vor vto select , and press | . |
|
| ||
3 | Set CABLE to ON or OFF: |
|
|
|
| |
| (1) Press Vor vto move the cursor (z) to CABLE, |
|
| |||
| and press | . |
|
|
|
|
| (2) Press Vor vto select ON or OFF, and press | . |
| |||
|
|
| SET UP |
|
|
|
|
|
| CHANNEL ERASE/ADD |
| ||
|
|
| CHANNEL CAPTION |
|
| |
|
|
| CHANNEL BLOCK |
|
| |
|
|
| FAVORITE CHANNEL |
|
| |
|
|
| CABLE : OFF |
|
| |
|
|
| AUTO PROGRAM |
|
| |
|
|
| VIDEO LABEL |
|
| |
|
| CC | LANGUAGE : ENGLISH |
| ||
|
| CONVERGENCE |
| EN | ||
|
| Use | MENU | Exit MENU | ||
|
|
| ||||
4 | Press MENU to return to the original screen. |
| ||||
Note
•If CABLE appears in gray, the projection TV is set to a video input and you cannot select CABLE. Press TV (black button) so that a channel number appears.
Getting Started