Step 4: Setting up the projection TV automatically
(AUTO SET UP)
You can set up your projection TV easily by using the AUTO SET UP feature. It presets all the receivable channels, adjusts the convergence and changes the on-
3 Press CHANNEL +/– or VOLUME + to select the
If you prefer Spanish or French to English, you can change the
– CHANNEL + | – VOLUME + |
or
All of the menus will be set to the factory preset condition in the selected language.
(2) Press TV/VIDEO to select RED or BLUE.
TV/VIDEO | CONVERGENCE | : RED | ||
|
| [CH+] | ||
| [VOL |
|
| [VOL +] |
|
|
| ||
|
|
| ||
|
|
| ||
|
|
| ||
|
|
|
|
|
![]() [CH–]
[CH–]
RED / BLUE : [TV/VIDEO] E x i t : [SET UP]
(3)Using CHANNEL +/– or VOLUME
B
– VOLUME + | – CHANNEL + | G+R | CONVERGENCE : RED |
|
| [CH+] | |
|
|
|
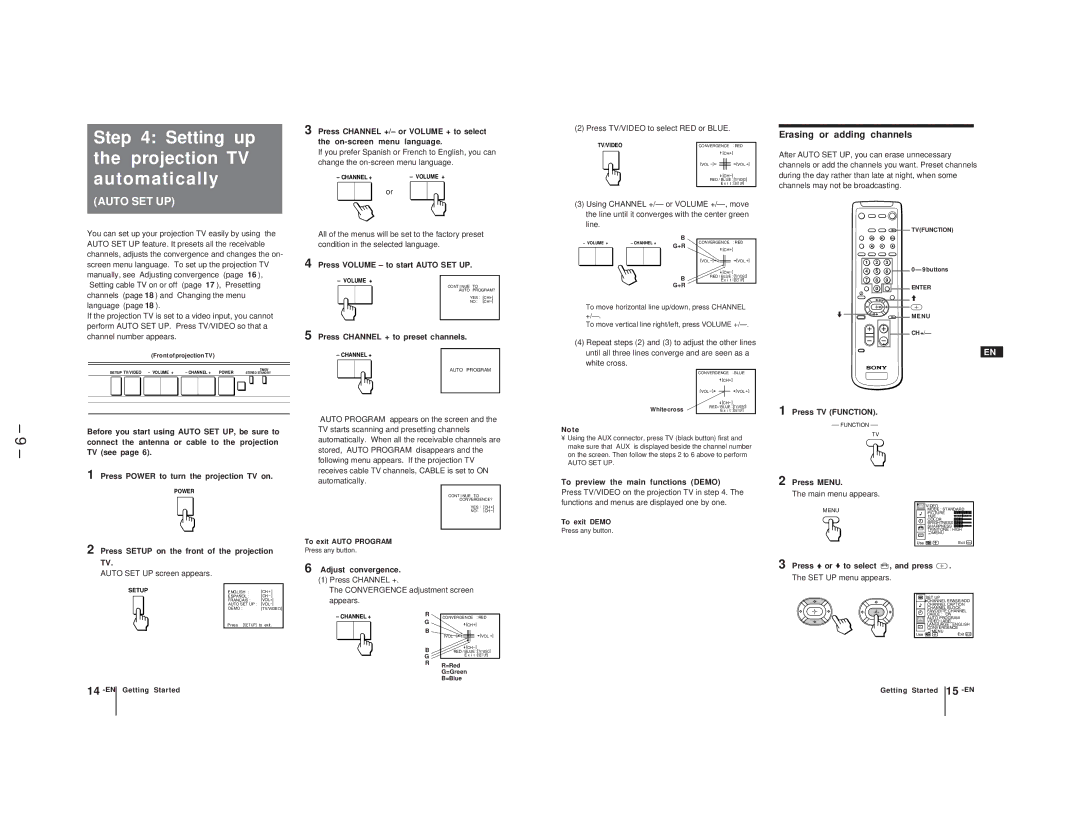
Erasing or adding channels
After AUTO SET UP, you can erase unnecessary channels or add the channels you want. Preset channels during the day rather than late at night, when some channels may not be broadcasting.
![]()
![]()
![]() TV (FUNCTION)
TV (FUNCTION)
– 9 –
screen menu language. To set up the projection TV manually, see “Adjusting convergence” (page 16), “Setting cable TV on or off” (page 17), “Presetting channels” (page 18) and “Changing the menu language” (page 18).
If the projection TV is set to a video input, you cannot perform AUTO SET UP. Press TV/VIDEO so that a channel number appears.
(Front of projection TV)
SETUP TV/VIDEO – VOLUME + | – CHANNEL + POWER |
|
|
| TIMER/ | ||||
| STEREO STAND BY | ||||||||
|
|
|
|
|
|
|
|
|
|
|
|
|
|
|
|
|
|
|
|
|
|
|
|
|
|
|
|
|
|
Before you start using AUTO SET UP, be sure to connect the antenna or cable to the projection TV (see page 6).
1 Press POWER to turn the projection TV on.
POWER
4 Press VOLUME – to start AUTO SET UP.
– VOLUME +
CONT I NUE TO
AUTO PROGRAM?
YES : [CH+]
NO :
5 Press CHANNEL + to preset channels.
– CHANNEL +
AUTO PROGRAM
“AUTO PROGRAM” appears on the screen and the TV starts scanning and presetting channels automatically. When all the receivable channels are stored, “AUTO PROGRAM” disappears and the following menu appears. If the projection TV receives cable TV channels, CABLE is set to ON automatically.
CONT I NUE TO
CONVERGENCE?
YES : [CH+]
NO :
| [VOL |
| [VOL +] |
|
| ||
|
| ||
B | RED / BLUE : [TV/VIDEO] | ||
| E x i t : [SET UP] | ||
G+R
To move horizontal line up/down, press CHANNEL
To move vertical line right/left, press VOLUME
(4)Repeat steps (2) and (3) to adjust the other lines until all three lines converge and are seen as a white cross.
| CONVERGENCE | : BLUE | ||
|
| [CH+] | ||
| [VOL |
| [VOL +] | |
|
|
| ||
|
|
| ||
|
| |||
White cross | RED / BLUE : [TV/ VIDEO] | |||
| E x i | t : [SET UP] | ||
Note
•Using the AUX connector, press TV (black button) first and make sure that “AUX” is displayed beside the channel number on the screen. Then follow the steps 2 to 6 above to perform
AUTO SET UP.
To preview the main functions (DEMO)
Press TV/VIDEO on the projection TV in step 4. The functions and menus are displayed one by one.
To exit DEMO
Press any button.
1 2 3
4 5 6
7 8 9
0
.
1 Press TV (FUNCTION).
FUNCTION
TV
2 Press MENU.
The main menu appears.
MENU
0 – 9 buttons
ENTER
>
MENU
CH +/–
EN
VIDEO
MODE : STANDARD
PICTURE
HUE
COLOR
BRIGHTNESS ![]()
![]()
![]()
![]()
![]()
![]()
![]()
![]()
![]()
![]()
![]()
![]()
![]()
![]()
![]()
![]()
![]()
![]()
![]()
![]()
![]()
![]()
![]()
![]()
![]()
![]()
![]()
![]()
![]()
![]()
![]()
![]()
SHARPNESS
TRINITONE : HIGH
MENU |
CC |
2 Press SETUP on the front of the projection
TV.
AUTO SET UP screen appears.
SETUP | ENGLISH : | [CH+ ] |
| ESPAÑOL : | [CH– ] |
| FRANÇAIS : | [VOL+] |
| AUTO SET UP : | |
| DEMO : | [TV/VIDEO] |
| Press [SET UP] | to exit. |
To exit AUTO PROGRAM
Press any button.
6 Adjust convergence.
(1)Press CHANNEL +.
The CONVERGENCE adjustment screen appears.
– CHANNEL + | R | CONVERGENCE | : RED |
| G | [CH+] | |
|
| ||
| B | [VOL | [VOL +] |
|
| ||
| B | ||
| RED / BLUE : [TV/ VIDEO] | ||
| G | E x i | t : [SET UP] |
|
|
| |
R | R=Red |
| G=Green |
| B=Blue |
Use | Exit MENU |
3 Press Vor vto select 


 , and press
  .
.
The SET UP menu appears.
| SET UP |
| CHANNEL ERASE/ADD |
| CHANNEL CAPTION |
| CHANNEL BLOCK |
| FAVORITE CHANNEL |
| CABLE : ON |
| AUTO PROGRAM |
| VIDEO LABEL |
CC | LANGUAGE : ENGLISH |
CONVERGENCE | |
Use | MENU |
Exit MENU |
14
Getting Started | Getting Started |