Dlriiii
Digital Audici
English
Sound
Clock and Timer
Preparations
Radio Reception
Right speaker
Connect the right speaker to the main unit
Connect the left speaker to the main unit
Left speaker
Connect thesupplied antennas
Connect the AC cord to an AC outlet
To connect other optional equipment+
Preset
+ Preset on the remote control
To turn the power off
Shiftfunction
Press ECO
Setting Power Economizing Mode
Channel Miulti-Amplifier System
Press Enter within 4 seconds
Press W twice to stop the remaining two numbers
To play the game Demo
Press once
To change the probability of equalizing the three numbers
To adjust the tempo of the rhythm pattern
Volume
Using the Ibeat Function
Press Rhythm repeatedly until the display read-s Tempo
Multi JOG
Using the Auto mode
Turn Multi JOG
To stop ‘the Beat function
To select sounds
Using the Spice Function
Lifsing the Fill in function
Press a
Still holding down the button, turn Multi JOG
Using a scratch mode
Using the Auto Spice function
Press Auto Spice
Setting a NEW Equalization Curve Manually
Selecting THE’PROGRAMMED ‘ ‘ ‘’ ’ Equalization Curve
Press GEQ, followed by Enter within 4 seconds
Press TUNER/BAND repeatedly to select the desired band
To select a band with the remote control
Go through steps 1-4 on previous
To search for a station quickly Auto Search
Selecting a preset number on the main unit
Preset NUtiBERTUNING
When an FM stereo broadcast contains noise
To clear a preset station
To SeleCt a playing deck
To select a reverse mode deck 2 only
Press to start play
To stop play, press
About cassette tapes
Replscing diets during play
Press Disc Change
Blank Skip Play
Press REV Mode to select the reverse mode
Inserting Blank Spaces
Insert the tape to be recorded on into deck
Press Sync DUB once or twice to start recording
Press TAPE/DECK 1/2 to select deck
Press O REC/REC Mute to start recording
To stop dubbing
Press REC/REC Mute to start recording on the first side
Insert the tape into deck
Press CD and load the discs Press CD EDIT/CHECK ~
To add tracks from other discs to the edit program
Press REC/REC Mute to start recordiw
Press CD and load the discs Press CD EDIT/CHECK twice
Repeat for the rest of the tracks for side a
To clear the edit program
Connect your microphone to MIC jack
When not using the microphone
Vocal Fadefumultiplex Functions
@ Multiplex
To skip a current track
Repeat to reserve other tracks Press ~ To start play
To add a reservation during play
To clear all the reservations
To cancel the sleep timer
To restore an original clock setting
To switch to the 24-hour standard
Press Clock
TIME’iREctiRiiNG
Press VIDEO/AUX or MD
When connecting a turntable
When the CD Digital OUT Optical jack is not being
Play the connected equipment
To reset
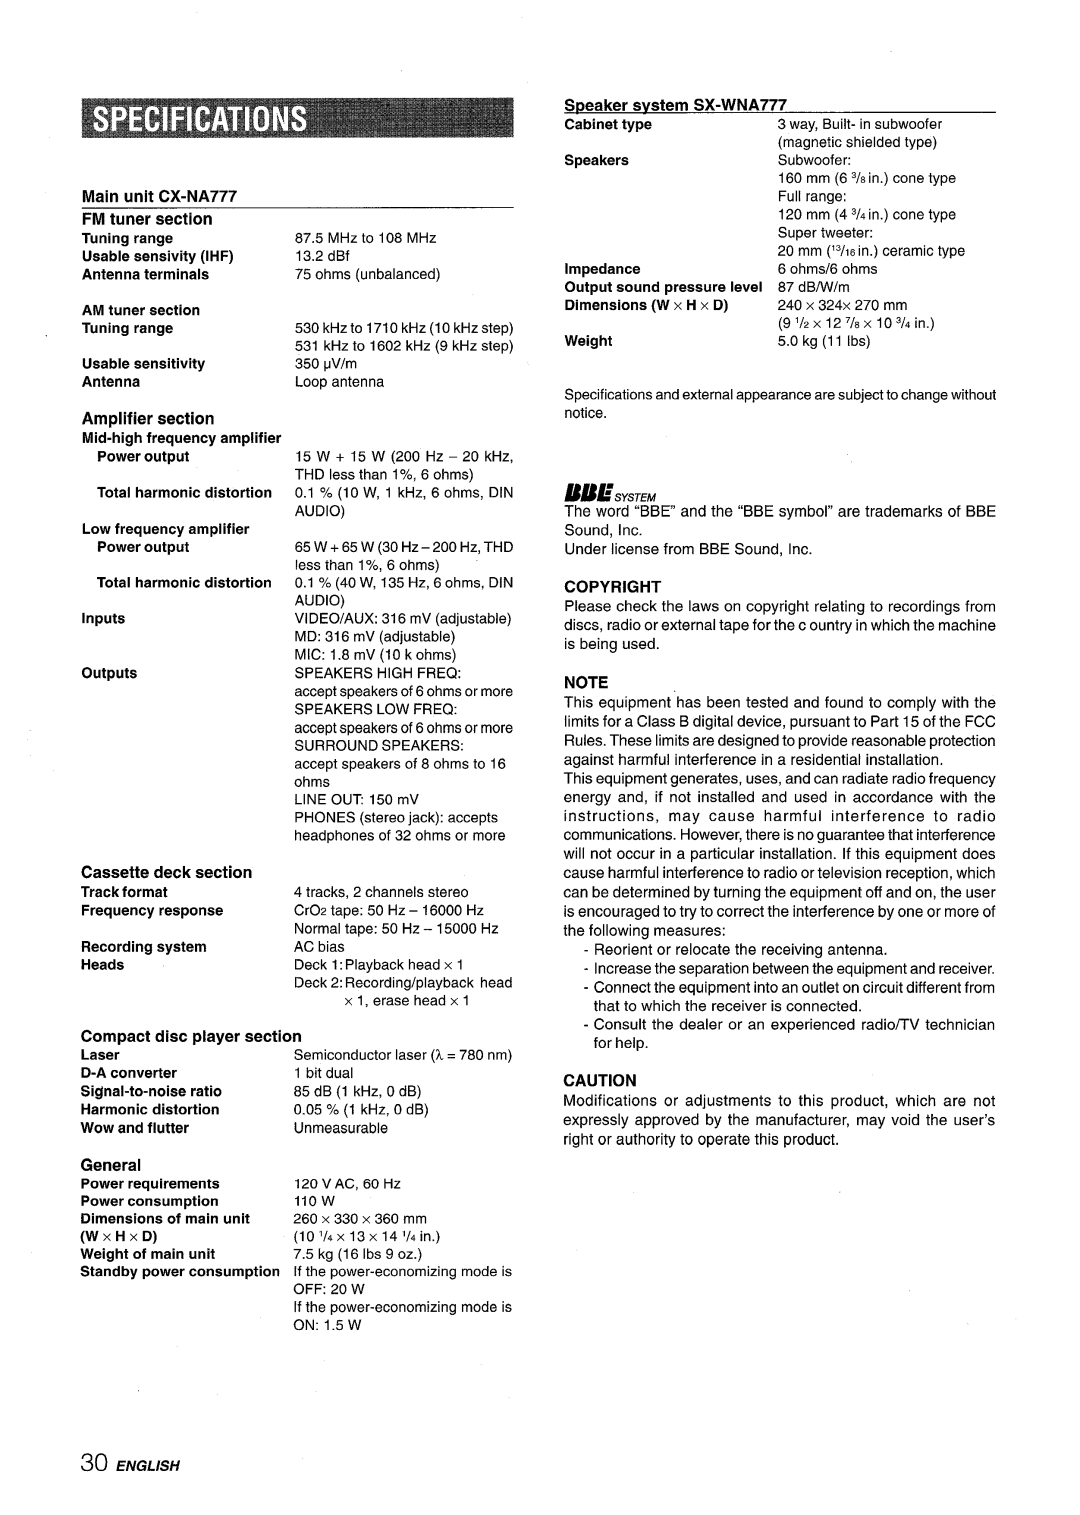
FM tuner section
Cassette deck section
~eaker svstem SX-WNA777
Page
SX-WNA777
Instalacion
Anotacion del propietario
Condensation En la Iente del fonocaptor del reproductor
Recepcion DE LA Radio
Preparatives
Sonido
Reproduction DE Cintas
Conecte el altavoz derecho a la unidad principal
Compruebe su sistema y Ios accesorios
Antes de conectar el cable de CA
Conecte el altavoz izquierdo a la unidad principal
Para conectar otro equipo optional ~ pagina
Conecte Ias antenas suministradas
Conecte el cable de CA a una toma de CA
Para posicionar Ias antenas Antena de FM
Insertion de Ias pilas
Para desconectar la alimentacion
Sisterna’ de altavoz de subgraves incorporado
Puesta DEL Modo DE Ahorro DE Energia
Sistema rnultiarnplficador de 4 canales
Pulse Eco
Pulse una vez W
Para disfrutar del juego
Pulse p
Pulse dos veces para detener Ios dos numeros restantes
$!M3hwm
Gire Volume de la unidad principal o pulse VOL dei
Utilization DE LA Funcion Beat
Para ajustar el tempo del patron de ritmo
Pulse Beat ON/OFF para activar la funcion
Gire Multi JOG
Utilization del modo Auto
Para desactivar la funcion Beat Pulse Beat ON/OFF
Pulse a
Funcion Spice A/B
Para seleccionar sonidos Utilization de la funcion Fill
De forma similar, seleccione un sonido para B
Spice
Pulse GEQ, seguido de Enter antes de que pasen 4 segundos
Ecuailizacion Programada
Ecualizacion Nueva
Espamol 1~
Realice Ios pasos 1-4 de la pagina anterior
Pulse Enter antes de aue ~asen 8 seaundos
Pulse ++ Down o *UP para seleccionar una emisora
Repita 10s pasos 1 y
Pulse P para Iniciar La reproduction
Para seleccionar un modo de inversion platina 2 solamente
Apush Push Eject
\Qih
REPRODUCCl~@~@~B=@COMPACTOS
Seleccion de una cancion con el control remoto
REPRODUCCIONALEATORlti
Repetiicicn DE Reproduction
REPRODU6CION CON’’SALT6 DE Secciones EN Blanco
Inserte la cinta que vaya a grabar en la platina
Pulse REV Mode para seleccionar el modo de inversion
Insercion DE Espacios SIN Grabar
Pulse REC/REC Mute para iniciar la grabacion
@ Para grabar a alta velocidad, pulselo dos veces para
Para deterw ef copiado
Para detener el copiado
Para detener la grabacion
Inserte la cinta en la platina
Pulse Disc Direct Play 1-3 para seleccionar un disco
Para borrar el programa de edition
Para cambiar el programa de cada cara
FUNClONES DE Desvanecimiento DE VOZ/MULTIPLEX
Conecte su microfono a la toma MIC
Microfonos recomendados
Para detener la relproduccion
Para aiiadir una reserva durante la reproduction
Para comprobar ks canciones reservadas
Para saltar una cancion
Pulse Enter o Il
Para cancelar el temporizador para dormir
Pulse Clock
Si parpadea la visualization del reloj
Timer hasta que ~
El volumen
Aparezca en el visualizador
Tomas MD
Tomas Surround Speakers d
Tomas VIDEO/AUX
Tomas Line OUT
Para desmagnetizar Ias cabezas magnetofonicas
Para Iimpiar la caja
Para limpiar Ias cabezas magnetofonicas
Cuidados de Ios discos
Seccion del amplificador
Page
SX-WNA777
FRAN~AIS
Lecture DE Disques Compacts
SON
Lecture DE Cassettes
Enregistrement
Avant de brancher Ie cordon secteur
Contr61er la chalne et Ies accessoires
X-A7771
Connecter I’ertceinte droite a I’appareil principal
Pour positioner Ies antennes Antenne FM interieure
Connecter Ies antennes fournies
Brancher Ie cordon secteur a une prise de Courant
Pour poser I’antenne AM sur une surface
H4E Preset de la telecommande
Pour utiliser Shift de la telecommande
Pour utiliser Function de la telecommande
Mise en place des pileS
Canaux
Mise EN Service DU Mode Economie D’ENERGIE
Pour mettre Ie mode economie d’energie en ou hors service
Appuyer sur Enter clans Ies quatre secondes
Appuyer sur F
Utilisation du jeu Demo
Tension, et que I’horloge soit reglee ou pas
Appuyer une fois sur
Pour regler Ie tempo du type de rythme
Appuyer sur Beat ON/OFF pour mettre 11 fonction en service
Pour selectionner avec la telecommande
Appuyer sur T-BASS
Tourner Multi JOG
Utilisation du mode Auto
Appuyer sur Beat ON/OFF pour mettre la fonction en service
Pour arr&er la fonction Beat
Pour Utiliser LA Fonction Fill
Pour selectionnler des sons Appuyer sur a
’une fa~on similaire, selectionner un son pour
Appuyer sur Spice a
Tout en tenant encore la touche enfoncee, tourner
Appuyer sur Auto Spice
Demarrer la lecture sur la source pour ecouter I’effet
Selection D’UNECOURBE ‘ ‘ D’EGALISATION Programmed
Courbe D’EGALISATION
Dans Ies huit secondes, tourner Multi JOG Ipout’
Dans Ies huit secondes, appuyer sur Enter
Memorisation DES Nouvelles Courbes D’EGALISATION
Effectuer Ies etapes 1 a 4 de la page precedence
Appuyer sur ++ Down ou UP pour selectionner une station
Repeter Ies elapes 1 et
Accord PAR Numero DE Prereglage
Pour changer I’intervalle d’accord AM
Selectionner urr numero de preregiage
Pour selectionner une platine de lecture
Pour selectionner un mode d’inversion platine 2 seuiement
Appuyer sur + pour demarrer la lecture
Pour obtenir une avarice rapide ou un rembobinage, appuyer
Au sujet des cassettes
Le ruban magnetique des cassettes de 120 minutes
Selection d’une plage avec la telecommande
Pour arr~ter la lecture, appuyer sur ~
Pour Iire un ou deux disaues, mettre Ies disques sur Ies
Appuyer sur + pour demarrer la lecture
Lecture Avec Saut DES Blancs
Appuyer sur CD Blank Skip
Franqak
Inserer la cassette a enregistrer clans la platine
Appuyer sur REV Mode pour selectionner Ie mode d’inversion
Insertion D’ESPACES Blancs a’’’
Appuyer sur REC/REC Mute pour demarrer ’enregistrement
Pour arrtMer la duplication
Appuyer sur TAPE/DECK 1/2 pour selectionner la platine
Pour arr~ter la duplication
FRAIV~A/S
Hw$rer la cassette clans la platine
Lns6rer la cassette clans la platine
Repeter I’@tape 5 pour Ie reste des plages de la face a
Appuyer sur Recirec Mute pour demarrer ’enregistrement
FONCTiOik Vocal FADER/iiilUiTIPL~X
Brancher Ie microphone a la prise MIC
Shift
Appuyer sur Clock
Appuyer sur Enter ou
Preparer La source Jlk
Regler Ie volume
Appuyer sur Power pour mettre I’appareil hors # tension
Utilisation de I’appareil Iorsque la minuterie est reglee
Appuyer sur VIDEO/AUX ou MD
Mettre I’appareil connecte en lecture
La reception presente des parasites ou Ie son presente
Generalities
11OW
Page
Timer
REV Mode Deck
DIRECTION/PRESET
CD EDIT/CHECK