Contents
Connecting Peripheral Devices
Customizing Your Vaio Computer
Adding Memory
About the Software on Your Computer.103
Additional Software Information
Troubleshooting 191
Troubleshooting Drives, PC Cards, and Peripheral De
Getting Help 213
Welcome
Vaio Computer User Guide
Using Your Vaio Computer
Functions of the keyboard keys
Using the Keyboard
Key Description
Function keys
Indicator lights
Indicators
Indicator Function
Light
Combination Function
Combinations and functions with the Windows key
Combinations and functions with the Fn key
Combination Feature Functions
Press the power button on your computer
Actions Descriptions
Using the Touchpad
To open the Mouse Properties dialog box
Vaio Action Setup
Using the center Jog Dial control
Using the Center Jog Dial Control
Using Launcher mode
Launcher mode
Using the center Jog Dial control with Sony software
Using Guide Mode
Using a dialog box
Using the center Jog Dial control with other software
To insert a PC Card
Using a PC Card
Removing PC Card
To remove a PC Card
Using a PC Card
What is MagicGate media?
Using Memory Stick Media
Types of Memory Stick media
Inserting Memory Stick media
Removing Memory Stick media
Viewing the contents of a Memory Stick media
Formatting a Memory Stick media
Write-protecting a Memory Stick media
To remove a Memory Stick media
To reformat a Memory Stick media
Vaio Computer User Guide
Normal mode
Using Power Saving Modes
Standby mode
Hibernate mode
To activate Hibernate mode
Plugging Telephone Cable into Telephone Jack
Connecting a Telephone Line
Setting up your Ethernet connection
Connecting to a LAN
To connect to a network
Connecting to a LAN
Turning On Wireless LAN
Connecting to a Wireless LAN
Wireless LAN Access Point
To communicate with an Access Point
Communication with an Access Point infrastructure
To communicate without an Access Point
Communicating without an Access Point peer-to-peer
Turning Off Wireless LAN
Vaio Computer User Guide
Connecting Peripheral Devices
Connecting the Docking Station
Left lever Floppy disk drive Air vent Link * network switch
Connecting the computer to the docking station
To connect your computer to the docking station
Disconnecting the docking station when the computer is off
Disconnecting the computer from the docking station
Disconnecting the docking station when the computer is on
To disconnect the docking station from the Start menu
To disconnect the docking station, using the Undock switch
Undock switch
To insert a floppy disk
Using the Floppy Disk Drive
To remove a floppy disk
Removing Floppy Disk
To insert a disc
Using an Optical Disc Drive
To remove a disc
Playing a DVD
To play an audio CD
Playing an audio CD
To write data to a CD-R or CD-RW disc
Using an Optical Disc Drive
Connecting an i.LINK optical disc drive
Connecting an i.LINK Optical Disc Drive
To connect an i.LINK optical disc drive
Connecting i.LINK optical disc drive
Vaio Computer User Guide
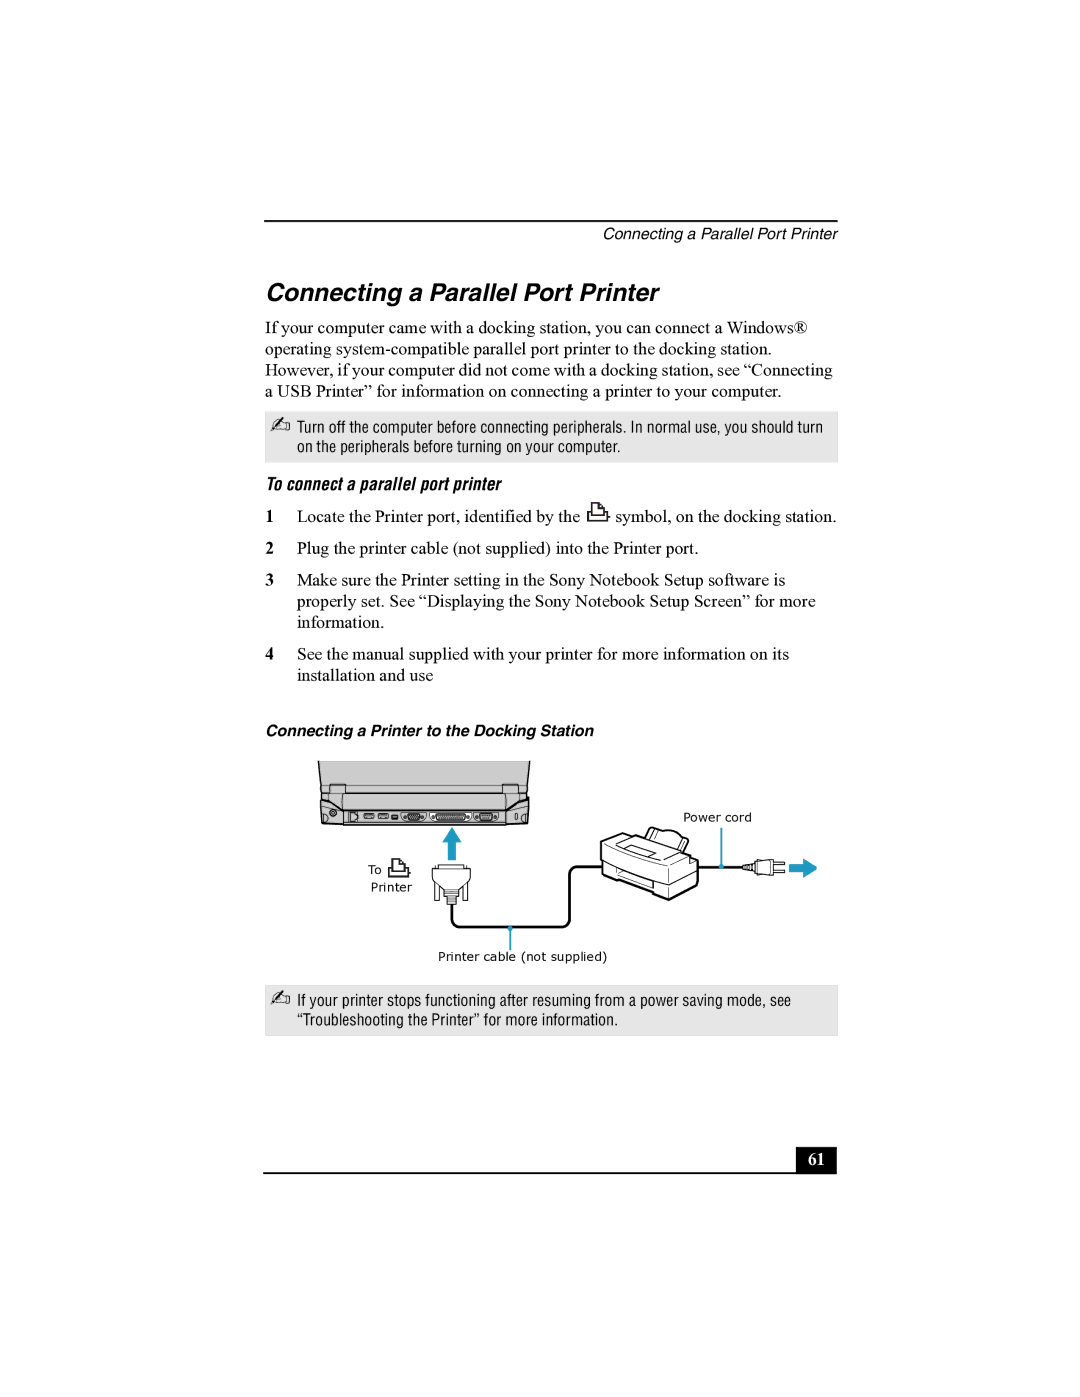
To connect a parallel port printer
Connecting a Parallel Port Printer
To connect a USB printer
Connecting a USB Printer
To connect a monitor to your computer
Connecting an External Display
To connect an external display to your docking station
Connecting Monitor to the Computer
Connecting Monitor to the Docking Station
Connecting Projector to the Computer
To select a display
To connect a USB device to your computer
Connecting a USB Device
To connect a USB device to the docking station
Connecting USB Device to the Docking Station
To connect a digital video camera recorder
Connecting an i.LINK* Device
Connecting Digital Video Camera Recorder
Vaio Computer User Guide
Connecting with an i.LINK cable
Connecting Vaio Computers
If your computer is connected to the docking station
Set the i.LINK network switch to the unmarked side
Before connecting your external speakers
Connecting External Speakers
To connect your external speakers
To connect an external microphone
Connecting an External Microphone
Personal Digital Assistant
Expanding Your Computer Capabilities
Expanding Your Computer Capabilities
Vaio Computer User Guide
Customizing Your Vaio Computer
To display the Sony Notebook Setup screen
Displaying the Sony Notebook Setup Screen
Tab Description
Sony Notebook Setup tabs
Viewing the Power Management status icons
Controlling Power Management
To activate your Power Management toolbar
To change the Power Management profile
To customize Power Management settings
Power Management profiles
Icon Description
Word Processing
Power Management commands
Spreadsheet
Communications
Standby
Conserving battery power
Hibernate
Battery icon descriptions
Displaying Battery Information
To activate the battery information toolbar
Battery Icon
Displaying detailed battery information
Displaying Battery Information
To select the display mode
Selecting the Display Mode
To change the window design of Sony software
Selecting the Display Mode
Vaio Computer User Guide
Adding Memory
Typical expansion memory configuration
Precautions and Procedures
On board MB Slot MB
Precautions and Procedures
To remove a memory module
Removing a Memory Module
To install a memory module
Installing a Memory Module
Lifting the Keyboard
Press the module into place until it clicks
To view the amount of memory
Viewing Memory
About the Software on Your Computer
Adobe Acrobat Reader
Overview of the Software on Your Computer
ArcSoft PhotoPrinter 2000 Pro
Adobe Photoshop Elements
America Online
EarthLink Network Total Access
DigitalPrint
Drag’n Drop CD/DVD
Microsoft Office XP Small Business Edition
Microsoft Office XP Professional
Microsoft Word
MovieShaker
PictureGear
PicoPlayer
Quicken 2002 New User Edition
QuickTime
Smart Capture
RealPlayer
Smart Connect
Sony on Yahoo
SonicStage
Vaio Support Agent
VisualFlow
Software Support Information
EarthLink Network Total Access EarthLink Network Inc
Apple QuickTime Apple Computer, Inc
America Online America Online, Inc
Quicken 2002 New User Edition Intuit Inc
PC-Cillin 2000 Trend Micro, Inc
RealJukebox, RealPlayer RealNetworks, Inc
Sony Applications Sony Electronics Inc
WinDVD 2000 InterVideo, Inc
Sony Service Center
114
Vaio AV Applications
Overview of Preinstalled Software
SonicStage Premium
Change text in this variable definition to document title
DigitalPrint Software
Using PhotoCapture
DigitalPrint main window
Enter Photo Folder Name dialog box
PhotoCapture window
Capture Pictures from Video window
PhotoCapture editing window
Using PhotoCollection
PhotoCollection window
Printer and Paper selection window
Using PhotoDecor
Click Edit icon to open the PhotoDecor New PhotoDecor
Using PhotoAlbum
PhotoDecor-New PhotoDecor window
Click Create New Album. The Select Photo window appears
PhotoAlbum New Album window
Label New Label window
Using LabelMaker
Design Edit window
DVgate Software
Connecting a digital video camcorder
To use DVgate software with a digital video camcorder
To use DVgate software to record AVI files to tape
MovieShaker software main window
MovieShaker Software
Creating movies with MovieShaker software
Using the Shake feature
Importing images and sound clips
Adding effects to a scene or a clip
Shake tray
Adding text effects to a scene or clip
Effect tray window Effect button selected
Saving a movie
Effects Tray Text button selected
Click Export on the Story Board tray
Export window
To upload MovieShaker files
ImageStation Login window
Select MPEG1 ImageStation, and click Next
Image Uploader window
Smart Capture Software
Mode indicator
Smart Capture main window
Help button
Mode dial Capture button
Using Still Mode
Movie mode
Options button Image window
Still Image Options window
Effect Settings window
To manage pictures in Still mode
To capture a picture in Still mode
Still Viewer window
Recording Options window
Using Net Movie Mode
To capture a movie in Net Movie mode
Movie Player window
To manage your movie in Net Movie mode
Click to see thumbnail previews of your pictures or movies
To upload with Movie Player
To upload with Still Viewer
Change text in this variable definition to document title
SonicStage feature tabs Main window
Electronic Music Distribution EMD Services
SonicStage Software
Starting SonicStage Software
SonicStage main window Playlist view
Feature tabs Tutorial
Player control buttons Internet address drop-down list
Playlist view
Recording from a CD
CD tab window
Check-Out
Transferring songs Check-In/Check-Out
Transfer window
Point to SonicStage, and click SonicStage Help
Check
Additional features
Change text in this variable definition to document title
SonicStage Premium Software
SonicStage Premium software features
Overview of SonicStage Premium Software
SonicStage Premium software compatibility
Click SonicStage Premium, and click SonicStage Premium Help
Media
Electronic Music Distribution EMD Services
Using SonicStage Premium Software
Devices
Audio file formats
Point to SonicStage Premium, and click SonicStage Premium
To start SonicStage Premium software First time
Select This is a new Cddb Registration. Click Next
Select I already have a Cddb Nickname. Click Next
SonicStage Premium main window
Simple Mode Switch button
CD Backup button
Menu button Displays the main menu Volume Control button
Operation area
Sleep Timer button
Timer Set button
Using the audio source icons
Internet button
Using the basic operations
Playing an audio CD
Using Playback and Recording Features
To record all songs on an audio CD
Recording an audio CD
To record specific songs on an audio CD
To play songs on your hard disk drive Playlist
Recording songs to a MiniDisc Check-out
To play a MiniDisc
To play songs from MagicGate Memory Stick media
To record songs to a MiniDisc
SonicStage Premium Software
Playing songs from a portable audio device
To use the Visualizer
Using the Visualizer, Equalizer, and Sound Effects
To use custom equalizer settings
Sound Mode Description
To use the MX Equalizer
To use sound effect settings
Using the FM Tuner
EffectDescription
To listen to FM radio stations
To record from an FM radio station
To use Quick Timer Recording
Using the Timer Functions
To set up a timer event
To set the Sleep Timer
To set up daily or weekly timer events
Additional Information
Additional information about Timer events
Change text in this variable definition to document title
Vaio Edit Components Software
To install Vaio Edit Components
Change text in this variable definition to document title
Legal Information
Change text in this variable definition to document title
Using the Recovery CDs
Application Recovery CDs
Application and System Recovery CDs
System Recovery CDs
Using the Application Recovery CDs
Using Your Recovery CDs
114
System Recovery options
Using the System Recovery CDs
If your computer does not start from the Recovery CD
To use the System Recovery CDs
117
118
Troubleshooting
My computer starts but a Bios error appears
Troubleshooting Your Computer
My computer does not start
193
My computer stops responding or does not shut down
Sound of my computer’s fan is too loud
My computer is unstable
To reduce fan noise
Troubleshooting the Docking Station
Disc tray does not eject even after I press the Eject button
Cannot remove the disc
Want to change the video resolution of my display
Troubleshooting the LCD Screen
My LCD screen is blank
My LCD screen continues to show the previous screen
My mouse does not work
Troubleshooting the Mouse and Touchpad
My touchpad does not work properly
Pointer does not move when I use the Touchpad or Mouse
My floppy disk drive cannot write to a floppy disk
Troubleshooting Drives, PC Cards, and Peripheral Devices
My optical drive is not playing my CD or DVD properly
My PC Card does not work
My optical drive tray does not open
My software program stops responding or crashes
Troubleshooting the Software
Application cannot find a file while a PC Card is inserted
What software do I use for CD-R/CD-RW software functions?
Troubleshooting i.LINK Devices
My modem does not work
Troubleshooting the Modem
My modem connection is slow
My speakers have no sound
Troubleshooting Audio
My microphone does not work
Cannot use the Wireless LAN functionality
Troubleshooting Wireless LAN functions
Cannot set up a Wireless LAN
Cannot access the Internet
Computer cannot connect to a Wireless LAN Access Point
Data transfer speed is slow
Cannot print
Troubleshooting the Printer
212
Vaio Computer User Guide
Support Options
Software Manuals and Online Help Files
Operating System Online Support
Sony Computing Support Sony Fax-on-Demand
Sony Service Center
Sony Customer Support
Index
174
LCD
Standby 17, 33
LCD screen 198 modem Mouse and touchpad 199 printer Software
220
221
222