SYSTEM MENU

///,

RETURN

ENTERo


/

REC STOP

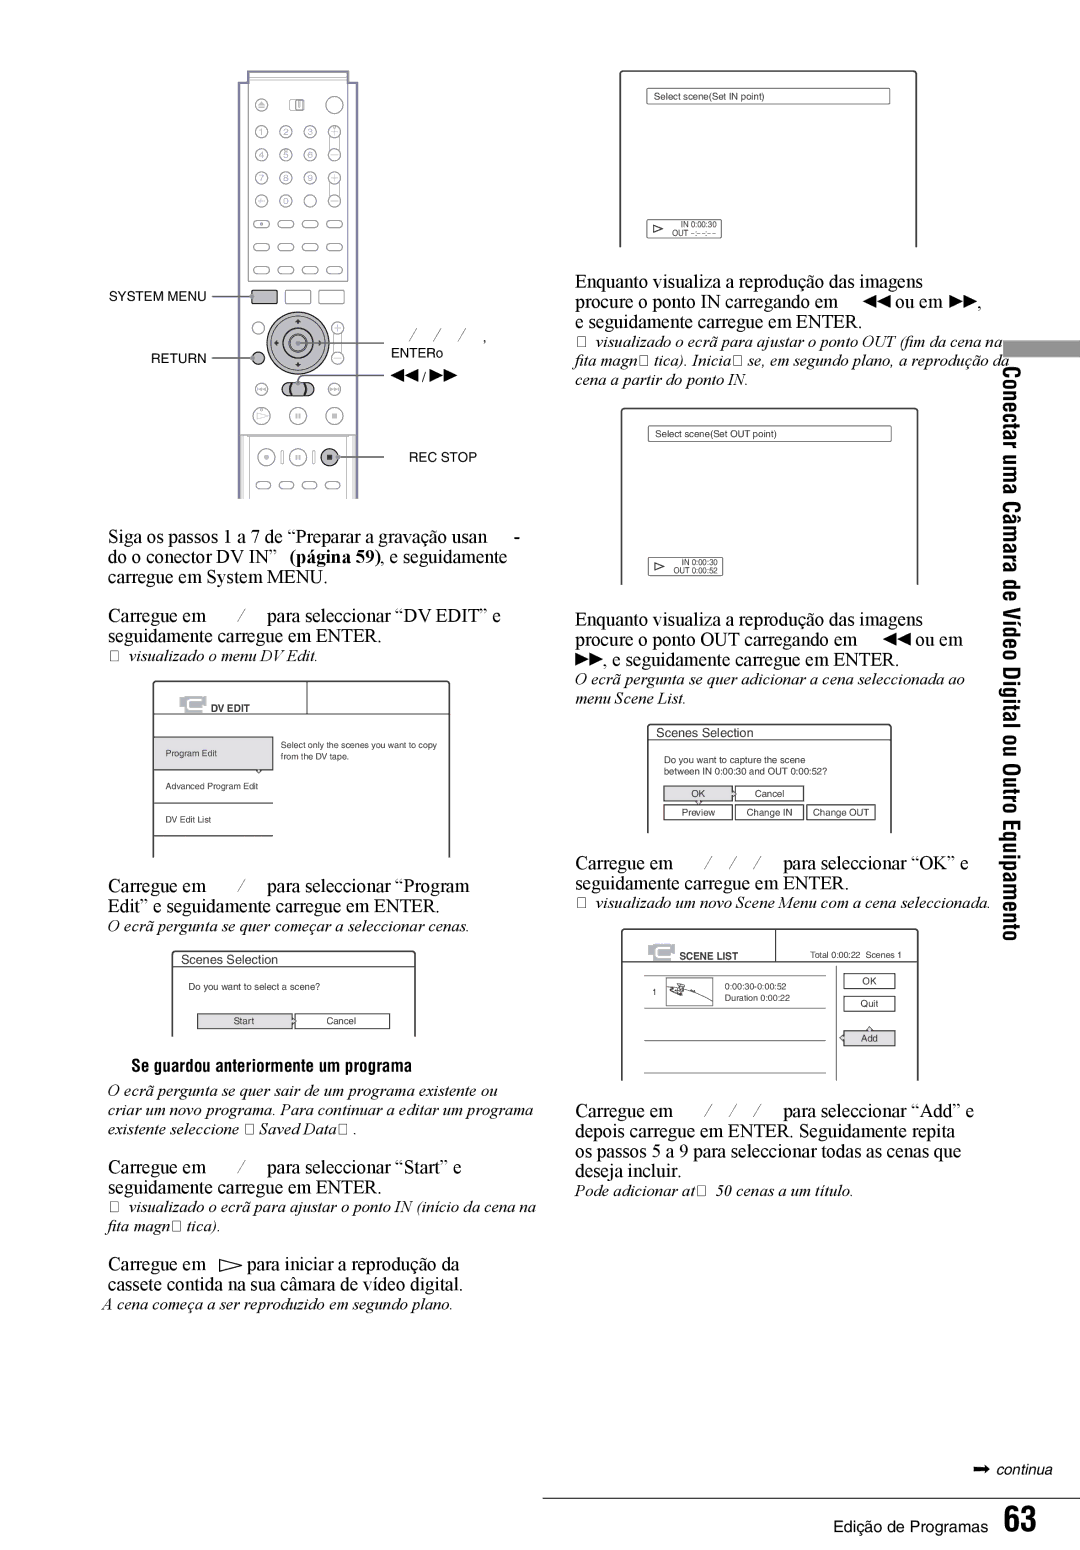
1Siga os passos 1 a 7 de “Preparar a gravação usan- do o conector DV IN” (página 59), e seguidamente carregue em System MENU.

2Carregue em /para seleccionar “DV EDIT” e seguidamente carregue em ENTER.

É visualizado o menu DV Edit.

DV EDIT

Program Edit

Select only the scenes you want to copy

from the DV tape.


Advanced Program Edit


DV Edit List

3Carregue em /para seleccionar “Program

Edit” e seguidamente carregue em ENTER.

O ecrã pergunta se quer começar a seleccionar cenas.

Scenes Selection

Do you want to select a scene?

Start

Cancel

Se guardou anteriormente um programa

O ecrã pergunta se quer sair de um programa existente ou criar um novo programa. Para continuar a editar um programa existente seleccione “Saved Data”.

4Carregue em /para seleccionar “Start” e seguidamente carregue em ENTER.

É visualizado o ecrã para ajustar o ponto IN (início da cena na fita magnética).

Select scene(Set IN point)

IN 0:00:30

OUT –:– –:–

Enquanto visualiza a reprodução das imagens

,


6 procure o ponto IN carregando em


ou em


e seguidamente carregue em ENTER.


É visualizado o ecrã para ajustar o ponto OUT (fim da cena na


fita magnética). Inicia-se, em segundo plano, a reprodução da

Conectaruma

cena a partir do ponto IN.


Select scene(Set OUT point)


IN 0:00:30


Câmara


OUT 0:00:52


de


Enquanto visualiza a reprodução das imagens


Vídeo

7 procure o ponto OUT carregando em

ou em


, e seguidamente carregue em ENTER.


Digital

O ecrã pergunta se quer adicionar a cena seleccionada ao


menu Scene List.


Scenes Selection


ou


Do you want to capture the scene


Outro


between IN 0:00:30 and OUT 0:00:52?


OK

Cancel


Preview

Change IN Change OUT


Equipamento

8 Carregue em ///para seleccionar “OK” e

seguidamente carregue em ENTER.


É visualizado um novo Scene Menu com a cena seleccionada.


SCENE LIST

Total 0:00:22 Scenes 1


0:00:30-0:00:52

OK


1


Duration 0:00:22


Quit


Add


9Carregue em ///para seleccionar “Add” e depois carregue em ENTER. Seguidamente repita os passos 5 a 9 para seleccionar todas as cenas que

deseja incluir.

Pode adicionar até 50 cenas a um título.

5 Carregue em para iniciar a reprodução da cassete contida na sua câmara de vídeo digital.

A cena começa a ser reproduzido em segundo plano.

Þ continua

Edição de Programas 63

Page 63
Image 63
Sony RDR-GX7 manual Câmara, Enquanto visualiza a reprodução das imagens, Carregue em /// para seleccionar OK e

RDR-GX7 specifications

The Sony RDR-GX7 is a versatile and highly regarded digital video recorder that has made a significant mark in the realm of home entertainment. Released during the early 2000s, the RDR-GX7 is celebrated for its ability to seamlessly record and play back a variety of media formats, focusing particularly on the DVD standard, which was rapidly becoming the norm for home video at the time.

One of the standout features of the RDR-GX7 is its superior recording capabilities. It employs a linear recording technology that allows users to capture video in high quality while also offering multiple recording modes. This flexibility enables users to choose between longer recording times or higher video fidelity, depending on their personal needs. Users can record directly to DVDs, making it convenient to create keepers for personal videos or to archive television shows.

The RDR-GX7 is equipped with various connectivity options, including composite and S-Video outputs, as well as standard audio outputs. This ensures compatibility with a wide range of televisions and audio systems, enhancing the overall viewing experience. Additionally, the unit features built-in dual-layer DVD recording capabilities, which allows for more storage space on standard DVDs, accommodating longer recordings without requiring multiple discs.

In terms of playback features, the RDR-GX7 supports a wide array of formats, including DVD-R, DVD-RW, and even Video CD playback, offering excellent flexibility for users who have a diverse collection of media. The unit also includes a Time Shift feature that allows users to pause live television, making it easier to enjoy programs without interruption. The instant replay functionality enhances this by allowing viewers to quickly re-watch segments of their favorite shows.

The Sony RDR-GX7 is also equipped with a user-friendly interface, making it easy to navigate settings and recording options. A notable inclusion is its programmable timer, enabling users to set recordings ahead of time, ensuring that their desired content is captured without requiring manual intervention.

In summary, the Sony RDR-GX7 combines robust recording capabilities with versatile playback options, making it an excellent choice for home entertainment enthusiasts. Its advanced technologies, together with its user-friendly features, position it as a reliable and practical solution for anyone looking to enhance their home viewing experience.