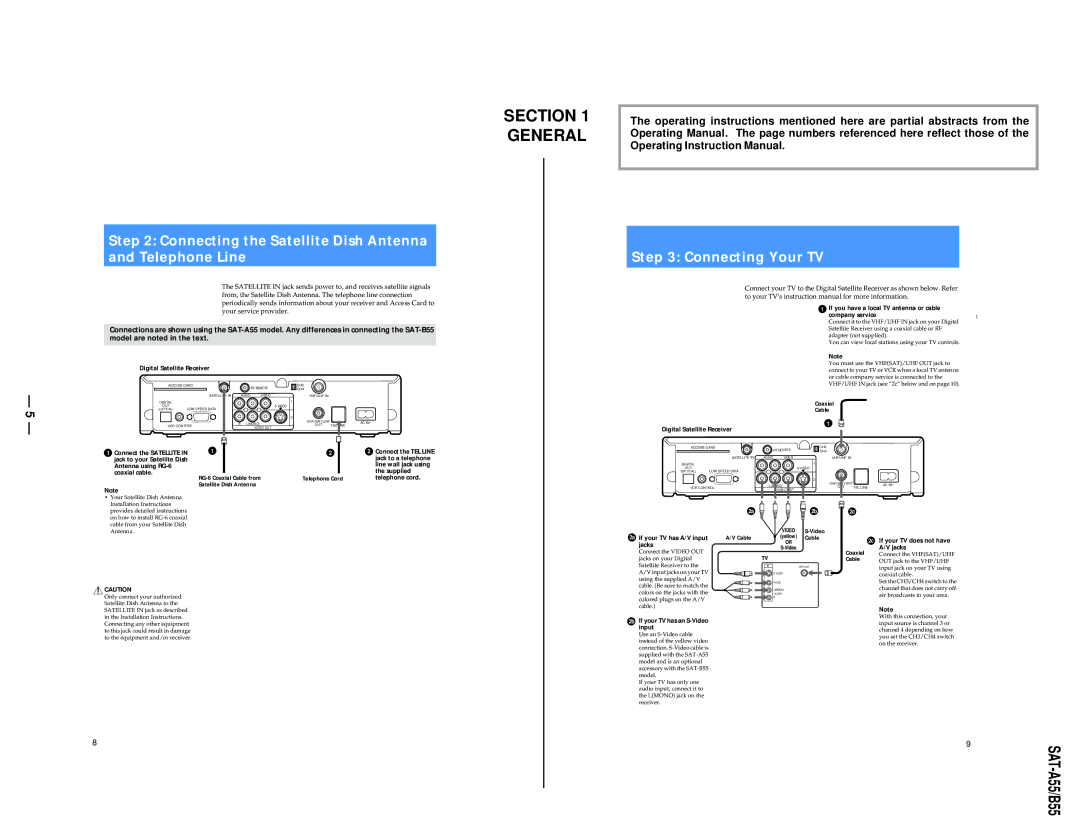
Step 2: Connecting the Satellite Dish Antenna and Telephone Line
The SATELLITE IN jack sends power to, and receives satellite signals from, the Satellite Dish Antenna. The telephone line connection periodically sends information about your receiver and Access Card to your service provider.
Connections are shown using the
Digital Satellite Receiver
ACCESS CARD | CH3 |
RF REMOTE | CH4 |
SECTION 1 GENERAL
The operating instructions mentioned here are partial abstracts from the Operating Manual. The page numbers referenced here reflect those of the Operating Instruction Manual.
Step 3: Connecting Your TV
Connect your TV to the Digital Satellite Receiver as shown below. Refer to your TV’s instruction manual for more information.
1If you have a local TV antenna or cable company service
Connect it to the VHF/UHF IN jack on your Digital Satellite Receiver using a coaxial cable or RF adapter (not supplied).
You can view local stations using your TV controls.
Note
You must use the VHF(SAT)/UHF OUT jack to connect to your TV or VCR when a local TV antenna or cable company service is connected to the VHF/UHF IN jack (see “2c” below and on page 10).
— 5 —
|
| SATELLITE IN | AUDIO | VIDEO | VHF/UHF IN |
|
|
DIGITAL |
|
|
|
| 1 |
|
|
OUT | LOW SPEED DATA |
|
| S VIDEO |
|
| |
(OPTICAL) |
|
|
|
|
| ||
|
|
|
|
| 2 |
|
|
|
| R | L(MONO) |
| VHF(SAT)/UHF | AC IN~ | |
VCR CONTROL |
| OUT | TEL LINE | ||||
| VIDEO OUT |
| |||||
|
|
|
|
|
| ||
1 Connect the SATELLITE IN | 1 |
|
|
| 2 | 2 Connect the TEL LINE | |
jack to your Satellite Dish |
|
|
|
|
| jack to a telephone | |
Antenna using |
|
|
|
|
|
| line wall jack using |
coaxial cable. |
|
|
|
|
|
| the supplied |
|
|
| Telephone Cord | telephone cord. | |||
Satellite Dish Antenna
Note
Digital Satellite Receiver
ACCESS CARD | |
| SATELLITE IN |
DIGITAL |
|
OUT | LOW SPEED DATA |
(OPTICAL) | |
VCR CONTROL | |
|
|
| Coaxial |
|
|
|
| Cable |
|
|
|
| 1 |
|
|
| RF REMOTE | CH3 |
|
|
| CH4 |
| |
| AUDIO | VIDEO | VHF/UHF IN |
|
|
|
| 1 |
|
|
|
| S VIDEO |
|
|
|
| 2 |
|
R | L(MONO) | VHF(SAT)/UHF | AC IN~ | |
|
| VIDEO OUT | OUT | TEL LINE |
•Your Satellite Dish Antenna Installation Instructions provides detailed instructions on how to install
CAUTION
Only connect your authorized Satellite Dish Antenna to the SATELLITE IN jack as described in the Installation Instructions. Connecting any other equipment to this jack could result in damage to the equipment and/or receiver.
2a
2a If your TV has A/V input | A/V Cable |
jacks |
|
Connect the VIDEO OUT jacks on your Digital Satellite Receiver to the A/V input jacks on your TV using the supplied A/V cable. (Be sure to match the colors on the jacks with the colored plugs on the A/V cable.)
2b If your TV has an S-Video input
Use an
If your TV has only one audio input, connect it to the L(MONO) jack on the receiver.
TV
IN
| 2b | 2c |
|
VIDEO |
|
| |
(yellow) | Cable | 2c | If your TV does not have |
OR |
| ||
| Coaxial | A/V jacks | |
|
| Connect the VHF(SAT)/UHF | |
|
| Cable | OUT jack to the VHF/UHF |
| VHF/UHF |
| input jack on your TV using |
S VIDEO |
|
| coaxial cable. |
VIDEO |
|
| Set the CH3/CH4 switch to the |
L(MONO) |
|
| channel that does not carry off- |
R |
|
| air broadcasts in your area. |
|
|
| |
|
|
| Note |
|
|
| With this connection, your |
|
|
| input source is channel 3 or |
|
|
| channel 4 depending on how |
|
|
| you set the CH3/CH4 switch |
|
|
| on the receiver. |
8
