Step 4: Adding a VCR and Audio System
You can record programs by adding a VCR. You can also connect your Digital Satellite Receiver to an audio system for enhanced sound enjoyment.
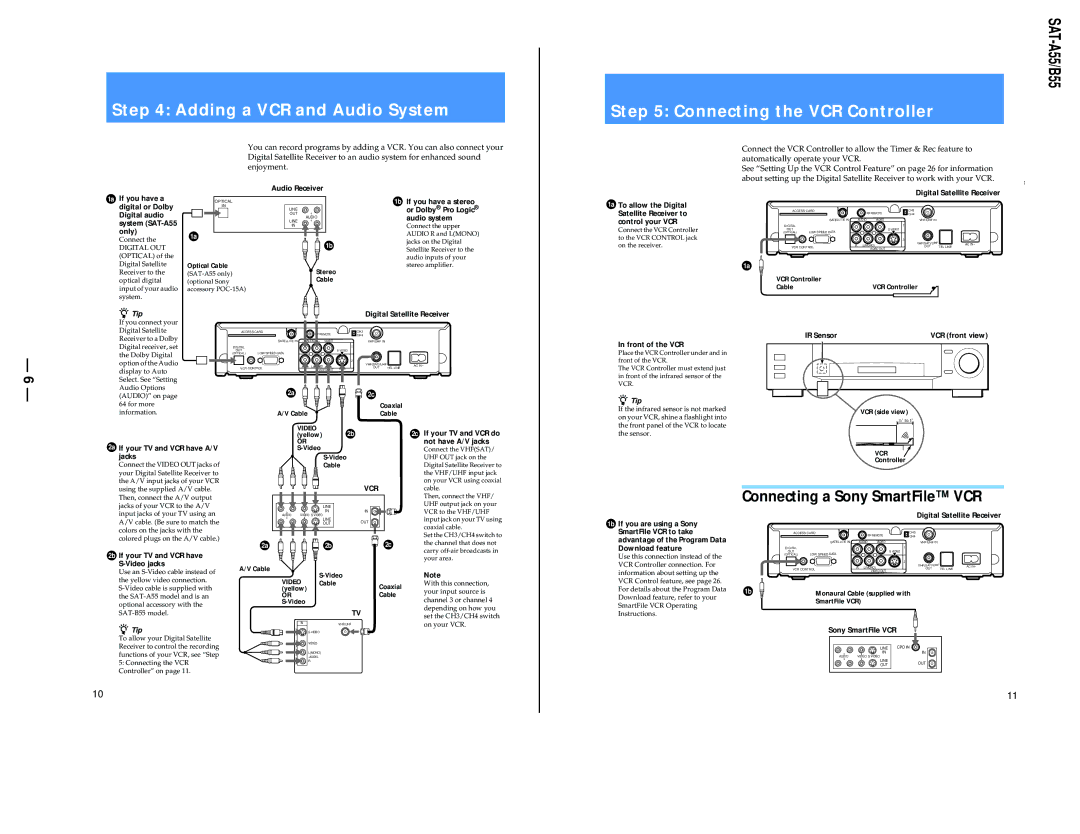
Step 5: Connecting the VCR Controller
Connect the VCR Controller to allow the Timer & Rec feature to automatically operate your VCR.
See “Setting Up the VCR Control Feature” on page 26 for information about setting up the Digital Satellite Receiver to work with your VCR.
1a If you have a digital or Dolby Digital audio system
Connect the
DIGITAL OUT (OPTICAL) of the Digital Satellite Receiver to the optical digital input of your audio system.
Audio Receiver
OPTICAL |
|
IN | LINE |
| |
| OUT |
| AUDIO |
| LINE |
| IN |
1a |
|
| 1b |
Optical Cable | Stereo |
(optional Sony | Cable |
accessory |
|
1b If you have a stereo or Dolby® Pro Logic® audio system
Connect the upper AUDIO R and L(MONO) jacks on the Digital Satellite Receiver to the audio inputs of your stereo amplifier.
1a To allow the Digital Satellite Receiver to control your VCR
Connect the VCR Controller to the VCR CONTROL jack on the receiver.
|
|
|
|
| Digital Satellite Receiver | ||
ACCESS CARD |
|
| RF REMOTE | CH3 |
| ||
|
|
|
| CH4 |
| ||
| SATELLITE IN |
| AUDIO | VIDEO | VHF/UHF IN |
| |
DIGITAL |
|
|
|
| 1 |
| |
OUT | LOW SPEED DATA |
|
|
| S VIDEO |
| |
(OPTICAL) |
|
|
|
|
| ||
|
|
|
|
| 2 |
| |
|
| R | L(MONO) | VHF(SAT)/UHF | AC IN~ | ||
VCR CONTROL | OUT | ||||||
|
| VIDEO OUT | TEL LINE | ||||
1a |
|
|
|
|
|
| |
VCR Controller |
|
|
|
|
| ||
Cable |
|
|
| VCR Controller |
| ||
— 6 —
zTip
If you connect your Digital Satellite Receiver to a Dolby Digital receiver, set the Dolby Digital option of the Audio display to Auto Select. See “Setting Audio Options (AUDIO)” on page 64 for more information.
|
|
|
|
| Digital Satellite Receiver | |||
ACCESS CARD |
|
| REMOTE | CH3 |
|
| ||
|
|
|
| CH4 |
|
| ||
|
| SATELLITE IN | AUDIO | VIDEO | VHF/UHF IN |
| ||
DIGITAL |
|
|
|
| 1 |
|
| |
OUT | LOW SPEED DATA |
|
| S VIDEO |
|
| ||
(OPTICAL) |
|
|
|
|
| |||
|
|
|
|
| 2 |
|
| |
|
| R | L(MONO) | VHF(SAT)/UHF | AC IN~ | |||
VCR CONTROL | OUT | TEL LINE | ||||||
|
| VIDEO OUT |
| |||||
|
|
|
|
|
|
| ||
|
| 2a |
|
| 2c |
|
| |
|
|
|
|
|
| Coaxial |
| |
|
| A/V Cable |
|
| Cable |
| ||
In front of the VCR
Place the VCR Controller under and in front of the VCR.
The VCR Controller must extend just in front of the infrared sensor of the VCR.
zTip
If the infrared sensor is not marked on your VCR, shine a flashlight into the front panel of the VCR to locate
IR Sensor | VCR (front view) |
VCR (side view)
1/2" to 1"
2a If your TV and VCR have A/V jacks
Connect the VIDEO OUT jacks of your Digital Satellite Receiver to the A/V input jacks of your VCR
VIDEO
(yellow) 2b
OR
Cable
2c If your TV and VCR do |
not have A/V jacks |
Connect the VHF(SAT)/ |
UHF OUT jack on the |
Digital Satellite Receiver to |
the VHF/UHF input jack |
on your VCR using coaxial |
the sensor.
VCR
Controller
using the supplied A/V cable. Then, connect the A/V output jacks of your VCR to the A/V input jacks of your TV using an A/V cable. (Be sure to match the colors on the jacks with the colored plugs on the A/V cable.)
2b If your TV and VCR have
Use an
VCR
| LINE |
|
| IN | IN |
AUDIO | VIDEO S VIDEO |
|
| LINE | OUT |
| OUT |
2a 


 2b
2b
A/V Cable
S-Video
| cable. |
| Then, connect the VHF/ |
| UHF output jack on your |
| VCR to the VHF/UHF |
| input jack on your TV using |
| coaxial cable. |
| Set the CH3/CH4 switch to |
2c | the channel that does not |
| carry |
|
your area.
Note
1b If you are using a Sony SmartFile VCR to take advantage of the Program Data Download feature
Use this connection instead of the VCR Controller connection. For information about setting up the
Connecting a Sony SmartFile™ VCR
|
|
|
|
| Digital Satellite Receiver | |
ACCESS CARD |
|
| RF REMOTE | CH3 |
| |
|
|
|
| CH4 |
| |
| SATELLITE IN |
| AUDIO | VIDEO | VHF/UHF IN |
|
DIGITAL |
|
|
|
| 1 |
|
OUT | LOW SPEED DATA |
|
|
| S VIDEO |
|
(OPTICAL) |
|
|
|
|
| |
|
|
|
|
| 2 |
|
|
| R | L(MONO) | VHF(SAT)/UHF | AC IN~ | |
VCR CONTROL |
|
| VIDEO OUT | OUT | TEL LINE | |
the yellow video connection.
zTip
To allow your Digital Satellite Receiver to control the recording functions of your VCR, see “Step
5:Connecting the VCR Controller” on page 11.
VIDEO | Cable | Coaxial |
(yellow) |
| |
OR |
| Cable |
|
|
TV
IN | VHF/UHF |
| S VIDEO |
| VIDEO |
| L(MONO) |
| |
| R |
With this connection, your input source is channel 3 or channel 4 depending on how you set the CH3/CH4 switch on your VCR.
VCR Control feature, see page 26. For details about the Program Data Download feature, refer to your SmartFile VCR Operating Instructions.
1b | Monaural Cable (supplied with |
| SmartFile VCR) |
Sony SmartFile VCR
| LINE | CPD IN |
| IN | IN |
AUDIO | VIDEO S VIDEO |
|
| LINE | OUT |
| OUT | |
|
|
10
11