STUDER INNOTEC |
| Low voltage | Float Charge | Absorption |
| Equalization | Absorption | |||||||
| LED 13 |
| LED 12 |
| LED 11 |
| LED 10 |
| Time | ||||
|
|
|
|
|
|
|
|
|
|
|
|
| LED |
LED | 12V | 24V | 48V | 12V | 24V | 48V | 12V | 24V | 48V | 12V | 24V | 48V |
|
14 | 12.0 | 24.0 | 48.0 | 13.7 | 27.4 | 54.8 | 16.2 | 32.4 | 64.8 | 16.2 | 32.4 | 64.8 | 4 h |
15 | 11.8 | 23.6 | 47.2 | 13.6 | 27.2 | 54.4 | 15.6 | 31.2 | 62.4 | 15.9 | 31.8 | 63.6 | 3 h |
16 | 11.6 | 23.2 | 46.4 | 13.5 | 27.0 | 54.0 | 15 | 30 | 60 | 15.6 | 31.2 | 62.4 | 2 h |
17 | 11.4 | 22.8 | 45.6 | 13.4 | 26.8 | 53.6 | 14.4 | 28.8 | 57.6 | 15.3 | 30.6 | 61.2 | 1 h |
18 | 11.2 | 22.4 | 44.8 | 13.3 | 26.6 | 53.2 | 14.2 | 28.4 | 56.8 | 15 | 30 | 60 | 0 – 1Min. |
The heavy printed values show the standard settings.
5.3.2 Set the voltage and timing threshold
The programming is done in accordance with the following steps:
Push and hold down, the Push Button 21 (Program) and the Push Button 19 (Change status) for minimum 2 seconds simultaneously.
With the Push Button 20 (select) select which of the battery level and of the absorption time have to be changed.
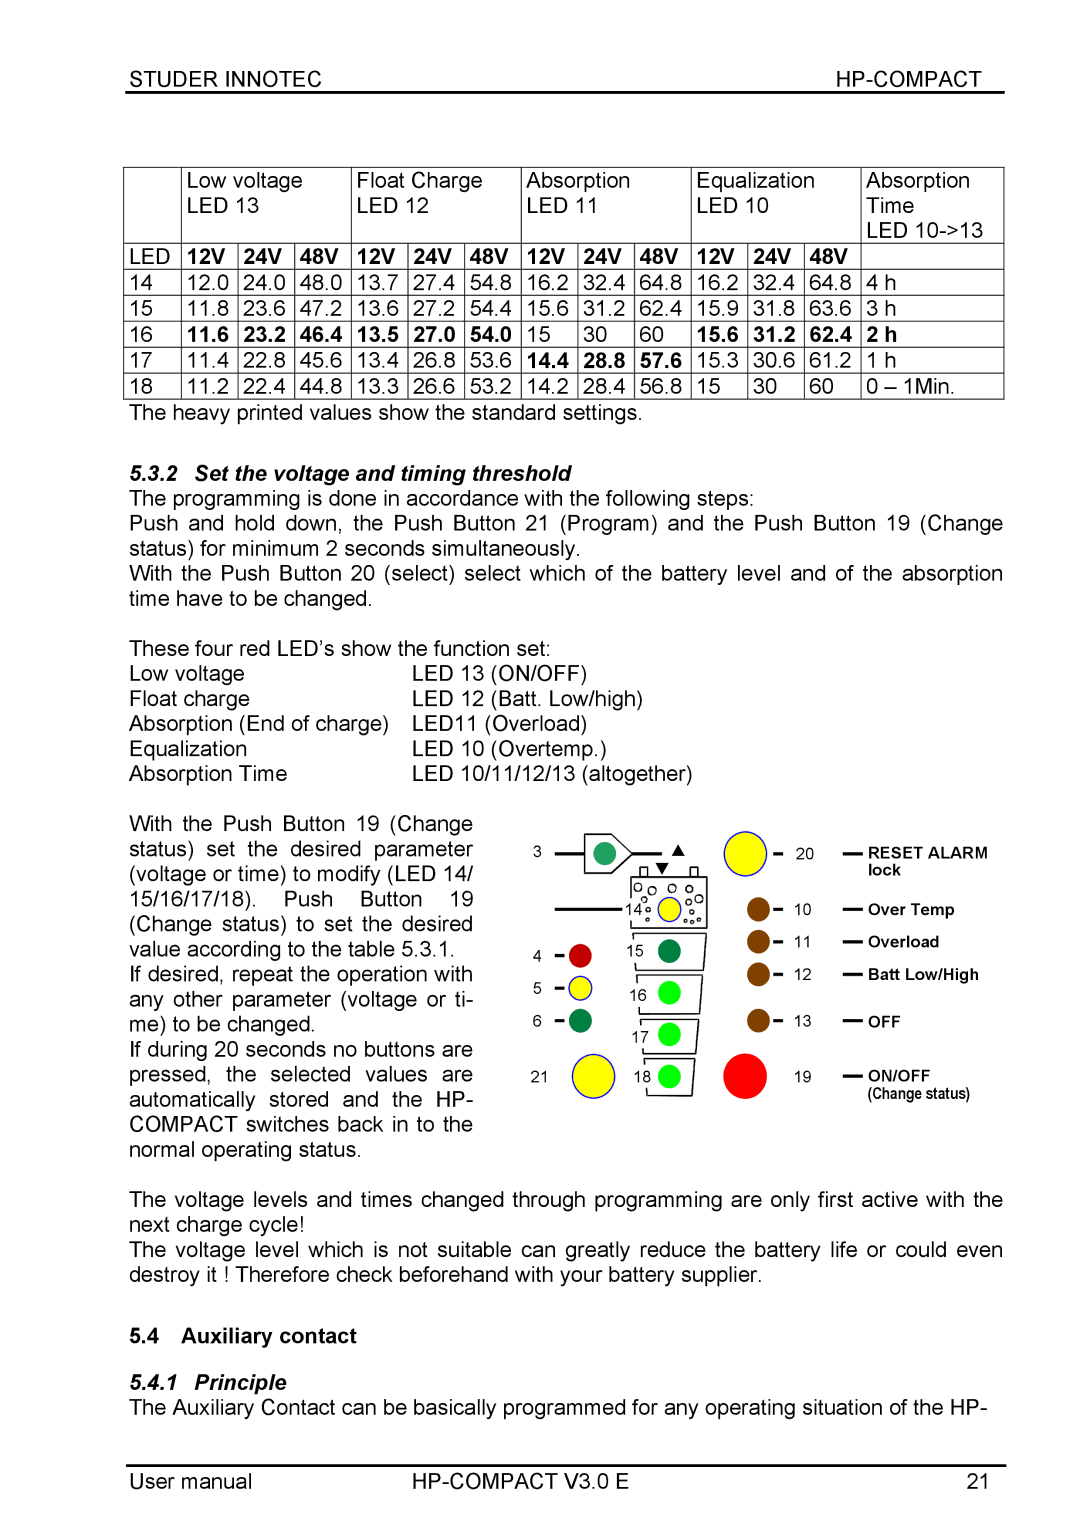
These four red LED’s show the function set:
Low voltage | LED 13 | (ON/OFF) |
Float charge | LED 12 | (Batt. Low/high) |
Absorption (End of charge) | LED11 (Overload) | |
Equalization | LED 10 | (Overtemp.) |
Absorption Time | LED 10/11/12/13 (altogether) | |
With the Push Button 19 (Change status) set the desired parameter (voltage or time) to modify (LED 14/ 15/16/17/18). Push Button 19 (Change status) to set the desired value according to the table 5.3.1.
If desired, repeat the operation with any other parameter (voltage or ti- me) to be changed.
If during 20 seconds no buttons are pressed, the selected values are automatically stored and the HP- COMPACT switches back in to the normal operating status.
3 |
|
| 14 |
4 | 15 |
5 | 16 |
| |
6 | 17 |
| |
21 | 18 |
20RESET ALARM lock
10Over Temp
11Overload
12Batt Low/High
13OFF
19ON/OFF
(Change status)
The voltage levels and times changed through programming are only first active with the next charge cycle!
The voltage level which is not suitable can greatly reduce the battery life or could even destroy it ! Therefore check beforehand with your battery supplier.
5.4Auxiliary contact
5.4.1 Principle
The Auxiliary Contact can be basically programmed for any operating situation of the HP-
User manual | 21 |