PORTASTUDIO 424 MKIII Brief Guide
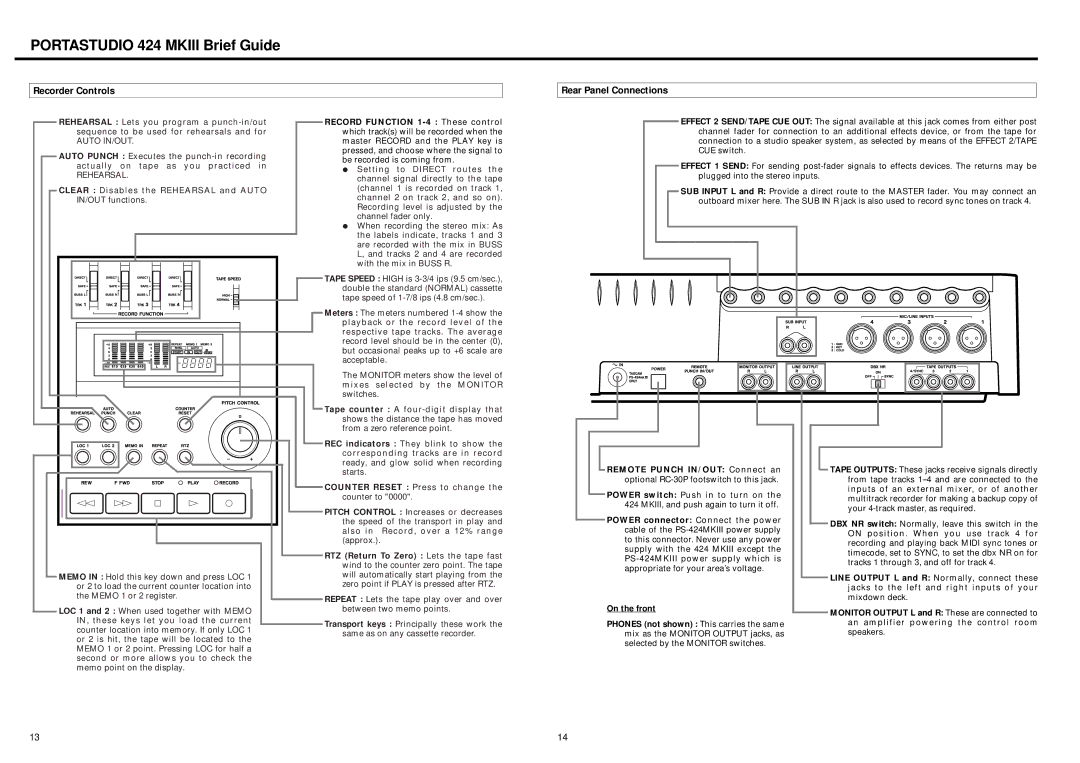
Recorder Controls
Rear Panel Connections
REHEARSAL : Lets you program a
AUTO IN/OUT.
AUTO PUNCH : Executes the
REHEARSAL.
CLEAR : Disables the REHEARSAL and AUTO IN/OUT functions.
RECORD FUNCTION
ÏSetting to DIRECT routes the channel signal directly to the tape (channel 1 is recorded on track 1, channel 2 on track 2, and so on). Recording level is adjusted by the channel fader only.
ÏWhen recording the stereo mix: As the labels indicate, tracks 1 and 3 are recorded with the mix in BUSS L, and tracks 2 and 4 are recorded with the mix in BUSS R.
TAPE SPEED : HIGH is
Meters : The meters numbered
The MONITOR meters show the level of mixes selected by the MONITOR switches.
Tape counter : A
EFFECT 2 SEND/TAPE CUE OUT: The signal available at this jack comes from either post channel fader for connection to an additional effects device, or from the tape for connection to a studio speaker system, as selected by means of the EFFECT 2/TAPE CUE switch.
EFFECT 1 SEND: For sending
SUB INPUT L and R: Provide a direct route to the MASTER fader. You may connect an outboard mixer here. The SUB IN R jack is also used to record sync tones on track 4.
MEMO IN : Hold this key down and press LOC 1 or 2 to load the current counter location into the MEMO 1 or 2 register.
LOC 1 and 2 : When used together with MEMO IN, these keys let you load the current counter location into memory. If only LOC 1 or 2 is hit, the tape will be located to the MEMO 1 or 2 point. Pressing LOC for half a second or more allows you to check the memo point on the display.
REC indicators : They blink to show the corresponding tracks are in record ready, and glow solid when recording starts.
COUNTER RESET : Press to change the counter to "0000".
PITCH CONTROL : Increases or decreases the speed of the transport in play and also in Record, over a 12% range (approx.).
RTZ (Return To Zero) : Lets the tape fast wind to the counter zero point. The tape will automatically start playing from the zero point if PLAY is pressed after RTZ.
REPEAT : Lets the tape play over and over between two memo points.
Transport keys : Principally these work the same as on any cassette recorder.
REMOTE PUNCH IN/OUT: Connect an optional
POWER switch: Push in to turn on the 424 MKIII, and push again to turn it off.
POWER connector: Connect the power cable of the
On the front
PHONES (not shown) : This carries the same mix as the MONITOR OUTPUT jacks, as selected by the MONITOR switches.
TAPE OUTPUTS: These jacks receive signals directly from tape tracks
DBX NR switch: Normally, leave this switch in the ON position. When you use track 4 for recording and playing back MIDI sync tones or timecode, set to SYNC, to set the dbx NR on for tracks 1 through 3, and off for track 4.
LINE OUTPUT L and R: Normally, connect these jacks to the left and right inputs of your mixdown deck.
MONITOR OUTPUT L and R: These are connected to an amplifier powering the control room speakers.
13 | 14 |