Model 2.0l | Model 3.2l |
PREPARATION
1.2
6
0.8
4
0.4
2
1
1.8
1.4
1.0
0.6
10
8
6
4
2
Before using for the first time
Read the instructions and follow them carefully.
Unpack the appliance
•Take the rice cooker out of its packa- ging and unpack all the attachments.
•Remove the lid.
•Take out all the printed documents.
•Take out the removable bowl.
•Clean the lid and the bowl with a sponge and a little washing up liquid. Wipe the outside of the appliance with a damp cloth.
•Dry carefully.
White |
| Level |
| |
Cup | of | Pers. | ||
Rice | ||||
| water |
|
Measuring the ingredients - Maximum capacity of the bowl
300 g | 2 | 2 | 2 | - 4 | |||
600 g | 4 | 4 | 4 | - 8 | |||
900 g | 6 | 6 | 6 - 12 | ||||
1200 g | 8 | 8 | 8 - 16 | ||||
1500 g | 10 | 10 | 10 | - 20 | |||
|
|
|
|
|
|
|
|
▲ ▲ ▲
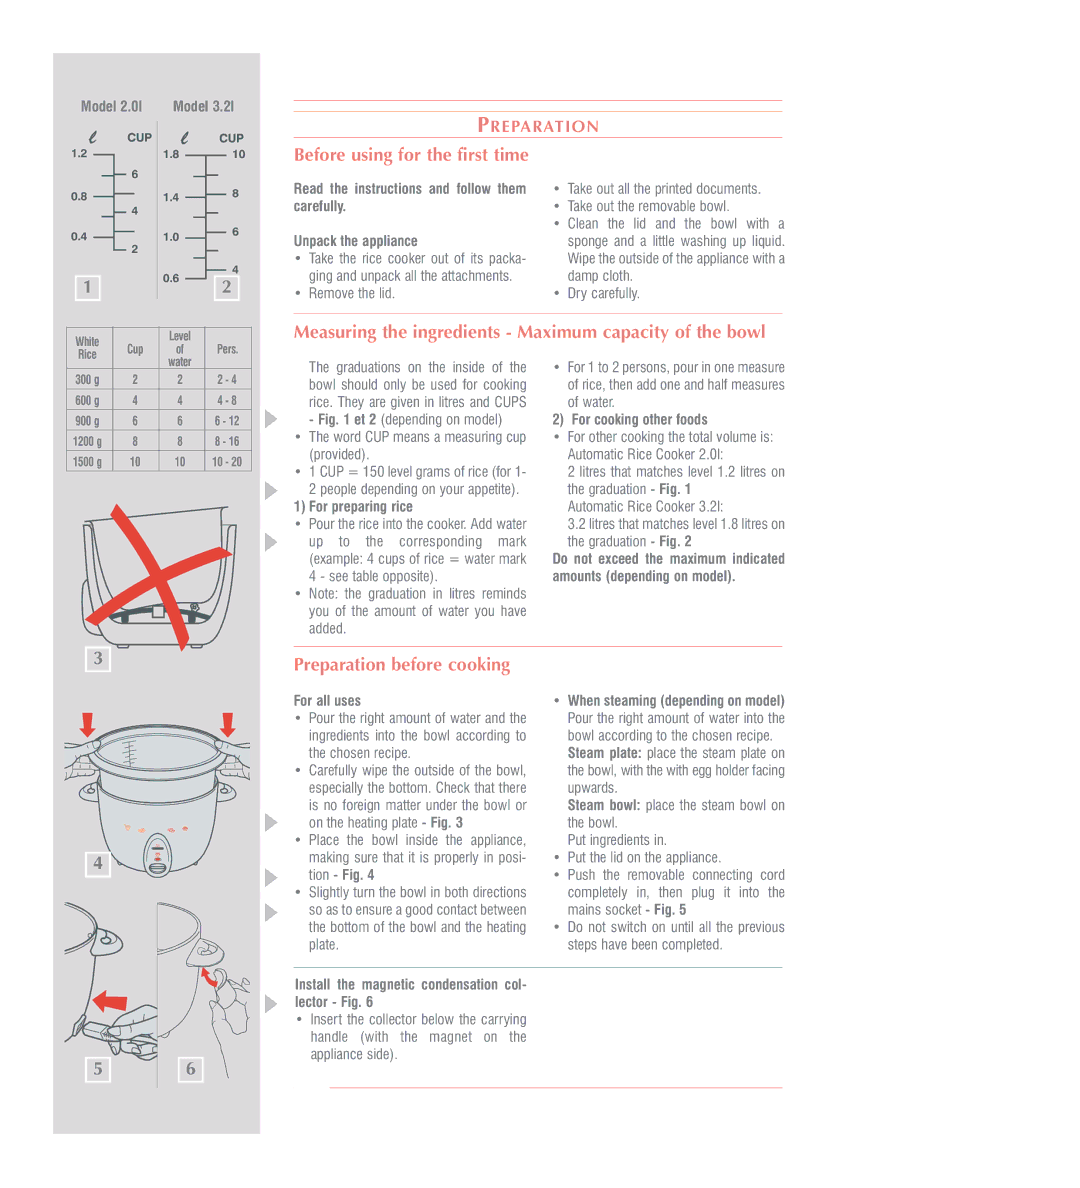
The graduations on the inside of the bowl should only be used for cooking rice. They are given in litres and CUPS
- Fig. 1 et 2 (depending on model)
•The word CUP means a measuring cup (provided).
•1 CUP = 150 level grams of rice (for 1- 2 people depending on your appetite).
1) For preparing rice
•Pour the rice into the cooker. Add water up to the corresponding mark (example: 4 cups of rice = water mark 4 - see table opposite).
•Note: the graduation in litres reminds you of the amount of water you have added.
•For 1 to 2 persons, pour in one measure of rice, then add one and half measures of water.
2) For cooking other foods
•For other cooking the total volume is: Automatic Rice Cooker 2.0l:
2 litres that matches level 1.2 litres on the graduation - Fig. 1
Automatic Rice Cooker 3.2l:
3.2litres that matches level 1.8 litres on the graduation - Fig. 2
Do not exceed the maximum indicated amounts (depending on model).
3
Preparation before cooking
4
5
Keep
warm
ok
6
![]()
![]()
![]()
![]()
![]()
![]() ▲ ▲ ▲ ▲
▲ ▲ ▲ ▲
For all uses | • When steaming (depending on model) | ||
• | Pour the right amount of water and the |
| Pour the right amount of water into the |
| ingredients into the bowl according to |
| bowl according to the chosen recipe. |
| the chosen recipe. |
| Steam plate: place the steam plate on |
• | Carefully wipe the outside of the bowl, |
| the bowl, with the with egg holder facing |
| especially the bottom. Check that there |
| upwards. |
| is no foreign matter under the bowl or |
| Steam bowl: place the steam bowl on |
| on the heating plate - Fig. 3 |
| the bowl. |
• Place the bowl inside the appliance, |
| Put ingredients in. | |
| making sure that it is properly in posi- | • | Put the lid on the appliance. |
| tion - Fig. 4 | • Push the removable connecting cord | |
• | Slightly turn the bowl in both directions |
| completely in, then plug it into the |
| so as to ensure a good contact between |
| mains socket - Fig. 5 |
| the bottom of the bowl and the heating | • | Do not switch on until all the previous |
| plate. |
| steps have been completed. |
Install the magnetic condensation col- lector - Fig. 6
•Insert the collector below the carrying handle (with the magnet on the appliance side).
