WARNING

Turn off electricity at the service panel before wiring the unit. (See Safety Instructions, Page 1).

Wiring the Hood with an

Integral Motor

1.Remove the j-box cover.

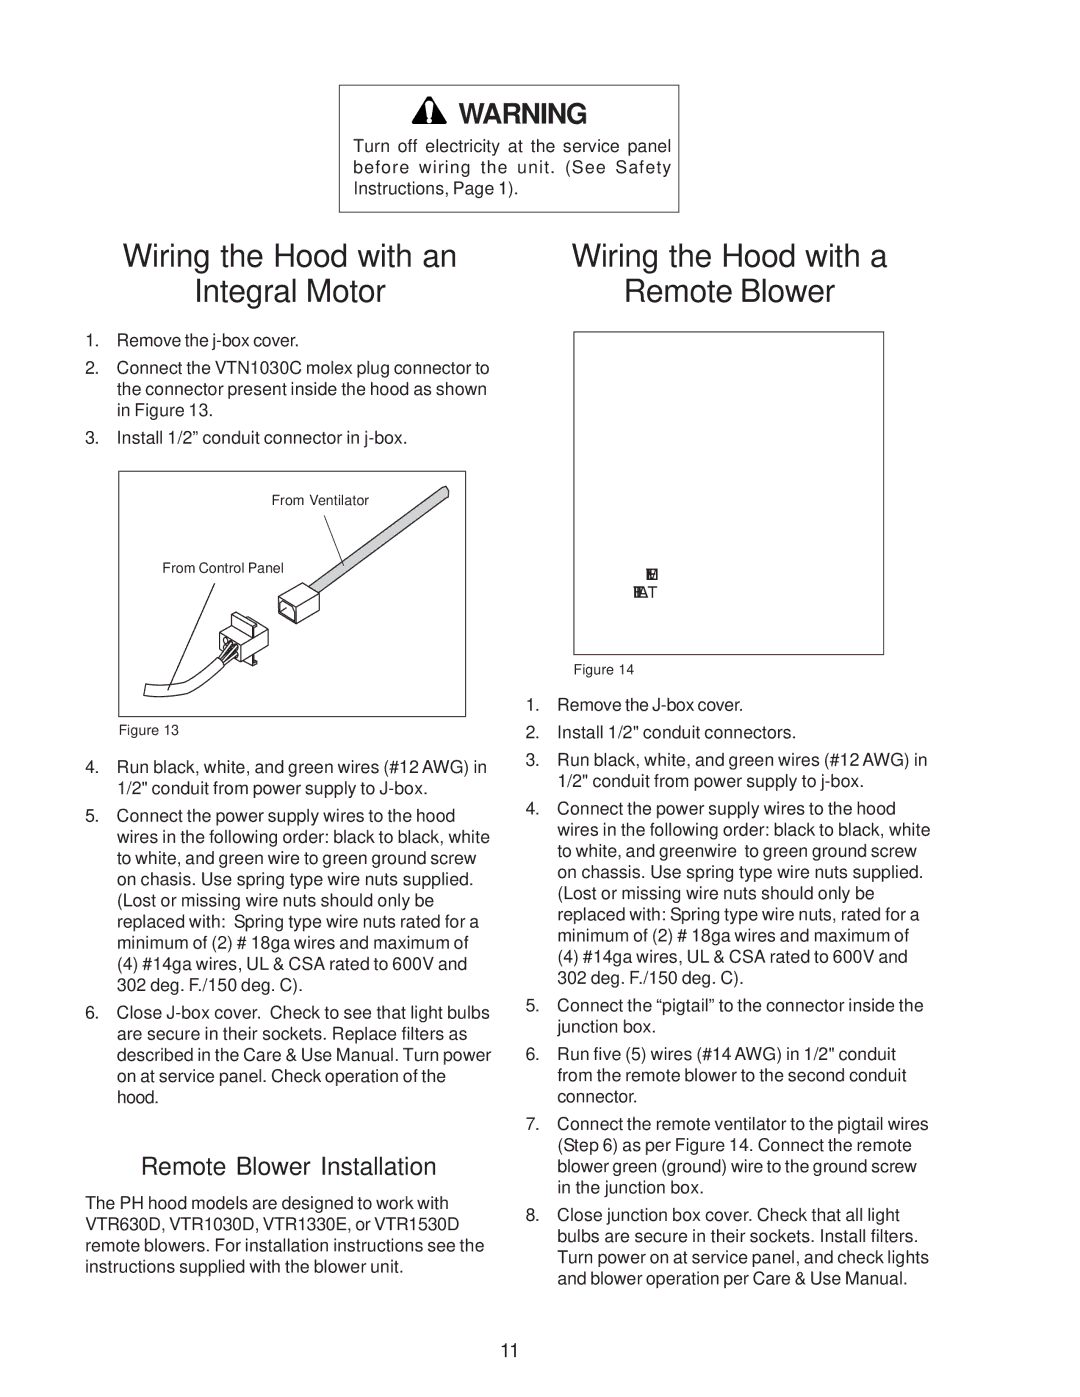
2.Connect the VTN1030C molex plug connector to the connector present inside the hood as shown in Figure 13.

3.Install 1/2” conduit connector in j-box.

FromFromVVentilator

From Control Panel

From Control Panel

Figure 13

4.Run black, white, and green wires (#12 AWG) in 1/2" conduit from power supply to J-box.

5.Connect the power supply wires to the hood wires in the following order: black to black, white to white, and green wire to green ground screw on chasis. Use spring type wire nuts supplied. (Lost or missing wire nuts should only be replaced with: Spring type wire nuts rated for a minimum of (2) # 18ga wires and maximum of

(4) #14ga wires, UL & CSA rated to 600V and 302 deg. F./150 deg. C).

6.Close J-box cover. Check to see that light bulbs are secure in their sockets. Replace filters as described in the Care & Use Manual. Turn power on at service panel. Check operation of the hood.

Remote Blower Installation

The PH hood models are designed to work with VTR630D, VTR1030D, VTR1330E, or VTR1530D remote blowers. For installation instructions see the instructions supplied with the blower unit.

Wiring the Hood with a

Remote Blower

REMOTE

VENTILATOR

Figure 14

1.Remove the J-box cover.

2.Install 1/2" conduit connectors.

3.Run black, white, and green wires (#12 AWG) in 1/2" conduit from power supply to j-box.

4.Connect the power supply wires to the hood wires in the following order: black to black, white to white, and greenwire to green ground screw on chassis. Use spring type wire nuts supplied. (Lost or missing wire nuts should only be replaced with: Spring type wire nuts, rated for a minimum of (2) # 18ga wires and maximum of

(4) #14ga wires, UL & CSA rated to 600V and 302 deg. F./150 deg. C).

5.Connect the “pigtail” to the connector inside the junction box.

6.Run five (5) wires (#14 AWG) in 1/2" conduit from the remote blower to the second conduit connector.

7.Connect the remote ventilator to the pigtail wires (Step 6) as per Figure 14. Connect the remote blower green (ground) wire to the ground screw in the junction box.

8.Close junction box cover. Check that all light bulbs are secure in their sockets. Install filters. Turn power on at service panel, and check lights and blower operation per Care & Use Manual.

11

Page 12
Image 12
Thermador PH42 Wiring the Hood with an Integral Motor, Wiring the Hood with a Remote Blower, Remote Blower Installation

PH30, PH36, PH42, PH48, PH54 specifications

The Thermador PH series, consisting of the PH54, PH48, PH42, PH36, and PH30 models, represents a pinnacle of culinary design and technology in the world of high-end kitchen appliances. These professional-grade refrigerators are crafted to meet the needs of aspiring chefs and home cooks alike, offering unparalleled performance, spaciousness, and advanced features.

One of the standout characteristics of the PH series is its sleek, integrated design. These refrigerators blend seamlessly with kitchen cabinetry, providing a sophisticated aesthetic that enhances any modern kitchen. With a robust construction, Thermador ensures durability and longevity, making these appliances a smart investment for any kitchen space.

Among the innovative technologies featured in the PH series is the Fresh Food Preservation system. This cutting-edge technology utilizes a precise temperature management system, ensuring that food stays fresher for longer. The models also come equipped with a MultiAirFlow system which optimizes air circulation within the refrigerator, maintaining consistent temperatures throughout and preventing hot spots that can spoil food.

The PH54, PH48, PH42, and PH36 models boast expansive storage options, with adjustable shelves and spacious drawers designed for maximum flexibility. The titling glass shelves allow for easy organization and retrieval, while soft-close mechanisms provide an added touch of luxury and convenience. Each unit also includes a dedicated crisper drawer to keep fruits and vegetables fresh and crisp.

Energy efficiency is a key feature in the PH series, with models designed to consume less energy while delivering high performance. This not only helps the environment but also reduces utility bills, making these refrigerators a practical choice for eco-conscious consumers.

Additionally, the intuitive control panel and Smart Home connectivity allow users to monitor and adjust settings remotely. Thermador’s Home Connect technology enables users to access appliance information via a smartphone app, allowing for greater convenience and customization of settings.

In summary, the Thermador PH series — encompassing the PH54, PH48, PH42, PH36, and PH30 models — combines elegant design, innovative technology, and efficient features to create some of the most sought-after refrigeration solutions on the market. With their focus on quality, performance, and usability, these refrigerators are perfect for anyone looking to elevate their culinary experience.