Introduction
 Identification of controls (Continued)
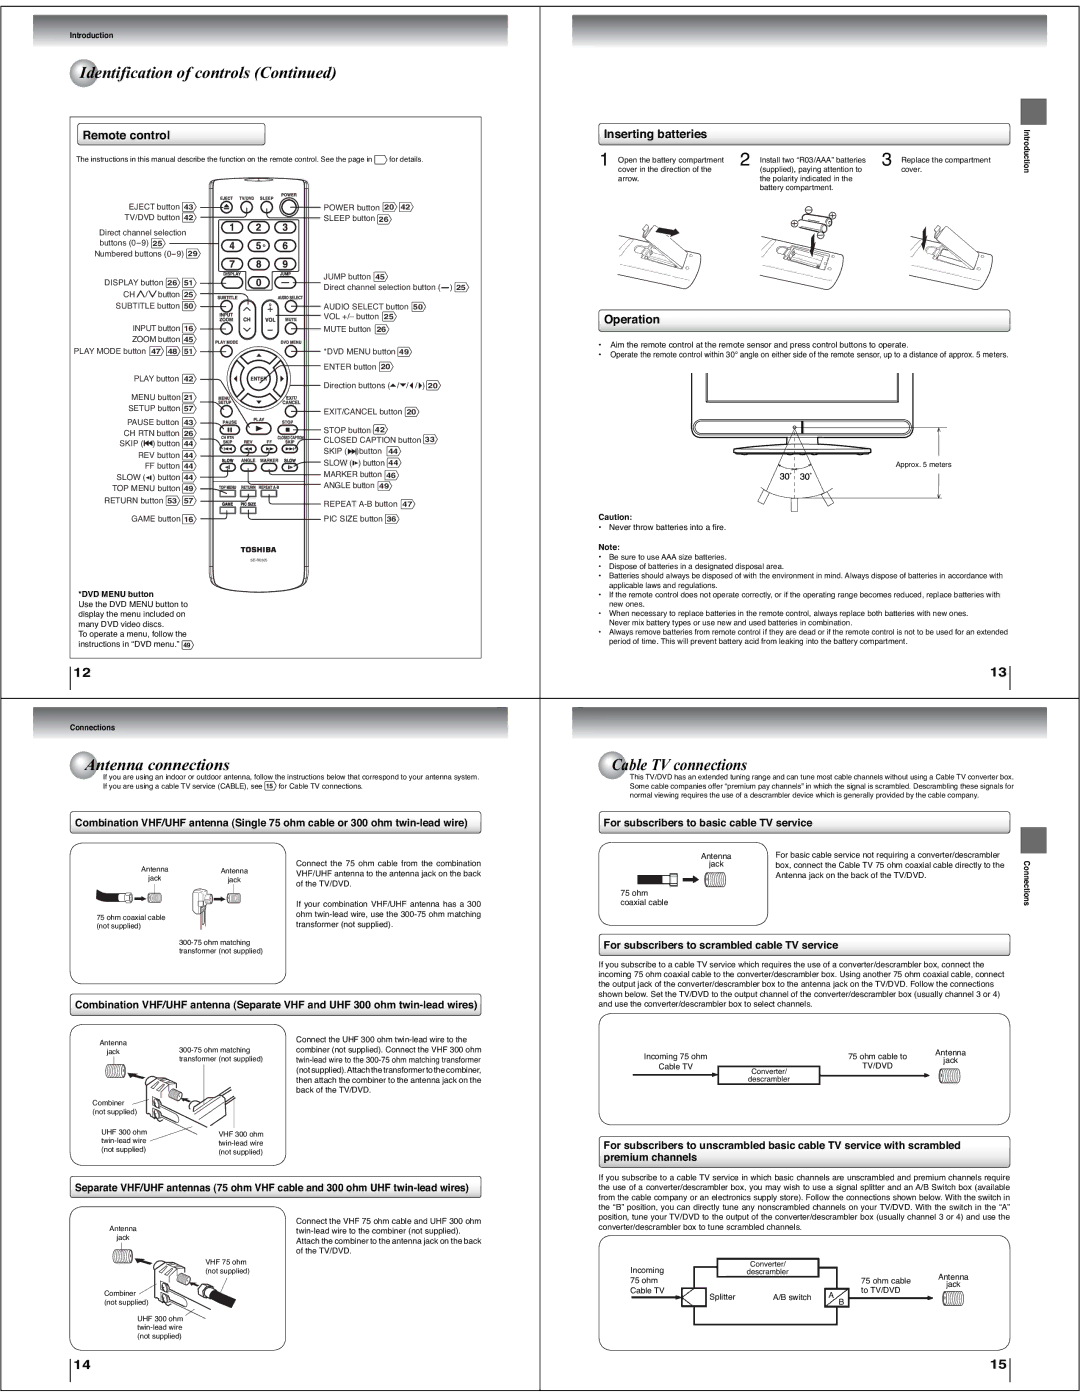
Remote control
The instructions in this manual describe the function on the remote control. See the page in ![]() for details.
for details.
EJECT button 43 | POWER button 20 42 |
TV/DVD button 42 | SLEEP button 26 |
Direct channel selection |
|
buttons |
|
Numbered buttons |
|
1 | cover in the direction of the | 2 (supplied), paying attention to | 3 cover. | Introduction |
Inserting batteries |
|
|
| |
| Open the battery compartment | Install two “R03/AAA” batteries | Replace the compartment |
|
| arrow. | the polarity indicated in the |
|
|
|
| battery compartment. |
|
|
DISPLAY button 26 51
CH / button 25
SUBTITLE button 50
INPUT button 16 ZOOM button 45 PLAY MODE button 47 48 51
PLAY button 42
MENU button 21
SETUP button 57
PAUSE button 43
CH RTN button 26
SKIP (![]() ) button 44
) button 44
REV button 44
FF button 44
SLOW (![]() ) button 44
) button 44
TOP MENU button 49
RETURN button 53 57
GAME button 16
JUMP button 45
Direct channel selection button ( ) 25
AUDIO SELECT button 50
VOL +/– button 25
MUTE button 26
*DVD MENU button 49 ENTER button 20
Direction buttons (![]() /
/![]() /
/![]() /
/![]() ) 20
) 20
EXIT/CANCEL button 20
![]()
![]() STOP button 42
STOP button 42
CLOSED CAPTION button 33
SKIP (![]()
![]() )button 44
)button 44
SLOW (![]() ) button 44 MARKER button 46 ANGLE button 49
) button 44 MARKER button 46 ANGLE button 49
REPEAT
PIC SIZE button 36
Operation
•Aim the remote control at the remote sensor and press control buttons to operate.
•Operate the remote control within 30° angle on either side of the remote sensor, up to a distance of approx. 5 meters.
Approx. 5 meters
Caution:
• Never throw batteries into a fi re.
Note:
*DVD MENU button
Use the DVD MENU button to display the menu included on many DVD video discs.
To operate a menu, follow the instructions in “DVD menu.” 49
12
Connections
 Antenna connections
If you are using an indoor or outdoor antenna, follow the instructions below that correspond to your antenna system. If you are using a cable TV service (CABLE), see 15 for Cable TV connections.
Combination VHF/UHF antenna (Single 75 ohm cable or 300 ohm
Connect the 75 ohm cable from the combination
Antenna | Antenna | VHF/UHF antenna to the antenna jack on the back | |
jack | jack | ||
of the TV/DVD. | |||
|
| ||
|
| If your combination VHF/UHF antenna has a 300 | |
75 ohm coaxial cable |
| ohm | |
| transformer (not supplied). | ||
(not supplied) |
|
Combination VHF/UHF antenna (Separate VHF and UHF 300 ohm
Antenna |
| Connect the UHF 300 ohm |
jack | combiner (not supplied). Connect the VHF 300 ohm | |
| transformer (not supplied) | |
|
| (notsupplied).Attachthetransformertothecombiner, |
|
| then attach the combiner to the antenna jack on the |
|
| back of the TV/DVD. |
Combiner |
|
|
(not supplied) |
|
|
UHF 300 ohm | VHF 300 ohm |
|
| ||
(not supplied) |
| |
(not supplied) |
| |
|
|
Separate VHF/UHF antennas (75 ohm VHF cable and 300 ohm UHF
Antenna | Connect the VHF 75 ohm cable and UHF 300 ohm |
jack | Attach the combiner to the antenna jack on the back |
| |
| of the TV/DVD. |
| VHF 75 ohm |
| (not supplied) |
Combiner |
|
(not supplied) |
|
UHF 300 ohm
14
•Be sure to use AAA size batteries.
•Dispose of batteries in a designated disposal area.
•Batteries should always be disposed of with the environment in mind. Always dispose of batteries in accordance with applicable laws and regulations.
•If the remote control does not operate correctly, or if the operating range becomes reduced, replace batteries with new ones.
•When necessary to replace batteries in the remote control, always replace both batteries with new ones. Never mix battery types or use new and used batteries in combination.
•Always remove batteries from remote control if they are dead or if the remote control is not to be used for an extended period of time. This will prevent battery acid from leaking into the battery compartment.
13
 Cable TV connections
This TV/DVD has an extended tuning range and can tune most cable channels without using a Cable TV converter box. Some cable companies offer “premium pay channels” in which the signal is scrambled. Descrambling these signals for normal viewing requires the use of a descrambler device which is generally provided by the cable company.
For subscribers to basic cable TV service
Antenna | For basic cable service not requiring a converter/descrambler |
| |
Connections | |||
coaxial cable | box, connect the Cable TV 75 ohm coaxial cable directly to the | ||
jack |
| ||
| Antenna jack on the back of the TV/DVD. |
| |
75 ohm |
|
|
For subscribers to scrambled cable TV service
If you subscribe to a cable TV service which requires the use of a converter/descrambler box, connect the incoming 75 ohm coaxial cable to the converter/descrambler box. Using another 75 ohm coaxial cable, connect the output jack of the converter/descrambler box to the antenna jack on the TV/DVD. Follow the connections shown below. Set the TV/DVD to the output channel of the converter/descrambler box (usually channel 3 or 4) and use the converter/descrambler box to select channels.
Incoming 75 ohm | 75 ohm cable to | Antenna | |
jack | |||
Cable TV | TV/DVD | ||
| |||
| Converter/ |
| |
| descrambler |
|
For subscribers to unscrambled basic cable TV service with scrambled premium channels
If you subscribe to a cable TV service in which basic channels are unscrambled and premium channels require the use of a converter/descrambler box, you may wish to use a signal splitter and an A/B Switch box (available from the cable company or an electronics supply store). Follow the connections shown below. With the switch in the “B” position, you can directly tune any nonscrambled channels on your TV/DVD. With the switch in the “A” position, tune your TV/DVD to the output of the converter/descrambler box (usually channel 3 or 4) and use the converter/descrambler box to tune scrambled channels.
Incoming | Converter/ |
|
|
|
descrambler |
|
| Antenna | |
75 ohm |
|
| 75 ohm cable | |
|
| jack | ||
Cable TV |
|
| to TV/DVD | |
A/B switch | A |
| ||
Splitter | B |
| ||
|
|
|
| |
|
|
|
|
|
15