Copying Guide
Page
Preface
Page
Contents
101
103
105
107
Image Adjustment Function Combination Matrix 201
142
146
147
203
Placing Paper
Basic Menu for the Copier Function
Basic Menu for the Copier Function
Storage button This is for the storage function
Equipment status indication area
Placing Paper
„ Acceptable copy paper
‰ Precautions for storing copy paper
‰ Unacceptable copy paper
„ Placing paper in drawers
Gap between the paper and the side guides a in the figure on
Gap between the paper and the end guide B in the figure on
Touch panel. When it is the same, press no
When Did you change paper size and type? appears
To automatically detect the size of paper placed in a drawer
When paper size is set to be detected automatically
„ Registering paper size
Select the paper size on the touch panel
„ Setting paper type
Thickness
Attribute
Placing Paper
„ Placing paper in the Tandem Large Capacity Feeder
Select the paper type
Clearing the set paper type
Do not touch the slide rail a in the figure on the right
Change the paper type as required
Place paper on the left tray
Place paper on the tray
Do not touch the slide rails a in the figure on the right
Page
Before Making Copies
Placing Originals
Making Copies
Bypass Copying
Before Making Copies
„ Storage of color copies
„ Forgery prevention function
Placing Originals
„ Acceptable originals
Maximum number of sheets for one scanning
When you copy highly transparent originals
„ Placing originals on the original glass
Raise the Radf
Lower the Radf carefully
„ Book-type originals
Its face down. Align it against the left rear corner
Original glass
Open the desired page of the original and place it with
When black streaks appear
‰ Continuous feed mode
Align all the originals
For long originals
‰ Single feed mode
If there is another original, insert it in the same way
After all the originals are pulled in, press Finished
„ Basic copying procedure
Making Copies
Make sure that paper is placed in the drawers
Place the originals
Making Copies
‰ Stopping and restarting copying
Canceling jobs being scanned
„ Scanning the next original during copying
Press the Start button on the control panel
Confirming auto jobs
„ Interrupting copying and making other copies
„ Proof copy
Press the Start button on the control panel
„ Selecting exit tray
Changing the exit tray
Bypass Copying
„ Bypass copying
Bypass Copying
Press Paper Type Select the paper type and then press OK
About Back
Paper type Icon
‰ Copying on other than the above standard sizes of paper
Press Other under Copy
Bypass Copying
„ Bypass copying on non-standard size paper
Press Custom Paper on the touch panel
Key in the dimension
‰ Registering non-standard size in the memory
Before Using Copying Functions
Selecting Finishing Mode
Paper Selection
Duplex Copying
Before Using Copying Functions
„ Default settings
„ Confirming the set functions
Clearing all settings changed
„ Clearing the set functions
„ Restrictions on function combinations
Paper Selection
„ Automatic Paper Selection APS
„ Selecting desired paper manually
Place paper in the drawers
„ Copying mixed-size originals in one operation
Press Zoom on the touch panel
Press Mixed Size
Switching Color Modes
Switching color modes
When color originals are copied in black Example
When black originals are copied in full colors Example
Setting Original Modes
Press Original Mode on the touch panel
Select the original mode
Density Adjustment
Adjusting automatically automatic density adjustment
Adjusting manually
Enlargement and Reduction Copying
„ Automatic Magnification Selection AMS
Place paper in the drawers Press Zoom on the touch panel
Automatic Magnification Selection AMS
Select the desired paper size and then press AMS
Enlargement and Reduction Copying
‰ Registering paper sizes to Other size
„ Specifying reproduction ratio manually
One-touch zoom buttons
Select the desired size
Photo Zoom
Select the original size
Select the desired copy paper size, and then press OK
‰ Setting photo originals in other sizes
Selecting Finishing Mode
„ Finishing modes and optional finishing devices
Finisher
Hole Punch Unit
Using the tray holder
‰ Name of each part of the Finisher optional
MJ-1103
MJ-1104
„ Sort/Group mode
Sort mode Group mode
Place paper in the drawers Place the originals
Press Finishing on the touch panel
„ Rotate sort mode
Selecting Finishing Mode
„ Staple sort mode
Place the originals Press Finishing on the touch panel
‰ Maximum number of sheets available for stapling
„ Magazine sort / Saddle stitch
Requirements for saddle stitching
Place paper in the drawers
„ Hole punch mode
Selecting Finishing Mode
„ Manual staple mode
Let go of the paper, and then press the stapling button
Maximum number of sheets available for manual stapling
Duplex Copying
„ Making a 1-sided copy
Place the originals Press 2-SIDED on the touch panel
Select the desired mode
„ Making a 2-sided copy
Press 2-SIDED on the touch panel Select the desired mode
„ Making a 2-sided copy from a book-type original
Select the book copying type
Select other copy modes as required
Place the original on the original glass
Performing Copy & File
Press OK
„ Setting share folder
FTP
SMB
NetWare IPX/SPX / NetWare TCP/IP
Page
Displaying Edit Menu Image Shift
134
Displaying Edit Menu
Image Shift
„ Creating top/bottom margin or left/right margin
Place the originals Press Image Shift on the Edit menu
Image Shift
„ Creating bookbinding margin
Press Book Adjust the width of the binding margin
Edge Erase
Place the originals Press Edge Erase on the Edit menu
Adjust the width of the part to be erased
Book Center Erase
Press either 2 mm 0.08 or 50 mm Press OK
Dual
Is finished, open the next pages and place them
Force
Breaking the glass could injure you
2IN1 / 4IN1
Place the originals Press 2IN1 / 4IN1 on the Edit menu
Perform 2IN1 / 4IN1 setting
Magazine Sort Mode
Magazine sort mode Magazine sort & saddle stitch mode
Select the paper size
Magazine sort & saddle stitch A3, A4-R, B4, LD, LG, LT-R
Magazine Sort Mode
Image Editing
„ Trimming / Masking
Press Editing on the Edit menu
Breaking the glass could injure you
Key in the read values
„ Mirror image / Negative/positive reversal
Place the originals Press Editing on the Edit menu
Image Editing
XY Zoom
Place the originals Press XY Zoom on the Edit menu
XY Zoom
Cover Sheet
Place the paper for the cover sheets
Place the normal paper in the drawers Place the originals
Cover Sheet
When they are placed on the original glass, follow steps 8
Sheet Insertion
Place sheets for sheet insertion
Place the normal paper in the drawers
Sheet Insertion
Copying starts
Time Stamp
Number
Select the direction and position of a page number
Number
Job Build
Press JOB Build on the Edit menu
Place the first stack of originals, and then select settings
Press the Start button on the control panel
Image Direction
Press Image Direction on the Edit menu
Sided open to left portrait original 1-sided copy
Image direction is now set
Book Tablet
ADF Sadf
Place the originals on the Radf one sheet at a time
Full Image
Full Image
Image Repeat
Image Repeat
Key in the read values and specify the repeat count
Omit Blank
Place the originals Press Omit Blank page on the Edit menu
Omit blank page is now set
Outside erase set No setting
Outside Erase
Set outside erase
Page
Image Adjustment
Displaying Image Menu
Using Image Adjustment Functions
„ Color balance Ymck adjustment
Canceling color balance adjustment
„ RGB adjustment
Canceling RGB adjustment
„ One-touch adjustment
Canceling one-touch adjustment
When Marker is selected
„ Background adjustment
Canceling background adjustment
Canceling sharpness adjustment
„ Sharpness
„ Twin color copying
‰ Twin color selectable
Press Twin Color Copy in the Image menu
Press Second Color Select the desired color
Press or of the color to obtain the desired color balance
‰ RED & Black
Adjust the color, press OK
Press RED & Black
Range Adjustment
Canceling mono color copying
„ Mono color copying
„ Hue
Press HUE in the Image menu
Adjust the hue
Canceling hue adjustment
Canceling saturation adjustment
„ Saturation
Templates 164
Registering Templates 167
Recalling Templates 174 Changing Data 177
Deleting Groups or Templates 180
Templates
„ Displaying template menu
„ Using Useful templates
Templates with copying functions
Templates with scanning functions
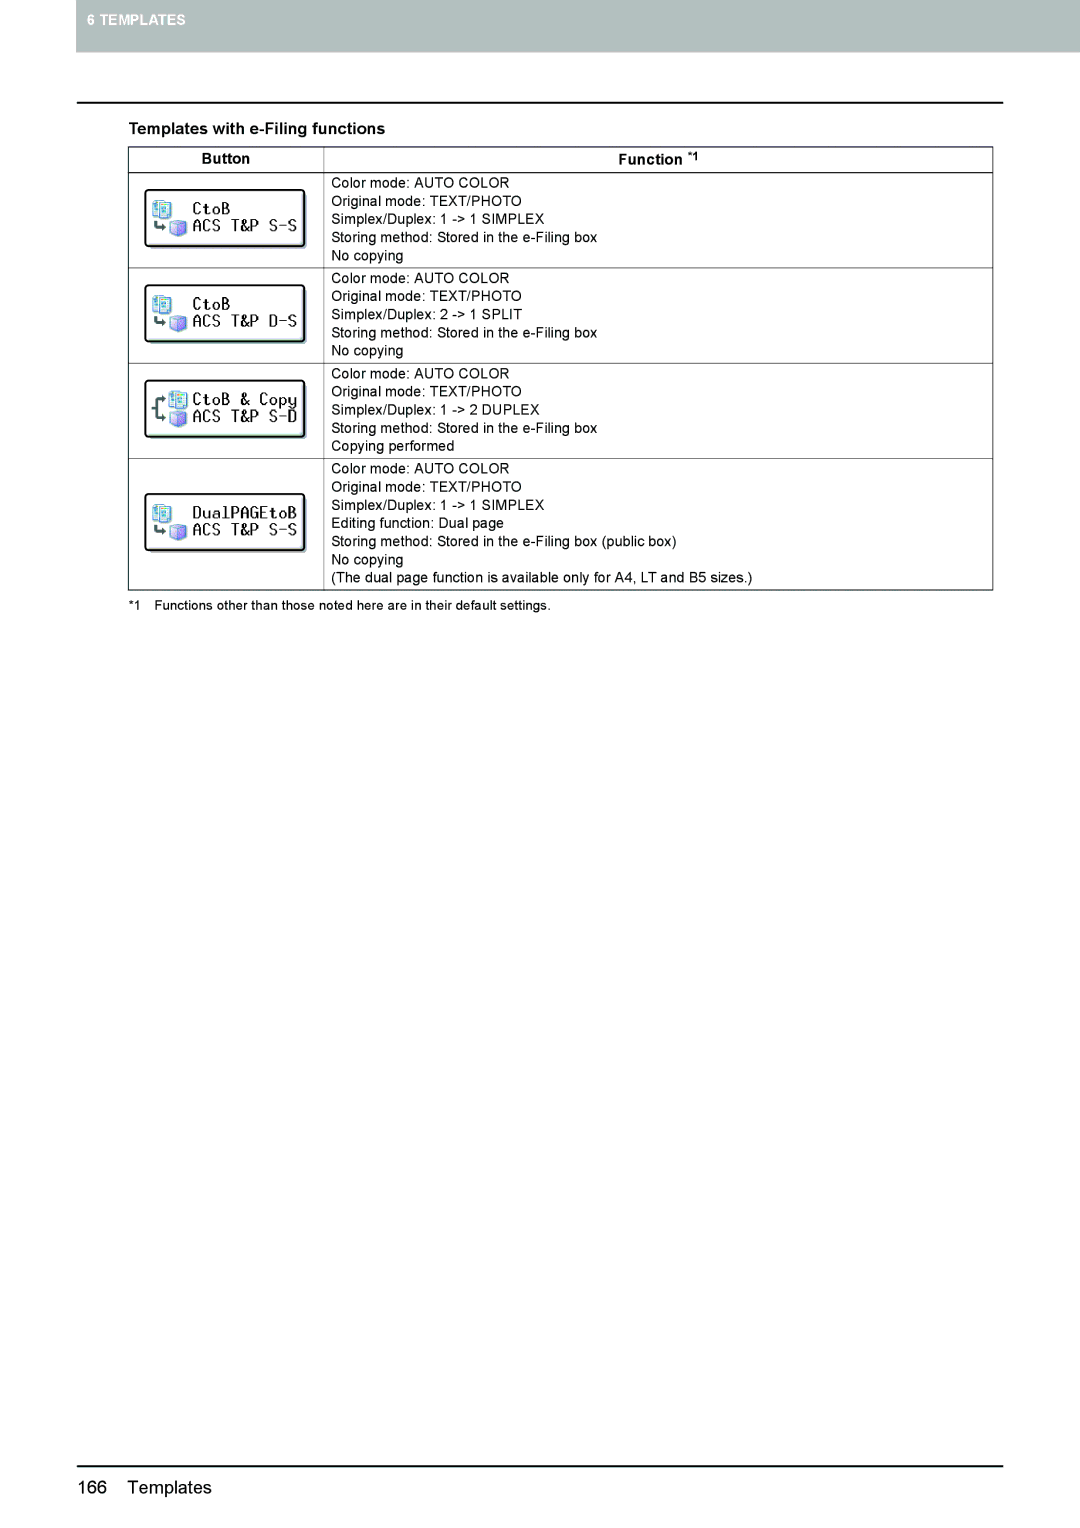
Templates with e-Filing functions
Registering Templates
„ Registering templates into the public template group
Set all the required functions
Press Template on the touch panel
Press Password
To switch the menu
Select a template
Enter the necessary information about the template
„ Creating a new private group
Select a group
Enter the necessary information about the group
„ Registering templates into a private group
Select the desired group
Register a template following steps 6 and 7 on
Public template group
Registering templates into
Recalling Templates
Press the button for the desired template
Message is displayed for approx seconds
Changing Data
„ Changing private group data
Template menu, select the desired group
Press the Function Clear button on the control panel
Enter the password as follows and then press OK
„ Changing template data
Select the desired template
Template group
Deleting Groups or Templates
„ Deleting private groups
Template menu, select the desired private group
Press Delete
„ Deleting templates
Press the button for the desired template Press Delete
Page
Confirming JOB Status
Confirming Copy Job Status 186
Confirming Copy Job Status
„ Confirming jobs in progress or ones in waiting
‰ Deleting jobs
‰ Pausing jobs
Resuming the paused job
‰ Moving jobs
„ Confirming copy job history
Confirming Copy Job Status
„ Confirming drawers
Press JOB Status on the touch panel Press the Supply tab
„ Confirming amount of toner remaining
Press JOB Status on the touch panel Press the Toner tab
Page
Image Adjustment Function Combination Matrix 201
Continuous Copying Speed 196
Copying Function Combination Matrix 199
Continuous Copying Speed
„ Color copying
STUDIO5520C
STUDIO6520C
„ Black-and-white copying
STUDIO6530C
STUDIO6530C
Copying Function Combination Matrix
Copying Function Combination Matrix
„ Combination matrix 2/2
Image Adjustment Function Combination Matrix
„ Combination matrix 1/2
Color mode Black
Index
Numerics
41, 52
174
Index
FC-5520C/6520C/6530C OME080008B0
Multifunctional Digital Color Systems