Satellite A40/A45 Series User’s Guide
If you need assistance Toshiba Global Support Centre
Critical Applications
Model Satellite A40/A45 Series ReWritable CD/DVD Drives
Protection of Stored Data
FCC Notice
Industry Canada Requirement
FCC Requirements
Telephone Company Procedures
Alarm equipment
Instructions for IC CS-03 certified equipment
Wireless Interoperability
Wireless LAN and your Health
Regulatory Information
Europe EU Declaration of Conformity
USA-Federal Communications Commission FCC
Page
Taiwan
Device Authorization
Interference Statement
USA
Venezuela
Bluetooth wireless technology Interoperability
Bluetooth wireless technology and your Health
Regulatory statements
Canada-Industry Canada IC
Taiwan
FH1
CD-ROM, DVD-ROM, Multi-function Drive Safety Instructions
Telecom Engineering Center
Export Administration Regulation
Copyright
Trademarks
Computer Disposal Information
Contents
Contents
100
117
Exploring Your Options 163
173
188
241
Appendix C Using ConfigFreeTM
Introduction
This guide
Introduction
Safety icons
Other documentation
Other icons used
Service options
Selecting a place to work
Creating a computer-friendly environment
Important information about your CPU cooling fan
Seating and posture
Placement of the computer
Keeping yourself comfortable
Correct posture and positioning of the computer
Work habits
Lighting
Arms and wrists
Precautions
Setting up your computer
Setting up your software
Registering your computer with Toshiba
Before starting to use your computer, you may also want to
Connect a local printer see Connecting a printer on
Adding external devices
Connecting to a power source
Sample power cable and sample AC adapter
Plug the AC adapter into the DC-IN
Connecting the power cable to the sample AC adapter
Connecting the AC adapter to the computer
Charging the main battery
Opening the display panel
Using the computer for the first time
Opening the display panel
Turning on the power
Pressing the power button
Activating the power-on password
Click Security Click User password
Using the TouchPad
Click Start, Control Panel
Control buttons
Disabling or enabling the TouchPad
Click Printers and Other Hardware
Sample Mouse Properties window
Using Toshiba Touch and Launch
Sample Toshiba Touch and Launch window
Parts of the Toshiba Touch and Launch window
Settings
Disable/Enable Help About
Toshiba Touch and Launch Settings
Sample Toshiba Touch and Launch Settings window
Setting up a printer
Disabling or enabling Toshiba Touch and Launch
Sample Control Panel
Using the Add Printer Wizard
Click Start, Control Panel. The Control Panel appears
Add Printer Wizard window appears
Sample Printers and Faxes window
Click Add a printer
Sample Add Printer Wizard
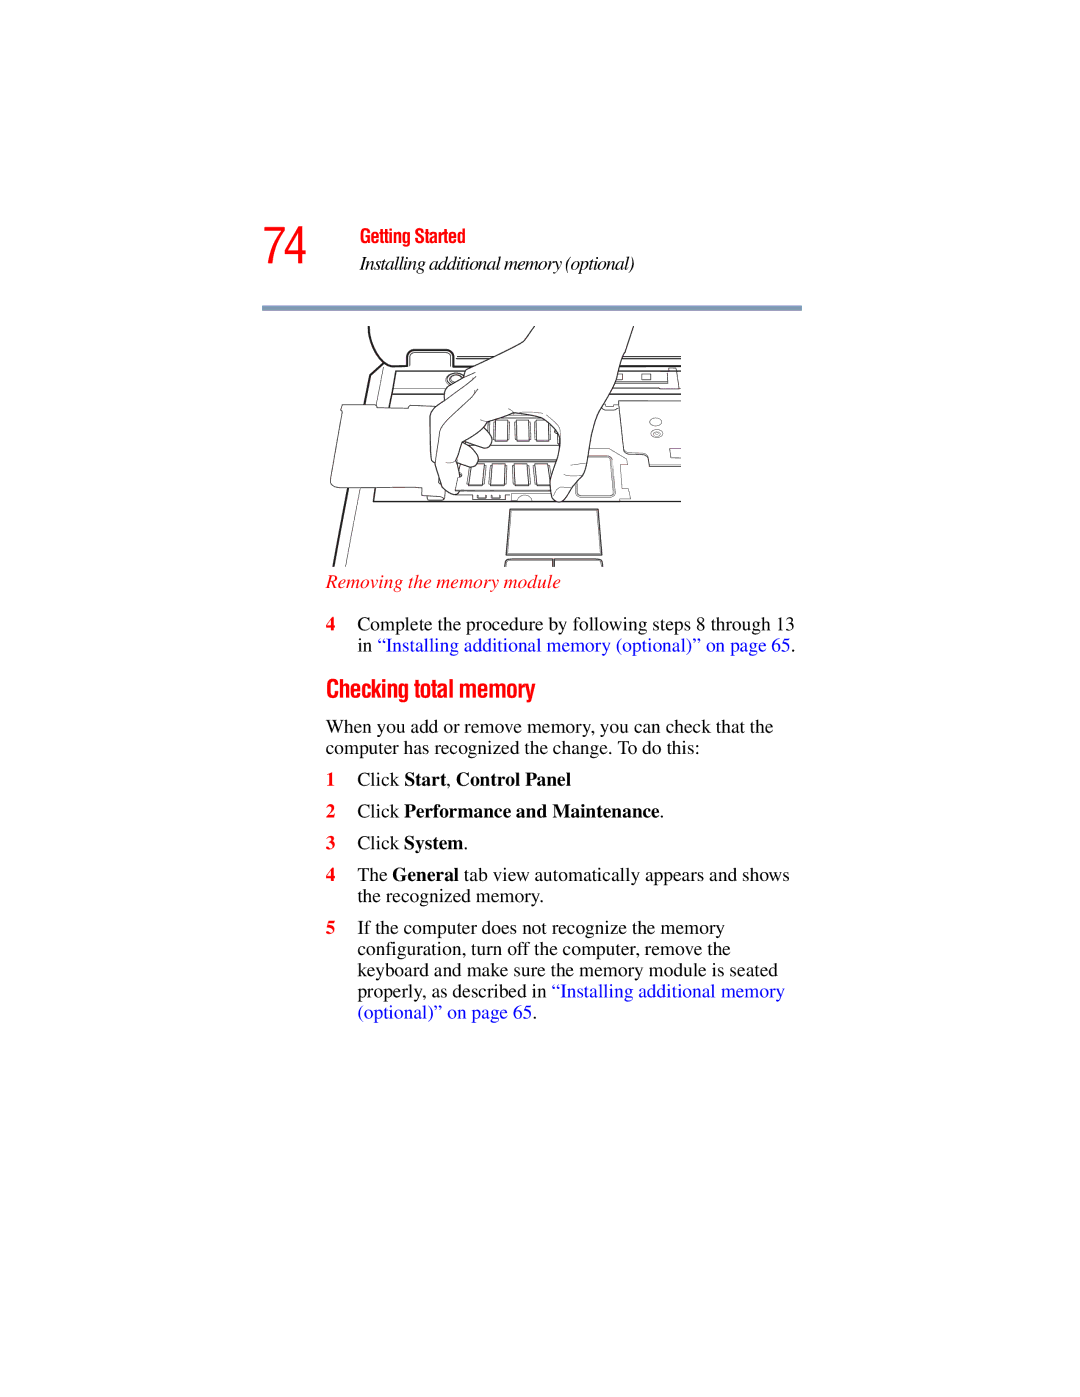
Installing additional memory optional
Follow the on-screen instructions
Phillips no zero screwdriver that is in good condition
Using a flat-head screwdriver to pry off the panel
Removing the panel above the keyboard
Removing a keyboard screw
Lifting the keyboard
Locating the covered memory module slots
Lifting the plastic covering the memory slots
Remove the new memory module from its antistatic packaging
Inserting the memory module
Removing a memory module
Press Any Key To Continue
Pulling the clips away from the memory module
Carefully remove the module from the slot
Checking total memory
Removing the memory module
Connecting a USB printer
Connecting a mouse
Connecting a printer
Connecting a parallel printer
Using external display devices
Connecting an external monitor
Adjusting the quality of the external display
Display limitations
Connecting an optional external diskette drive
Sample external USB diskette drive
Sample diskette drive
Using an external keyboard
Powering off the computer
Caring for your computer
Moving the computer
Cleaning the computer
Using a computer lock
PORT-Noteworthycomputer lock cable
Locking the computer
Learning the Basics
Computing tips
Using the keyboard
Sample keyboard
Function keys
Character keys
Ctrl, Fn, and Alt keys
Ctrl, Fn and Alt keys
Windows special keys
Windows special keys
Overlay keys
Keyboard overlay keys
Using the numeric keypad overlay
Using the cursor control overlay
Emulating a full-size keyboard
Starting a program
Saving your work
Printing your work
Backing up your files
Using the DVD-ROM or Multifunction drive
Sample DVD-ROM drive
DVD-ROM drive components
Your DVD-ROM drive may look like this
CD/DVD control buttons
CD/DVD control buttons
CD/DVD and Digital audio modes
Stop/eject button stops a disc that is currently playing
Inserting a disc
Inserting a disc
Positioning the disc on the spindle
Playing an audio CD
Sample Audio CD window
Windows MediaTM Player window appears
Sample Windows MediaTM Player window
Viewing the contents of a CD or DVD
Removing a disc with the computer on
Removing a disc with the computer off
Setting up for communications
100
Caring for CDs and DVDs
101
Connecting the modem to a phone line
Connecting your computer to a network
Powering down the computer
102
103
Turn Off or Shut down command
Restart command
Each option has its advantages
104
Hibernation command
Standby command
Click Start, Turn off computer
Using Turn Off or Shut down
105
Turn off computer window appears
Click Turn Off
106
Sample Turn off computer window
Sample Shut down computer window
Click OK Computer turns itself off
107
Turning off or shutting down more quickly
When I close the lid
Sample Toshiba Power Saver Properties window
When I press the power button
108
Going into Hibernation mode
Using Hibernation
Enabling the Hibernation command
109
Click Start, Shut Down
Going into Hibernation mode more quickly
110
Sample Hibernate computer window
111
Select Hibernation for the options you want
Using Standby
Using Standby
Starting again from Hibernation mode
112
Sample Stand by window
113
Click Stand By
Select Stand by from the drop-down list of options Click OK
Going into Standby mode more quickly
114
115
Select Standby for the options you want
116
Starting again from Standby
Mobile Computing
Toshiba’s energy-saver design
118
Battery Notice
Power management
119
Using additional batteries
Charging the main battery
Charging the batteries
Charging the RTC battery
120
Monitoring battery power
121
Determining remaining battery power
122
Conserving battery power
123
124
What to do when the battery runs low
Setting battery alarms
125
Changing the main battery
Removing the battery from the computer
Releasing the battery
Releasing the battery lock
Slide the battery release latch to the right
126
127
Inserting the battery in the computer
Removing the battery
128
Taking care of your battery
Safety precautions
Maximizing battery life
129
Traveling tips
130
Disposing of used batteries safely
131
Traveling tips
Getting to Know Windows XP Operating System
Finding your way around the desktop
133
Lesson 1 Exploring the desktop
Icons
134
Start button
System tray
135
Taskbar
Windows XP file system
Lesson 2 Using the TouchPad and control buttons together
136
Sample My Computer window
137
Sample desktop shortcut menu
138
Sample desktop with the taskbar on the right
Opening a Web page from a window
139
Lesson 3 Learning about the Internet
Lesson 3 Learning about the Internet
Lesson 4 Creating a new document
140
Lesson 4 Creating a new document
Lesson 5 Creating a new folder
141
Lesson 5 Creating a new folder
Lesson 6 Starting programs
Click Accessories
142
Lesson 6 Starting programs
Click Windows Explorer
143
Sample Paint window
Sample Windows Explorer window
144
Lesson 7 Resizing, repositioning, and hiding windows
Minimizing and maximizing windows
Using the taskbar
145
146
Resizing and moving windows
Lesson 8 Closing programs
147
Lesson 8 Closing programs
Sample Windows Explorer windows
Creating a shortcut to the Calculator
148
Lesson 9 Creating shortcuts
Lesson 9 Creating shortcuts
Sample Create Shortcut dialog box
149
Creating a shortcut to the Character Map
Click All Files and Folders
150
Sample Search options on the Start menu
Operating system displays the Search Results dialog box
Lesson 10 Changing the screen saver
151
Lesson 10 Changing the screen saver
Click Create Shortcut here
Operating system opens the Display Properties dialog box
152
Click Properties
153
Sample Display Properties dialog box
154
Lesson 11 Setting the date and time
Lesson 11 Setting the date and time
Click the Date, Time, Language, and Regional Options icon
155
Sample Date and Time Properties dialog box
156
Lesson 12 Removing objects from the desktop
157
Sample Recycle Bin open on the desktop
Sample System Restore Welcome screen
Lesson 13 Using System Restore
Lesson 13 Using System Restore
158
Windows XP Help and Support Center
159
Lesson 14 If I am lost, what do I do?
Lesson 14 If I am lost, what do I do?
Help and Support Center Index window pane appears
Double-clickCreating pictures using Paint
160
Sample Help and Support Center Index
Sample Drawing help window
Using the online tours and tutorials
161
Click Start, then Help and Support
Lesson 15 Turning off your computer
162
Lesson 15 Turning off your computer
Click What’s new for Help and support
Windows XP special features
Exploring Your Options
Customizing the taskbar
164
Personalizing your desktop
Bringing the world to your desktop
Turning on the Web content interface
165
Click the Customize Desktop button
166
Changing desktop and browsing style
Personalizing individual windows
167
Choosing a style
Sample Folder Options dialog box
Sample toolbar locations
168
Customizing window toolbars
Displaying information about each folder
169
Displaying a toolbar in a window
Elements you can add to the top of the window are
Open the folder you want to view as a Web
Using your computer at the office
170
Tools menu, select Folder Options
Determining the COM port
Setting up for communications
171
Phone and Modem options window appears
172
Connecting the modem to a telephone line
Setting up a dial-up connection
Getting help transferring files
173
Getting started
Click the Index button
Setting up a wireless connection
174
175
Connecting to the Internet
Using a modem
Internet
An overview of using the Internet
176
World Wide Web
177
Internet Service Providers
Signing up with an Internet Service Provider
Surfing the Internet
Uploading and downloading files on the Internet
Internet features
178
179
Exploring video features
Changing the display properties setting
Toshiba’s online resources
180
Playing DVDs
Using a microphone
Exploring audio features
Display settings hot key
181
Sample Sound Recorder screen
Adjusting recording settings
182
Using PC Cards
Using PC Cards
Using external speakers or headphones
183
PC Card supporting software
Inserting PC Cards
Inserting a PC Card
185
Removing PC Cards
Removing a PC Card
Hot swapping
Using SD Cards
Hot swapping precautions
Inserting an SD card
Inserting an SD card
187
Removing an SD card
Click the Safely Remove Hardware icon on the system tray
Toshiba Accessibility
Toshiba Utilities
Sample Toshiba Accessibility window
Select Toshiba, Utilities, Accessibility
Toshiba Accessibility window appears
189
Sample Fn-esse keyboard
Fn-esse
Starting Fn-esse
Assigning a key to a program or document
Using the Fn-esse drag-and-drop
191
Fn-esse
Using the keyboard
Viewing existing key assignments
193
Hotkey utility
Changing or removing existing key assignments
Sample Toshiba Hotkey utility window
194
Toshiba Console
Customize Your Computer
Features available in this category are Power Management
195
Sample Toshiba Console window
Security
ConfigFree
196
Hotkey assignment
Sample Toshiba Power Saver Properties window
197
Toshiba Hardware Setup
198
Sample Toshiba HWSetup window
199
200
Problems that are easy to fix
Your program stops responding
202
Your program performs an illegal operation
203
Computer starts but, when you press a key, nothing happens
These problems may occur when you turn on the power
Computer will not start
Windows operating system is not working
Computer displays the Non-System disk or disk error message
204
Operating system takes a long time to start
Using Startup options to fix problems
205
Windows XP operating system can help you
Internet problems
206
Resolving a hardware conflict
Click the Fixing a hardware problem
207
Plan of action
Resolving hardware conflicts on your own
Direct Memory Access
208
Interrupt Request Channel
Resolving conflicts
209
Plug and Play
Disabling a device
Fixing a problem with Device Manager
210
Checking device properties
To check a device’s properties
Click Troubleshooting
211
Memory module problems
212
213
Power and the batteries
Here are some typical problems and how to solve them
Keyboard produces unexpected characters
Keyboard problems
214
215
Display problems
Here are some typical display problems and their solutions
Display is blank
Built-in screen flickers
216
Screen does not look right
Adjust the screen resolution and/or color quality Click OK
Disk drive problems
Error-checking
217
Your data files are damaged or corrupted
218
Your hard disk seems very slow
Some programs run correctly but others do not
219
DVD-ROM or multi-function drive problems
You cannot access a disc in the drive
Message
220
Secondary IDE Channel DMA setting
To ensure the Secondary IDE Channel DMA setting
Some discs run correctly, but others do not
221
Sound system problems
Click the Advanced Settings tab
You do not hear any sound from the computer
Card Information Structure
PC Card problems
222
Computer emits a loud, high-pitched noise
Here are some common problems and their solutions
PC Card checklist
Resolving PC Card problems
223
224
Computer stops working hangs when you insert a PC Card
Follow this procedure before you remove a PC Card
System does not recognize your PC Card
This section lists some of the most common printer problems
Printer problems
PC Card error occurs
225
226
Modem problems
This section lists common modem problems
Printer will not print what you see on the screen
Save your work frequently
227
Develop good computing habits
Read the user’s guides
Before you call
228
If you need further assistance
Toshiba voice contact
229
Contacting Toshiba
Toshiba’s worldwide offices
230
Other Toshiba Internet Web sites
231
Toshiba’s worldwide offices
232
This hot key enables/disables volume mute on your
Volume Mute
Instant password security
Computer
Click the On resume, password protected check box
Without a password
With a password
Click Start, Control Panel Click Appearances and Themes
Click Start, Help and Support
Press Enter
Sample power usage modes
236
Sample Standby confirmation box
Standby mode
This hot key puts the computer into Standby mode
Mode
Hibernation mode
This hot key puts the computer into Hibernation
Sample Hibernation confirmation box
Display brightness
This hot key cycles through the power-on display
Display modes
Options
Fn + This hot key turns the numeric overlay on and off
Sample disable and enable TouchPad windows
Keyboard hot keys
USA and Canada
AustraliaEurope
Appendix C
243
ConfigFree Main Screen
ConfigFree main screen
Getting Started
244
Starting ConfigFree
Configuring ConfigFree
245
ConfigFree Utilities
ConfigFree Utilities
Connectivity Doctor
Connectivity Doctor
Device Settings
246
Viewing the device settings
247
Viewing registered profiles
Profile Settings
248
Add, Modify, and Delete a Profile
Switch Profiles
249
Quick Connect
250
Using Auto Switch
Using Auto Switch
251
Auto Switch Cable Disconnect
Auto Switch Ssid
Acronyms
Following acronyms may appear in this user’s guide
Glossary
Terms
Following terms may appear in this user’s guide
Basic input/output system Bios See Bios
CD-ROM compact disc read-only memory a form of high
CPU See central processing unit CPU
Directory See folder
DVD-ROM digital versatile or video disc read-only memory
Standby, Suspend
Internal device See device
Local area network See LAN
MS-DOS prompt See system prompt
Random access memory See RAM
Read-only memory See ROM. reboot See boot, restart
TFT display See active-matrix display
Web See World Wide Web
Index
Light 53
245
162
204
177
DVD-ROM
193
176
207
171
222
216
214
218
117
164
Help 159
146