2.PRINTER SETUP

ENGLISH VERSION EO1-33047

2.11 Threshold Setting

2.11Threshold Setting (Cont.)

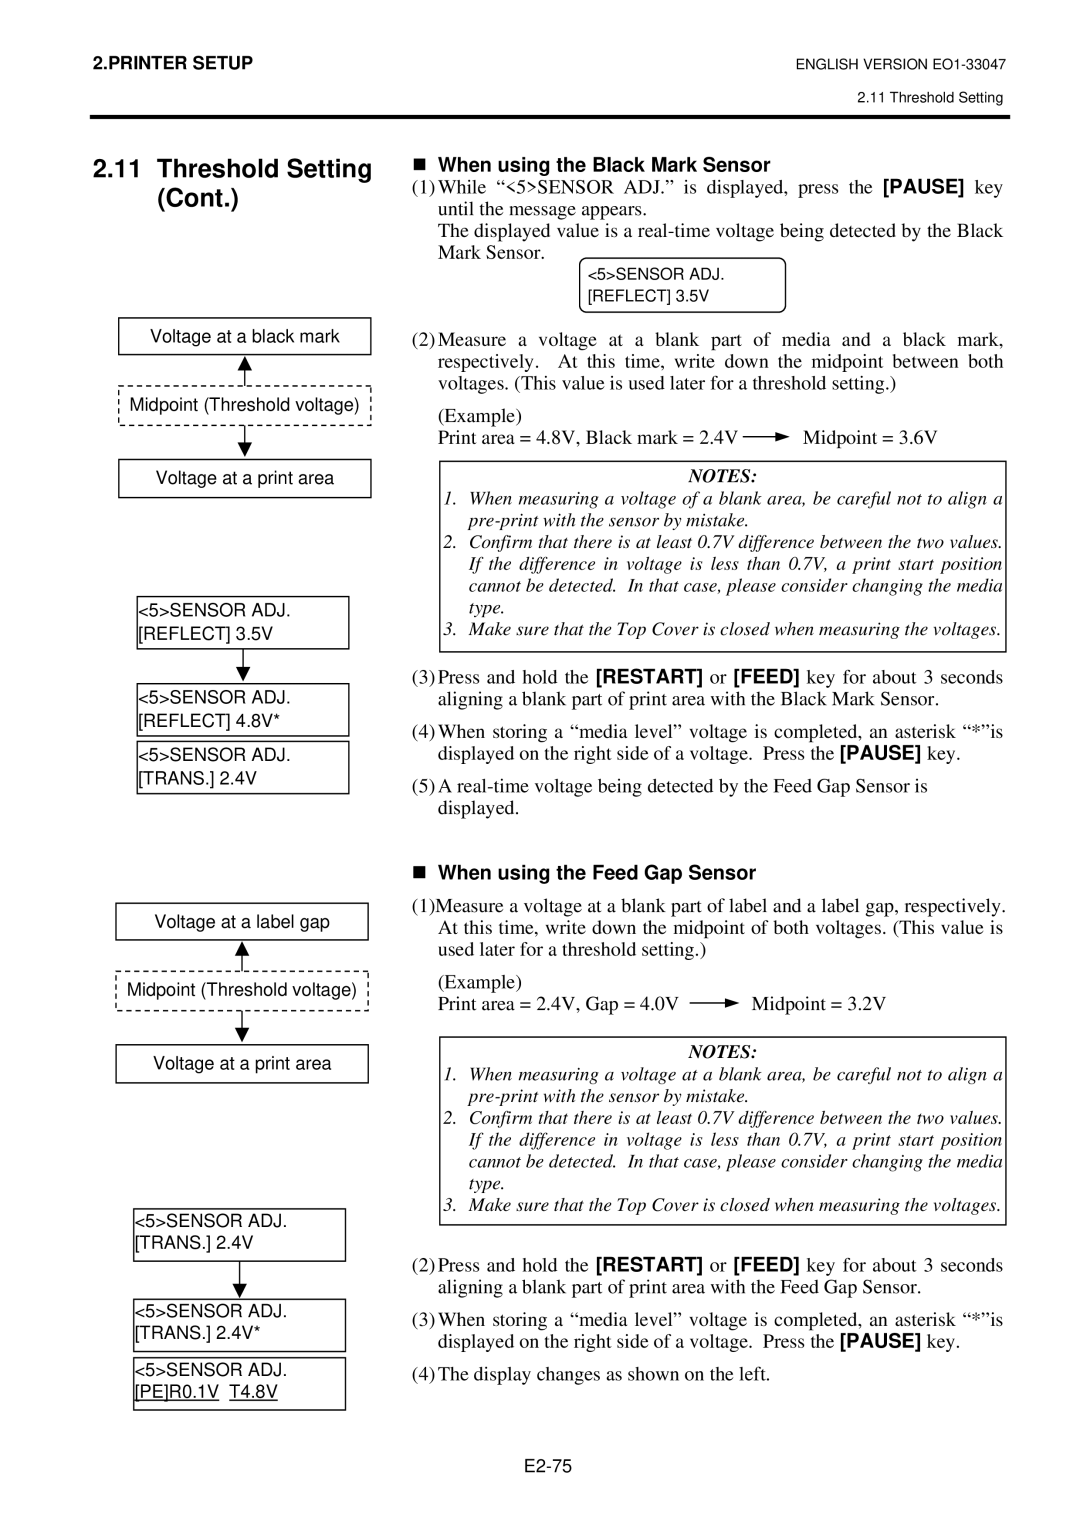
Voltage at a black mark

Midpoint (Threshold voltage)

Voltage at a print area

<5>SENSOR ADJ. [REFLECT] 3.5V

<5>SENSOR ADJ. [REFLECT] 4.8V*

<5>SENSOR ADJ. [TRANS.] 2.4V

Voltage at a label gap

Midpoint (Threshold voltage)

Voltage at a print area

<5>SENSOR ADJ. [TRANS.] 2.4V

<5>SENSOR ADJ. [TRANS.] 2.4V*

<5>SENSOR ADJ. [PE]R0.1V T4.8V

„When using the Black Mark Sensor

(1)While “<5>SENSOR ADJ.” is displayed, press the [PAUSE] key until the message appears.

The displayed value is a real-time voltage being detected by the Black

Mark Sensor.

<5>SENSOR ADJ. [REFLECT] 3.5V

(2)Measure a voltage at a blank part of media and a black mark, respectively. At this time, write down the midpoint between both voltages. (This value is used later for a threshold setting.)

(Example)


Print area = 4.8V, Black mark = 2.4V

Midpoint = 3.6V

NOTES:

1.When measuring a voltage of a blank area, be careful not to align a pre-print with the sensor by mistake.

2.Confirm that there is at least 0.7V difference between the two values. If the difference in voltage is less than 0.7V, a print start position cannot be detected. In that case, please consider changing the media type.

3.Make sure that the Top Cover is closed when measuring the voltages.

(3)Press and hold the [RESTART] or [FEED] key for about 3 seconds aligning a blank part of print area with the Black Mark Sensor.

(4)When storing a “media level” voltage is completed, an asterisk “*”is displayed on the right side of a voltage. Press the [PAUSE] key.

(5)A real-time voltage being detected by the Feed Gap Sensor is displayed.

„When using the Feed Gap Sensor

(1)Measure a voltage at a blank part of label and a label gap, respectively. At this time, write down the midpoint of both voltages. (This value is used later for a threshold setting.)

(Example)


Print area = 2.4V, Gap = 4.0V

Midpoint = 3.2V

NOTES:

1.When measuring a voltage at a blank area, be careful not to align a pre-print with the sensor by mistake.

2.Confirm that there is at least 0.7V difference between the two values. If the difference in voltage is less than 0.7V, a print start position cannot be detected. In that case, please consider changing the media type.

3.Make sure that the Top Cover is closed when measuring the voltages.

(2)Press and hold the [RESTART] or [FEED] key for about 3 seconds aligning a blank part of print area with the Feed Gap Sensor.

(3)When storing a “media level” voltage is completed, an asterisk “*”is displayed on the right side of a voltage. Press the [PAUSE] key.

(4)The display changes as shown on the left.

E2-75

Page 89
Image 89
Toshiba B-SA4TM-TS12-QM-R, BSA4TMTS12QMR owner manual „ When using the Black Mark Sensor, „ When using the Feed Gap Sensor

BSA4TMTS12QMR, B-SA4TM, B-SA4TM-TS12-QM-R specifications

The Toshiba B-SA4TM-TS12-QM-R is a versatile and high-performance thermal printer designed to meet the demanding needs of various industries, ranging from retail to logistics. Known for its reliability and efficiency, this printer is part of Toshiba's celebrated B-SA4 series that showcases robust engineering and advanced printing technologies.

One of the standout features of the B-SA4TM-TS12-QM-R is its exceptional print speed, capable of reaching up to 152 mm per second. This rapid output ensures that businesses can efficiently manage their printing tasks, reducing wait times and boosting productivity. Its 300 dpi resolution guarantees that printed images and text are sharp and clear, making it ideal for producing high-quality labels, barcodes, and receipts.

The printer is equipped with a user-friendly interface that simplifies operation and maintenance. The LCD screen provides real-time information about printing status and alerts, allowing users to monitor the printer's performance easily. Furthermore, its compact design makes it suitable for environments with limited space while still delivering a robust printing solution.

In terms of connectivity, the B-SA4TM-TS12-QM-R offers multiple options including USB, Ethernet, and serial ports, ensuring that it can easily integrate into existing systems. It also supports a range of operating systems, enhancing its versatility across different hardware environments.

Toshiba has integrated advanced technologies into the B-SA4TM series, such as an innovative ribbon-saving mechanism, which allows for longer print runs without frequent ribbon changes. This feature not only reduces operational costs but also minimizes waste, making it a more environmentally friendly choice.

Additionally, the printer supports a wide variety of media types and sizes, including labels, tags, and wristbands. Its ability to handle diverse materials makes it an excellent choice for businesses that have varied printing needs. The B-SA4TM is also designed for easy media loading, allowing users to change supplies quickly and efficiently.

Overall, the Toshiba B-SA4TM-TS12-QM-R combines speed, quality, and user-friendliness, making it a formidable addition to any business's printing lineup. With its advanced features and robust design, it stands out as a reliable solution for users looking for high-performance thermal printing. Whether it's for shipping, inventory management, or retail operations, the B-SA4TM series delivers exceptional performance that meets the needs of today’s fast-paced environments.